Pi Pico Game Boy Flash Cart Gets Slim RP2040 Upgrade

The story for this one starts a few months ago, when [John Green] released his PICO-GB project. His code allowed the Raspberry Pi Pico to stand in for a Game Boy cartridge, complete with a simple text menu that let the user select between ROMs that had been baked into the microcontroller’s firmware. The project was particularly notable for the fact that it was entirely a software solution; while a custom breakout cartridge made for a handy temporary solution, you could have permanently wired the Pico’s pins directly to the Game Boy’s cartridge connector if you wanted to.

PICO-GB running on the full-size Pi Pico

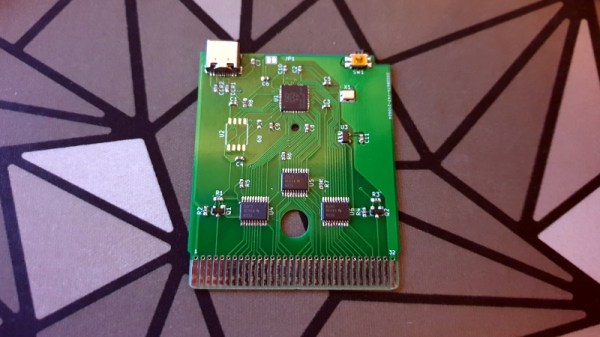
Then in early June, the RP2040 chip that powers the Pi Pico went up for sale in single unit quantities. That opened up the possibility of building the PICO-GB functionality into a cartridge small enough to actually fit inside the Game Boy. So [Martin “HDR” Refseth] got to work creating the slick cartridge PCB you’re seeing now.

The RP2040 is joined by a trio of Texas Instruments TXB0108 level shifters, and there’s a spot for adding a SPI flash chip. The RP2040 supports a maximum of 16 MB of external flash, but given the size of Game Boy games were generally measured in kilobytes, that shouldn’t pose much of a problem.

Looking ahead, the original PICO-GB documentation mentions enhancements like loading ROMs from SD card, as well as hardware additions like a real-time-clock for the more advanced games that supported it. We assume those concepts will become part of [Martin]’s PCB eventually, but these are still early days.

We’ve seen Game Boy cartridge emulation with a microcontroller in the past, but we’re exited to see how the unique capabilities of the Raspberry Pi Foundation’s custom silicon can improve the state-of-the-art.

[Thanks to Itay for the tip.]

The Game Boy As You Have Never Seen It Before Is Newest From [Sprite_tm]

Explain a Game Boy to a child in 2021 and they’ll have little idea of how much impact that chunky grey brick had back in the day. Search for a YouTube video to demonstrate, and you might find the one we’ve put below the break. It starts with the classic Tetris on the Game Boy, then moves on to Super Mario World before treating us to Sonic the Hedgehog, and finally Doom. All seminal games of the Game Boy’s heyday, with one small problem. The last three were never Game Boy titles, and certainly wouldn’t have run on the device’s limited hardware. Most of you will by now not be surprised to find that the narrator is none other than [Sprite_tm], and his Game Boy has one of the nicest Raspberry Pi conversions we’ve ever seen.

Given his previous work we expected the cartridges to have an ESP32 on board that  somehow mapped into Game Boy display memory, but in fact he’s swapped the original Nintendo motherboard with a replacement carrying an ICE40 FPGA on one side to handle the Nintendo hardware and a Pi Zero on the other to do the heavy lifting. Insert a Game Boy cartridge and it emulates the original to the point you’d never suspect it wasn’t the real thing, but insert one of the non Game Boy cartridges and it passes an identifier to the Pi which launches a script to run the appropriate Pi code. So the Mario and Sonic games are running in Pi-based emulators, and Doom is running natively on the Pi. It gives the appearance of a seamless gaming experience, wherein lies its charm.

This project certainly has the quality we’ve come to expect from Sprite, and a quick flick through these pages will show plenty of previous examples. One of the most recent was a miniature working DEC VT100 terminal containing an emulated PDP minicomputer.

Continue reading “The Game Boy As You Have Never Seen It Before Is Newest From [Sprite_tm]”

Game Boy Color Gets A Rechargeable Battery

Nintendo’s classic Game Boy has long been the darling queen of the handheld scene. However, with many fans modifying their handhelds with power-sucking features like modern backlit LCDs, running on AA batteries can become a frustrating exercise as they rapidly run out. [esotericsean] gets around that by modifying his Game Boys with a USB rechargeable battery setup. (Video, embedded below.)

The hack is a simple one, but the execution is quite tidy. [esotericsean] starts by removing the original DC jack from the Game Boy motherboard, and hogs out the hole in the case to fit a micro USB port. The original battery housing is similarly carved out to suit a 2000 mAh lithium-polymer pouch cell. A single-cell charging board is used to manage the battery, with its original connector removed and replaced with a neater-looking panel mount micro USB port instead. The electronics is then wrapped up in Kapton tape and stuffed inside the shell as everything is put back together.

The result is a USB rechargeable Game Boy that lasts for ages. [esotericsean] reports playing the console for hours each day for a full week without running out of power. The hack could become popular with chiptuners who often knock AA cells out of their handhelds during the more enthusiastic parts of their sets. We’ve seen similar hacks for other Game Boy models, too. Continue reading “Game Boy Color Gets A Rechargeable Battery”

Simulating The Game Boy Printer’s Actual Paper Output

Sometimes, we appreciate electronic devices not for their outright performance and crystal clear output, but precisely because they kind of suck in a unique and charming way. The Game Boy Camera, and its companion the Game Boy Printer, are much loved for precisely this reason. [Raphael BOICHOT] decided that he wanted to simulate the analog reality of the latter printer’s output in code, and set about the hefty coding task.

The result is the Game Boy Printer Paper Simulation, and it does a great job of reproducing the grainy, somewhat noisy output of the original thermal printer. The simulation was coded with the assistance of multiple high-resolution scans of the original printer’s output, which allowed [Raphael] to create a mathematical model of how the original digital pixelized image came out when hot thermal print head was put to paper.

What started with a single dot became a fully-fledged simulation package that can be run in MATLAB and Octave. It allows the end user to generate legitimate-looking images of Game Boy Printer output without actually having to own the printer and a roll of thermal paper.

We’ve seen Nintendo’s much-beloved printer before, such as this hack that turns it into an 8-bit photo gun. If you’re meddling with thermal printers yourself, be sure to let us know!


Game Boy Macro Build Retains DS Compatibility

Building a so-called “Game Boy Macro” is a great way to salvage a Nintendo DS that has a broken hinge or top screen, as the system only needs the lower display to play Game Boy Advance games. Naturally, DS games that were designed to use both screens would no longer be playable. Or at least, that’s what we thought. But as [Facelesstech] shows, it’s actually possible to play DS games on a Game Boy Macro if you do a little extra soldering.

It turns out that there are two test points on the original DS motherboard where you can pick up the signal for the top and bottom screens respectively. With just three wires and a simple switch, you can select which signal gets fed into the bottom screen in real-time with no image degradation. Now, this won’t do you any good on games that make constant use of both the top and bottom DS displays, but for many titles, the bottom screen was used for little more than a map or inventory display that you only need to glance at occasionally.

Installed screen switch. Note USB-C upgrade module.

With the ability to switch between them at will, a large number of DS games are perfectly playable with just one screen. Interestingly, the touch panel still works the same regardless of which video feed is being pipped in; so if you memorize which areas need to be touched to perform different actions, you don’t even need to flip the images. In the video below, [Facelesstech] demonstrates the concept with New Super Mario Bros, which would otherwise be unplayable as the action usually is shown on the top screen.

This hack is only possible because the two displays on the DS are identical beyond the touch overlay, which as we learned during a previous deep-dive into the technology behind this revolutionary handheld, was a trick Nintendo used to squeeze as much performance as they could out of its relatively meager 3D hardware. Unfortunately, it seems like the modification is much harder to pull off on the DS Lite, so it wouldn’t be compatible with the slick Game & Watch styled Game Boy Macro we covered recently. Continue reading “Game Boy Macro Build Retains DS Compatibility”

A Commodore 64 As You Have Never Seen One Before: Game Boy Form Factor!

It’s now nearly four decades since the iconic Commodore 64 8-bit computer saw the light of day, and the vintage format shows no sign of dying. Enthusiasts have produced all kinds of new takes on the platform, but it’s fair to say that most of them have concentrated on the original style keyboard console form factors. A completely different take on a Commodore 64 comes from [UNI64] in the form of the Handheld 64, a complete Commodore 64 in a Game Boy style form factor that uses the original 64 chipset.

It achieves this improbable feat by sandwiching together several PCBs, with a tactile switch keyboard and LCD display at the top. It appears to bring the 64 ports out to headers, and the ROM cartridge port to an edge connector socket at the top of the device. A departure from the 1980s comes in using a Raspberry Pi Zero to emulate a 1541 floppy drive though.

Sadly unlike a Game Boy there’s no onboard battery, but don’t let that take away from the quality of this feat. A forum post from [3D-vice] has a set of decent-quality pictures, and even if you don’t have a handy 64 chipset lying about we’re sure you’ll still appreciate them. If home made 64s are your thing, take a look at how you can build one without Commodore parts.

Thanks [pbuyle] for the tip!

Original Game Boy Powered Up With GBA Motherboard

The Game Boy DMG-01 is about as iconic as a piece of consumer electronics can get, but let’s be honest, it hasn’t exactly aged well. While there’s certainly a number of games for the system that are still as entertaining in 2021 as they were in the 80s and 90s, the hardware itself is another story entirely. Having to squint at the unlit display, with its somewhat nauseating green tint, certainly takes away from the experience of hunting down Pokémon.

Which is precisely why [The Poor Student Hobbyist] decided to take an original Game Boy and replace its internals with more modern hardware in the form of a Game Boy Advance (GBA) SP motherboard and aftermarket IPS LCD panel. The backwards compatibility mode of the GBA allows him to play those classic Game Boy and Game Boy Color games from their original cartridges, while the IPS display brings them to life in a way never before possible.

Relocating the cartridge connector took several attempts.

Now on the surface, this might seem like a relatively simple project. After all, the GBA SP was much smaller than its predecessors, so there should be plenty of room inside the relatively cavernous DMG-01 case for the transplanted hardware. But [The Poor Student Hobbyist] made things quite a bit harder on himself by deciding early on that there would be no external signs that the Game Boy had been modified; beyond the wildly improved screen, anyway.

That meant deleting the GBA’s shoulder buttons, though since the goal was always to play older games that predated their addition to the system, that wasn’t really a problem. The GBA’s larger and wider screen is still intact, albeit hidden behind the Game Boy’s original bezel. It turns out the image isn’t exactly centered on the physical display, so [The Poor Student Hobbyist] came up with a 3D printed adapter to mount it with a slight offset. The adapter also allows the small tactile switch that controls the screen brightness to be mounted where the “Contrast” wheel used to go.

An incredible amount of thought and effort went into making the final result look as close to stock as possible, and luckily for us, [The Poor Student Hobbyist] did a phenomenal job of documenting it for others who might want to make similar modifications. Even if you’re not in the market for a rejuvenated Game Boy, it’s worth browsing through the build log to marvel at the passion that went into this project.

Some would argue [The Poor Student Hobbyist] should have just put a Raspberry Pi into a Game Boy case and be done with it, but where’s the fun in that? Sure it might have been a somewhat better Bitcoin miner, but there’s something to be said for playing classic games on real hardware.