Enterprise Helm Commands The Entertainment Center

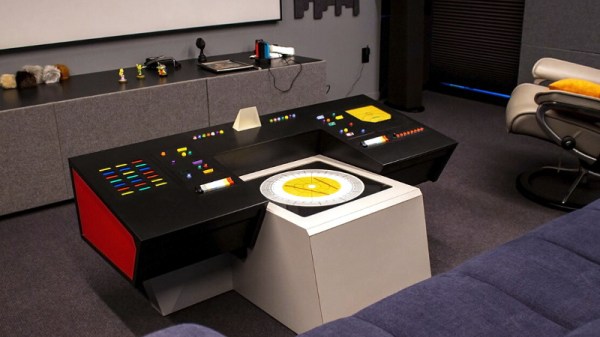
Many a young geek wished they could get a chance to sit at the helm of the USS Enterprise, wildly tapping on unlabeled technicolor buttons with the self-assured confidence of a proper Starfleet officer. For most of us it was a dream unrealized, but right now somebody in the Seattle, Washington area is getting to do exactly that in their media room. We won’t deny being jealous, but at least our collective egos can take some comfort in the knowledge that they had to outsource the construction of their replica helm to the fine folks at [Blackmouth Design].

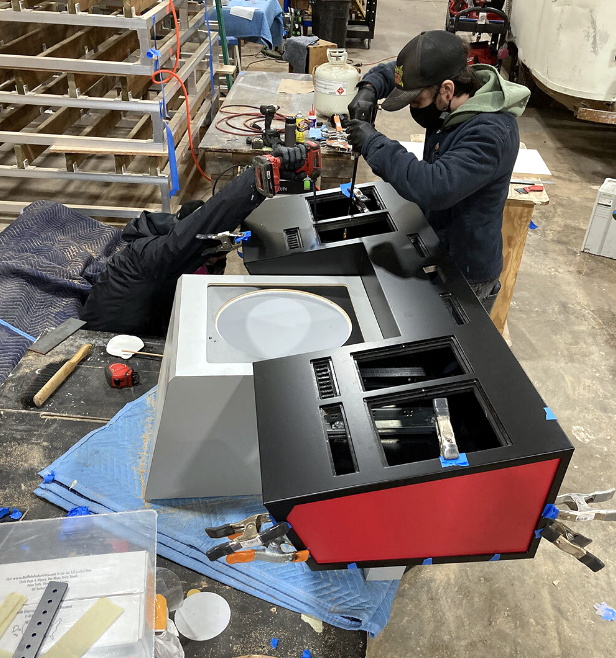
There’s not a lot of technical details to be had, but considering the page for this project is only meant to show off the company’s design and fabrication skills, we can’t blame them too much. If we were in the business of selling these things, we’d probably keep some of the juicer details under wraps too.

But we do know there’s “Arduino technology” under the hood that fires up different light and sound effects depending on which of the vintage rocker switches has been flipped. The red momentary buttons lined up on the right side of the coffee table sized panel are tied into the home media center to do things like turn off the lights and lower the projector screen. Check out the video below for a brief demo.

In a post on Reddit, one of the engineers behind the project explains that the top surface of the helm is 3/16″ powder coated aluminum, with the plywood that makes up the base laminated in the classic Original Series color scheme of red, grey, and black. The artwork for the astrogator was created from scratch, backlit with LEDs, and placed behind a 1/4″ acrylic panel for protection. We imagine the fact that it’s parallel to the ground means it’s supposed to be a space to place your drinks or popcorn, though if it was in our house, nobody would be bringing food or drink anywhere near it.

In all honesty, while Hackaday is decidedly more about building than buying, we can’t fault anyone for forking over their hard earned cash for craftsmanship of this caliber. After all, we’ve had our eyes on that officially licensed tricorder replica for quite some time now.

Continue reading Enterprise Helm Commands The Entertainment Center”

Do Wristwatches Get Any Better Than A Cuckoo Clock?

There are few better ways of asserting your independent spirit as a hardware hacker than by creating your own special timepiece. Even more so if the timepiece is a watch, particularly in this era of smartwatches. Few home-made timepieces though have come as near to wristwatch Nirvana as the cuckoo clock wristwatch from [Kiyotaka Akasaka], which we would venture to name as having won wristwatches. Nobody will top this one in the field of home-made clocks!

Superlatives aside, this is an electronic cuckoo clock on the wrist, with an LED ring dial and a motorised cuckoo, all clothed in an authentically rustic tiny wooden cuckoo clock case. It communicates via BLE with a smartphone, and even has a sound channel for a cuckoo sound. Frustratingly there’s little in the way of detail about the electronics themselves, but we’re guessing that almost Bluetooth-capable microcontroller could be pressed into service. Take a look at the video below the break.

So we’ve established that it’s a cuckoo clock wristwatch, and that we like it, a lot. It is however not the only novelty cuckoo clock we’ve brought you.

Continue reading “Do Wristwatches Get Any Better Than A Cuckoo Clock?”

Huge Hand-Wired Ortho Is A Beautiful Battleship Keyboard

There are all sorts of reasons to build your own keyboard, and we would argue that the more custom the layout, the easier it is to justify the time and expense. At least, that’s what we’re going with for this post about [GoldenSights]’ big, beautiful custom ortholinear called Nearer, as in nearer to perfect. Just look at this battleship!

[GoldenSights] has long wanted a mechanical keeb, but has never been into any of the commercial offerings. That goes double since none of them seem to have a vertical Home/End cluster, which [GoldenSights] has become quite attached to thanks to a space-saving Logitech rectangle keeb. But if you’re going to make your own keyboard, you should go all out, right? Right. So [GoldenSights] started by adding another 12 F keys and making it ortholinear. Then things got personal with an extra Backspace where Num Lock usually lives, and dedicated keys for switching between English, Korean, and Chinese.

[GoldenSights] wanted USB-C and so they used an Elite-C microcontroller, but there’s one big problem — it only has 24 pins, and according to the matrix math, the board needs 27 total. Rather than using an I/O expansion chip or a second microcontroller, they wired it up as duplex matrix. This is an alternative way of wiring up a matrix so that it’s closer to being square by doubling up the rows and halving the number of columns.

We don’t think [GoldenSights] gives themselves enough credit here. They say that they lean toward calling it assembly rather than a build, but we disagree with that assessment. [GoldenSights] broke in this giant keeb with giant write-up of the build, so go see for yourself. There’s a ton of build pictures and a fair amount of hot glue, so be warned.

Let’s talk about those keycaps for a second. The space bar was supposed to be black PBT like the others, but the keycap manufacturer didn’t have a 6u space bar in black and sent a gray one instead. Honestly, we like the way it looks. And we love that [GoldenSights] painstakingly laid out the keys on foam board before committing to a laser-cut metal switch plate.

Want a space-saving ortholinear that doesn’t feel too cramped? Check out this wafer-thin keyboard that’s designed to squat over your inferior laptop keys.

Via KBD and r/mk

A Commodore 64 As You Have Never Seen One Before: Game Boy Form Factor!

It’s now nearly four decades since the iconic Commodore 64 8-bit computer saw the light of day, and the vintage format shows no sign of dying. Enthusiasts have produced all kinds of new takes on the platform, but it’s fair to say that most of them have concentrated on the original style keyboard console form factors. A completely different take on a Commodore 64 comes from [UNI64] in the form of the Handheld 64, a complete Commodore 64 in a Game Boy style form factor that uses the original 64 chipset.

It achieves this improbable feat by sandwiching together several PCBs, with a tactile switch keyboard and LCD display at the top. It appears to bring the 64 ports out to headers, and the ROM cartridge port to an edge connector socket at the top of the device. A departure from the 1980s comes in using a Raspberry Pi Zero to emulate a 1541 floppy drive though.

Sadly unlike a Game Boy there’s no onboard battery, but don’t let that take away from the quality of this feat. A forum post from [3D-vice] has a set of decent-quality pictures, and even if you don’t have a handy 64 chipset lying about we’re sure you’ll still appreciate them. If home made 64s are your thing, take a look at how you can build one without Commodore parts.

Thanks [pbuyle] for the tip!

An Open-source Scientific RPN Calculator

Why reach for a bland, commercially available calculator when you be using a model that employs RPN (Reverse Polish Notation) in its calculations and be a custom build all at the same time? The kids may have colour TFTs and graphing functions, but your keyboard has no equals sign, and that means something.

Unfortunately for RPN enthusiasts, the RPN calculator is a little on the rare side. Since classic models from the 1970s and ’80s are rather pricey, [Anton Poluektov]’s just build his own called the OpenCalc. This glorious specimen is an open hardware RPN calculator with more than a nod to the venerable Hewlett Packard HP42 in its design.

At its heart is an STM32L476 low-power ARM processor and a Sharp Memory LCD, all on a PCB clad in a 3D-printed case you’d have been proud to own in the 1980s. It runs from a CR2032 which is more than can be said for some modern styles of calculator, and it gives the user everything you could wish for in a scientific calculator. The key legends are a set of printable stickers, which when printed on self-adhesive laser film prove durable enough to last. All the resources can be found in a GitHub repository, so if RPN is your thing there’s nothing to stop you building one for yourself.

If RPN interests you, it’s a subject we’ve looked at in greater detail in the past.

Wreck Your Mail Before You Check Your Mail

Every five years or so, I think it’s time to review my e-mail flow. (Oh no!) I run my own mail server, and you should too, but this means that I get to figure out managing and searching and archiving and indexing it all by myself. (Yippee!)

And I’ll be honest — sometimes I’m a bit of a luddite. I actually, literally have been using Mutt, or its derivative NeoMutt for maybe fifteen years, after a decade or so of mouse-intensive graphical mail readers. If e-mail is about typing words, and maybe attaching the occasional image, nothing beats a straight-up text interface. But what a lot of these simple mail clients lack is good search. So I decided to take that seriously.

Notmuch is essentially an e-mail database. It’s an e-mail searcher, tagger, and indexer, but it’s not much else. The nice thing is that it’s brutally fast. Searches and extraction of tagged subsets are faster than sending the same data back and forth to the Big G, and I have a ton more flexibility. It’s awesome. Of course good ol’ Mutt can work with Notmuch. Everything can. It’s Linux/UNIX. Continue reading “Wreck Your Mail Before You Check Your Mail”

A Vacuum Battery Made For Looks And Learning

Looks and RGB LEDs are usually not a priority in tool batteries, but [Oleg Pevtsov] decided the battery for his DIY vacuum cleaner needed to be different. In the process, he learned some lessons in chemical etching, plating, machining, casting, and electronics. See the video after the break for the build compilation.

The core of the battery is just five 18650 cells in a 3D-printed holder with a BMS, but the real magic is in the external components. The outer body is a brass tube with the logo etched through the 0.6 mm wall. Getting the etching right took a few tries and a lot of frustration, but he eventually found success with a solution of sulfuric acid and nitric acid in a magnetically stirred container. For etch resist he sprayed lacquer on the outside and filled the inside with silicone. The inside was then coated with clear epoxy by allowing it to cure while spinning. The final touches were nickel plating, then gold plating, and a high polish.

The silver-plated connector on one end consists of a machined copper tip and ring, epoxied together for isolation. The tip has a multi-start external thread, allowing the female side of the connector to securely connect with a single twist. A set of RGB LEDs were added to the core to light up the battery from the inside. We have to hope the vacuum this is supposed to attach to is equally impressive.

This being Hackaday, we see a lot of custom power banks for all the custom electronics. These range from a small power bank for on-the-go soldering to a heavy metal beast with a built-in inverter.

Continue reading “A Vacuum Battery Made For Looks And Learning”