PoE-powered GPIB Adapter With Ethernet And USB-C Support

In the world of (expensive) lab test equipment the GPIB (general purpose interface bus) connection is hard to avoid if you want any kind of automation, but nobody likes wrangling with the bulky cables and compatibility issues when they can just use Ethernet instead. Here [Chris]’s Ethernet-GPIB adapter provides an easy solution, with both Power over Ethernet (PoE) and USB-C power options. Although commercial adapters already exist, these are rather pricey at ~$500.

Features of this adapter include a BOM total of <$50, with power provided either via PoE (802.3af) or USB-C (5V-only). The MCU is an ATmega4809 with the Ethernet side using a Wiznet W5500 SPI Ethernet controller. There is also a serial interface (provided by a CH340X USB-UART adapter), with the firmware based on the AR488 project.

The adapter supports both the VXI-11.2 and Prologix protocols, though not at the same time (due to ROM size limitations). All design documents are available via the GitHub repository, with the author also selling assembled adapters and providing support primarily via the EEVBlog forums.

Hacky Shack? The TRS-80 Model I Story

The 1970s saw a veritable goldrush to corner the home computer market, with Tandy’s Z80-powered TRS-80 probably one of the most (in)famous entries. Designed from the ground up to be as cheap as possible, the original (Model I) TRS-80 cut all corners management could get away with. The story of the TRS-80 Model I is the subject of a recent video by the [Little Car] YouTube channel.

Having the TRS-80 sold as an assembled computer was not a given, as kits were rather common back then, especially since Tandy’s Radio Shack stores had their roots in selling radio kits and the like, not computer systems. Ultimately the system was built around the lower-end 1.78 MHz Z80 MPU with the rudimentary Level I BASIC (later updated to Level II), though with a memory layout that made running the likes of CP/M impossible. The Model II would be sold later as a dedicated business machine, with the Model III being the actual upgrade to the Model I. You could also absolutely access online services like those of Compuserve on your TRS-80.

While it was appreciated that the TRS-80 (lovingly called the ‘Trash-80’ by some) had a real keyboard instead of a cheap membrane keyboard, the rest of the Model I hardware had plenty of issues, and new FCC regulations meant that the Model III was required as the Model I produced enough EMI to drown out nearby radios. Despite this, the Model I put Tandy on the map of home computers, opened the world of computing to many children and adults, with subsequent Tandy TRS-80 computers being released until 1991 with the Model 4.

Continue reading “Hacky Shack? The TRS-80 Model I Story”

Understanding Linear Regression

Although [Vitor Fróis] is explaining linear regression because it relates to machine learning, the post and, indeed, the topic have wide applications in many things that we do with electronics and computers. It is one way to use independent variables to predict dependent variables, and, in its simplest form, it is based on nothing more than a straight line.

You might remember from school that a straight line can be described by: y=mx+b. Here, m is the slope of the line and b is the y-intercept. Another way to think about it is that m is how fast the line goes up (or down, if m is negative), and b is where the line “starts” at x=0.

[Vitor] starts out with a great example: home prices (the dependent variable) and area (the independent variable). As you would guess, bigger houses tend to sell for more than smaller houses. But it isn’t an exact formula, because there are a lot of reasons a house might sell for more or less. If you plot it, you don’t get a nice line; you get a cloud of points that sort of group around some imaginary line.

Continue reading “Understanding Linear Regression”

Is This The Truck We’ve Been Waiting For?

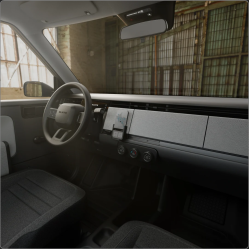
Imagine a bare-bones electric pickup: it’s the size of an old Hilux, it seats two, and the bed fits a full sheet of plywood. Too good to be true? Wait until you hear that the Slate Pickup is being designed for DIY repairability and modification, and will sell for only $20,000 USD, after American federal tax incentives.

Using the cellphone for infotainment makes for a less expensive product and a very clean dash. (Image: Slate Motors)

There are a few things missing: no infotainment system, for one. Why bother, when almost everyone has a phone and Bluetooth speakers are so cheap? No touch screen in the middle of the dash also means the return of physical controls for the heat and air conditioning.

There is no choice in colors, either. To paraphrase Henry Ford, the Slate comes in any color you want, as long as it’s grey. It’s not something we’d given much though to previously, but apparently painting is a huge added expense for automakers. Instead, the truck’s bodywork is going to be injection molded plastic panels, like an old Saturn coupe. We remember how resilient those body panels were, and think that sounds like a great idea. Injection molding is also a less capital-intensive process to set up than traditional automotive sheet metal stamping, reducing costs further.

That being said, customization is still a big part of the Slate. The company intends to sell DIY vinyl wrap kits, as well as a bolt-on SUV conversion kit which customers could install themselves. The plan is to have a “Slate University” app that would walk owners through maintaining their own automobile, a delightfully novel choice for a modern carmaker.

Continue reading “Is This The Truck We’ve Been Waiting For?”

Printable Pegboard PC Shows Off The RGB

Sometimes it seems odd that we would spend hundreds (or thousands) on PC components that demand oodles of airflow, and stick them in a little box, out of sight. The fine folks at Corsair apparently agree, because they’ve released files for an open-frame pegboard PC case on Printables.

According to the write-up on their blog, these prints have held up just fine with ordinary PLA– apparently there’s enough airflow around the parts that heat sagging isn’t the issue we would have suspected. ATX and ITX motherboards are both supported, along with a few power supply form factors. If your printer is smaller, the ATX mount is per-sectioned for your convenience. Their GPU brackets can accommodate beefy dual- and triple-slot models. It’s all there, if you want to unbox and show off your PC build like the work of engineering art it truly is.

Of course, these files weren’t released from the kindness of Corsair’s corporate heart– they’re meant to be used with fancy pegboard desks the company also sells. Still to their credit, they did release the files under a CC4.0-Attribution-ShareAlike license. That means there’s nothing stopping an enterprising hacker from remixing this design for the ubiquitous SKÅDIS or any other perfboard should they so desire.

We’ve covered artful open-cases before here on Hackaday, but if you prefer to hide the expensive bits from dust and cats, this mid-century box might be more your style. If you’d rather no one know you own a computer at all, you can always do the exact opposite of this build, and hide everything inside the desk.

The DIY 1982 Picture Phone

If you’ve only been around for the Internet age, you may not realize that Hackaday is the successor of electronics magazines. In their heyday, magazines like Popular Electronics, Radio Electronics, and Elementary Electronics brought us projects to build. Hacks, if you will. Just like Hackaday, not all readers are at the same skill level. So you’d see some hat with a blinking light on it, followed by some super-advanced project like a TV typewriter or a computer. Or a picture phone.

In 1982, Radio Electronics, a major magazine of the day, showed plans for building a picture phone. All you needed was a closed-circuit TV camera, a TV, a telephone, and about two shoeboxes crammed full of parts.

Like many picture phones of its day, it was stretching the definition a little. It actually used ham radio-style slow scan TV (SSTV) to send a frame of video about once every eight seconds. That’s not backwards. The frame rate was 0.125 Hz. And while the resulting 128 x 256 image would seem crude today, this was amazing high tech for 1982.

Continue reading “The DIY 1982 Picture Phone”

Adding An Atari Joystick Port To TheC64 USB Joystick

“TheC64” is a popular recreation of the best selling computer of all time, the original Commodore 64. [10p6] enjoys hacking on this platform, and recently whipped up a new mod — adding a 9-pin Atari joystick connector for convenience.

When it comes to TheC64 units, they ship with joysticks that look retro, but aren’t. These joysticks actually communicate with the hardware over USB. [10p6]’s hack was to add an additional 9-pin Atari joystick connector into the joystick itself. It’s a popular mod amongst owners of TheC64 and the C64 Mini. All one needs to do is hook up a 9-pin connector to the right points on the joystick’s PCB. Then, it effectively acts as a pass-through adapter for hooking up other joysticks to the system.

While this hack could have been achieved by simply chopping away at the plastic housing of the original joystick, [10p6] went a tidier route. Instead, the joystick was granted a new 3D printed base that had a perfect mounting spot for the 9-pin connector. Clean!

We’ve seen some great hacks from [10p6] lately, like the neat reimagined “C64C” build that actually appears in this project video, too.

Continue reading “Adding An Atari Joystick Port To TheC64 USB Joystick”