Restoring A Vintage CGA Card With Homebrew HASL

Right off the bat, we’ll stipulate that what [Adrian] is doing in the video below isn’t actual hot air solder leveling. But we thought the results of his card-edge connector restoration on a CGA video card from the early 80s was pretty slick, and worth keeping in mind for other applications.

The back story is that [Adrian], of “Digital Basement” YouTube fame, came across an original IBM video card from the early days of the IBM-PC. The card was unceremoniously dumped, probably due to the badly corroded pins on the card-edge bus connector. The damage appeared to be related to a leaking battery — the corrosion had that sickly look that seems to only come from the guts of batteries — leading him to try cleaning the formerly gold-plated pins. He chose naval jelly rust remover for the job; for those unfamiliar with this product, it’s mostly phosphoric acid mixed with thickeners and is used as a rust remover.

The naval jelly certainly did the trick, but left the gold-plated pins a little worse for the wear. Getting them back to their previous state wasn’t on the table, but protecting them with a thin layer of solder was easy enough. [Adrian] used liquid rosin flux and a generous layer of 60:40 solder, which was followed by removing the excess with desoldering braid. That worked great and got the pins on both sides of the board into good shape.

[Adrian] also mentioned a friend who recommended using toilet paper to wick up excess solder, but sadly he didn’t demonstrate that method. Sounds a little sketchy, but maybe we’ll give it a try. As for making this more HASL-like, maybe heating up the excess solder with an iron and blasting the excess off with some compressed air would be worth a try.

Continue reading “Restoring A Vintage CGA Card With Homebrew HASL”

Displays We Love Hacking: DSI

We would not be surprised if DSI screens made up the majority of screens on our planet at this moment in time. If you own a smartphone, there’s a 99.9% chance its screen is DSI. Tablets are likely to use DSI too, unless it’s eDP instead, and a smartwatch of yours definitely will. In a way, DSI displays are inescapable.

This is for a good reason. The DSI interface is a mainstay in SoCs and mobile CPUs worth their salt, it allows for higher speeds and thus higher resolutions than SPI ever could achieve, comparably few pins, an ability to send commands to the display’s controller unlike LVDS or eDP, and staying low power while doing all of it.

There’s money and power in hacking on DSI – an ability to equip your devices with screens that can’t be reused otherwise, building cooler and cooler stuff, tapping into sources of cheap phone displays. What’s more, it’s a comparably underexplored field, too. Let’s waste no time, then!

Decently Similar Internals

DSI is an interface defined by the MIPI Alliance, a group whose standards are not entirely open. Still, nothing is truly new under the sun, and DSI shares a lot of concepts with interfaces we’re used to. For a start, if you remember DisplayPort internals, there are similarities. When it comes to data lanes, DSI can have one, two or four lanes of a high-speed data stream; smaller displays can subsist with a single-lane, while very high resolution displays will want all four. This is where the similarities end. There’s no AUX to talk to the display controller, though – instead, the data lanes switch between two modes.

Continue reading “Displays We Love Hacking: DSI”

Remixed Pi Recovery Kit V2 Offers Another Path

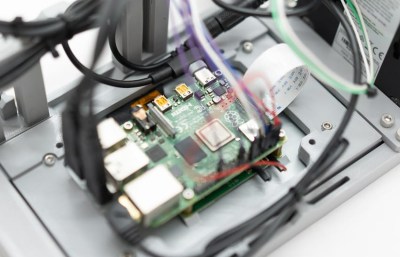
Just a few months after releasing the long-awaited second version of his Raspberry Pi Recovery Kit, [Jay Doscher] is back with an alternate take on his latest Pi-in-a-Pelican design. This slightly abridged take on the earlier design should prove to be easier and cheaper to assemble for those playing along at home while keeping the compromises to a minimum.

Probably the biggest change is that the Raspberry Pi 5 has been swapped out for its less expensive and more abundant predecessor. The Pi 4 still packs plenty of punch, but since it requires less power and doesn’t get as hot, it’s less temperamental in a build like this. Gone is the active cooling required by the more powerful single-board computer, and the wiring to distribute power to the Kit’s internal components has been simplified. The high-end military style connectors have been deleted as well. They looked cool, but they certainly weren’t cheap.

One of the most striking features of the original Recovery Kit was the front-mounted switches — both the networking type that’s intended to help facilitate connecting the Raspberry Pi to whatever hardware is left after the end of the world, and the toggles used to selectively control power to to accessory devices. Both have returned for the Recovery Kit 2B, but they’re also optional, with blank plates available to fill in their vacant spots.

Ultimately, both builds are fairly similar, but there’s enough changes between the two that it will have a notable impact on how much time (and money…) it would take you create one of your own. [Jay] has attempted to offer less intimidating versions of his designs in the past; while other creators take a “one and done” approach to their projects, he seems eager to go back and rethink problems that most others would have considered solved.

Scrapping The Local Loop, By The Numbers

A few years back I wrote an “Ask Hackaday” article inviting speculation on the future of the physical plant of landline telephone companies. It started innocently enough; an open telco cabinet spotted during my morning walk gave me a glimpse into the complexity of the network buried beneath my feet and strung along poles around town. That in turn begged the question of what to do with all that wire, now that wireless communications have made landline phones so déclassé.

At the time, I had a sneaking suspicion that I knew what the answer would be, but I spent a good bit of virtual ink trying to convince myself that there was still some constructive purpose for the network. After all, hundreds of thousands of technicians and engineers spent lifetimes building, maintaining, and improving these networks; surely there must be a way to repurpose all that infrastructure in a way that pays at least a bit of homage to them. The idea of just ripping out all that wire and scrapping it seemed unpalatable.

With the decreasing need for copper voice and data networks and the increasing demand for infrastructure to power everything from AI data centers to decarbonized transportation, the economic forces arrayed against these carefully constructed networks seem irresistible. But what do the numbers actually look like? Are these artificial copper mines as rich as they appear? Or is the idea of pulling all that copper out of the ground and off the poles and retasking it just a pipe dream?

Continue reading “Scrapping The Local Loop, By The Numbers”

Donkey Kong Bongos Ditch The GameCube, Go Mobile

Historically speaking, optional peripherals for game consoles tend not to be terribly successful. You’ll usually get a handful of games that support the thing, one of which will likely come bundled with it, and then the whole thing fades into obscurity to make way for the next new gimmick.

For example, did you know Nintendo offered a pair of bongos for the GameCube in 2003? They were used almost exclusively by the trio of Donkey Konga rhythm games, although only two of them were ever released outside of Japan. While the games might not have been huge hits, they were successful enough to stick in the memory of [bl3i], who wanted a way to keep the DK bongo experience alive.

The end result is, arguably, more elegant than the hokey musical controller deserves. While most people would have just gutted the plastic bongos and crammed in some new hardware, [bl3i] went through considerable effort so the original hardware would remain intact. His creation simply snaps onto the bongos and connects to them via the original cable.

Internally, the device uses an Arduino to read the output of the bongos (which appeared to the GameCube essentially as a standard controller) and play the appropriate WAV files from an SD card as hits are detected. Add in an audio amplifier module and a battery, and Nintendo’s bongos can finally go forth into the world and spread their beats.

As far as we’re able to tell, this is the first time the Donkey Kong bongos have ever graced the pages of Hackaday in any form, so congratulations to [bl3i] for getting there first. But it’s certainly not the first time we’ve covered ill-conceived game gadgets — long time readers will perhaps be familiar with Nintendo’s attempt to introduce the Robotic Operating Buddy (ROB) to households back in 1985.

Continue reading “Donkey Kong Bongos Ditch The GameCube, Go Mobile”

Switching Regulator Layout For Dummies

Last time, we went over switching regulator basics – why they’re wonderful, how do you find a switching regulator chip for your purpose, and how to easily pick an inductor for one. Your datasheet should also tell you about layout requirements. However, it might not, or you might want to deviate from them – let’s go more in-depth on what those requirements are about.

Appreciate The Feedback

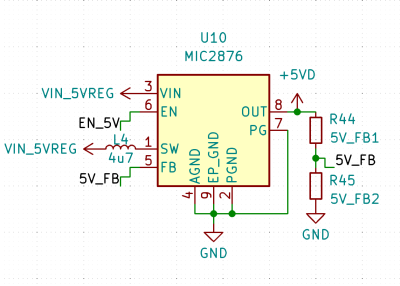
The two resistors on the right decide what your output voltage will be, and their output is noise-sensitive

There’s a few different switching regulator topologies. Depending on your regulator’s topology and how many components your chip contains, you might need some external components – maybe a Schottky diode, maybe a FET, or maybe even a FET pair. It’s often that the FET is built-in, and same goes for diodes, but with higher-current regulator (2 A to 3 A and above), it’s not uncommon to require an external one. For sizing up those, you’ll want to refer to the datasheet or existing boards.

Another thing is input and output capacitors – don’t skimp on those, because some regulators are seriously sensitive to the amount of capacitance they’re operating with. Furthermore, if you fail to consider things like capacitance dropping with voltage, you might make your regulator very unhappy – not that a linear regulator would be happy either, to be clear. We’ve covered an explainer on this recently – do check it out!

One thing you will likely need, is a feedback resistor divider – unless your switching regulator is pre-set for a certain voltage or is digitally controlled, you need to somehow point it to the right voltage, in an analog way. Quite a few switching regulators are set for a certain voltage output, but most of them aren’t, and they will want you to add a resistor divider to know what to output. There’s usually a formula for resistor divider calculation, so, pick a common resistor value, put it in as one of the resistors into the formula, get the other resistor value out of that formula, and see what’s the closest value you can actually buy. Don’t go below about 10 kΩ so that you don’t have unnecessary idle power consumption, but also don’t go too far above 100 kΩ to ensure good stability of the circuit. Continue reading “Switching Regulator Layout For Dummies”

A Peek Inside Apple Durability Testing Labs

Apple is well-known for its secrecy, which is understandable given the high stakes in the high-end mobile phone industry. It’s interesting to get a glimpse inside its durability labs and see the equipment and processes it uses to support its IP68 ingress claims, determine drop ability, and perform accelerated wear and tear testing.

Check out these cool custom-built machines on display! They verify designs against a sliding scale of water ingress tests. At the bottom end is IPx4 for a light shower, but basically no pressure. Next up is IPx5, which covers low-pressure ambient-temperature spray jets from all angles – we really liked this machine! Finally, the top-end IPx7 and IPx8 are tested with a literal fire hose blast and a dip in a static pressure tank, simulating a significant depth of water. An Epson robot arm with a custom gripper is programmed to perform a spinning drop onto a hard surface in a repeatable manner. The drop surface is swapped out for each run – anything from a wooden sheet to a slab of asphalt can be tried. High-speed cameras record the motion in enough detail to resolve the vibrations of the titanium shell upon impact!

Accelerated wear and tear testing is carried out using a shake table, which can be adjusted to match the specific frequencies of a car engine or a subway train. Additionally, there’s an interview with the head of Apple’s hardware division discussing the tradeoffs between repairability and durability. He makes some good points that suggest if modern phones are more reliable and have fewer failures, then durability can be prioritized in the design, as long as the battery can still be replaced.

The repairability debate has been raging strong for many years now. Here’s our guide to the responsible use of new technology.

Continue reading “A Peek Inside Apple Durability Testing Labs”