Lots of solutions have been proposed and enacted for multi-color and multi-material 3D printing, from color mixing in the nozzle to scripts requiring manual filament change. A solution proposed fairly early on was to manually splice the filament together, making a custom spool. The printer would print as normal, but the filament would change color. This worked pretty well, but it was tedious and it wasn’t entirely possible to control where the color change happened on the model.
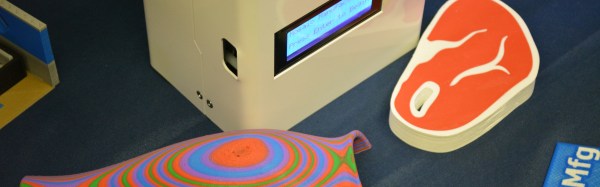
You’ll find some examples of the more successful manual splicing hacks in the pictures below. Scroll down a bit further to find our interview with Mosaic Manufacturing at Bay Area Maker Faire 2016. They have a new product that automates the filament splicing process with precision as the ultimate goal. It unlocks a single extruder printer to behave like a multi-extruder model without stopping and starting.
Mosaic pulled off a very difficult combination of two methods mentioned above. Their flagship product is a machine they’ve dubbed, “Palette”. It’s an automatic filament splicer. Up to four different filaments can feed into Palette, and it will splice them at determined intervals. This would be cool by itself, if only to save the tedium of splicing and winding a custom spool by hand.
The real killer app with Palette, however, is the software that runs alongside it. Palette can take the GCODE output of any properly prepared multi material file from any slicer, and then precisely combine and splice the filament. This can feed into any printer without modifying it, aside from sticking an encoder somewhere in the filament path. The results are indistinguishable from a dual, or quad extruder set-up.
3D printing seems like it takes forever when you’re waiting for a part to come out. But if you’re like us, the real time spent in making something new is in modelling and refining the piece. There are tons of CAD programs out there, and finding one that meets your needs is part functionality and part personal preference. Reader [Leibowitz] pointed us to Solvespace, and it looks like it fills the gap between something like OpenSCAD and something more feature-full (and complicated) like FreeCAD.
We’re wondering why we hadn’t heard of Solvespace before. It looks great. It has a lot of what we like about OpenSCAD — the ability to quickly and easily specify two 5 mm holes exactly 21 mm from each other, center-to-center and then change that distance easily. But it also has other features like constraint solvers for mechanisms and linkages. It looks like a great way to design your next Strandbeest. The tutorials seem like a good way to get started quickly.
As we said above, choosing a 3D modeller is partly based on your requirements, but also partly on your feelings. If you’re feeling limited by OpenSCAD, there’s also ImplicitCAD. Or try out Autodesk’s free (but not open) Fusion 360. And now there’s Solvespace. It’s great to have options.
Josef Prusa’s designs have always been trustworthy. He has a talent for scouring the body of work out there in the RepRap community, finding the most valuable innovations, and then blending them together along with some innovations of his own into something greater than the sum of its parts. So, it’s not hard to say, that once a feature shows up in one of his printers, it is the direction that printers are going. With the latest version of the often imitated Prusa i3 design, we can see what’s next.
Resin-based SLA printers need a different slicing algorithm from “normal” melted-plastic printers. Following their latest hackathon, [Matt Keeter] and [Martin Galese] from Formlabs have polished off an open source slicer, and this one runs in your browser. It’s Javascript, so you can go test it out on their webpage.
Figuring out whether or not the voxel is inside or outside the model at every layer is harder for SLA printers, which have to take explicit account of the interior “empty” space inside the model. [Matt] and [Martin]’s software calculates this on the fly as the software is slicing. To do this, [Matt] devised a clever algorithm that leverages existing hardware to quickly accumulate the inside-or-out state of voxels during the slicing.
[Matt] is stranger to neither 3D mesh manipulation nor Hackaday. If you’re just getting started in this realm, have a look at Antimony, [Matt’s] otherworldly CAD software with a Python interface to get your feet wet with parametric 3D modeling.
2016 is the year of the consumer 3D printer. Yes, the hype over 3D printing has died down since 2012. There were too many 3D printers at Maker Faire three years ago. Nevertheless, sales of 3D printers have never been stronger, the industry is growing, and the low-end machines are getting very, very good.
Printers are also getting cheap. At CES last January, Monoprice, the same company you buy Ethernet and HDMI cables from, introduced a line of 3D printers that would be released this year. While the $300 resin-based printer has been canned, Monoprice has released their MP Select Mini 3D printer for $200. This printer appeared on Monoprice late last month.
My curiosity was worth more than $200, so Hackaday readers get a review of the MP Select Mini 3D printer. The bottom line? There are some problems with this printer, but nothing that wouldn’t be found in printers that cost three times as much. This is a game-changing machine, and proof 2016 is the year of the entry-level consumer 3D printer.
We were trolling around Hackaday.io, and we stumbled on [Barb]’s video series called (naturally enough) “Barb Makes Things“. The plot of her videos is simple — Barb points a time-lapse camera at her desk and makes stuff. Neat stuff.
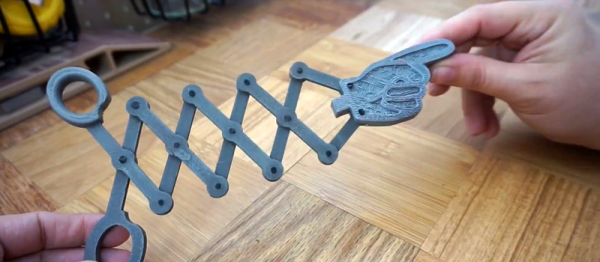
Two particularly neat projects caught our attention: a mechanical pointy-finger thing and the useful 3D-printing-filament rivets that she used to make it. (Both of which are embedded below.) The finger is neat because the scissor-like extension mechanism is straight out of Wile E. Coyote’s lab.
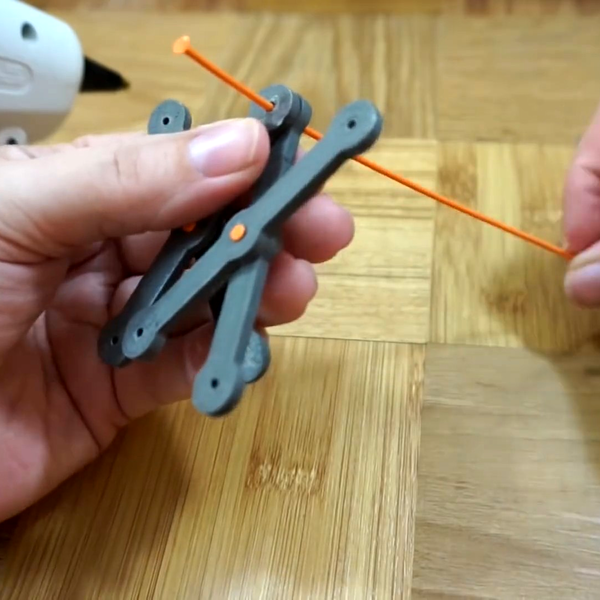
But the real winners are the rivets that hold it together. [Barb] takes a strand of filament, and using something hot like the side of a hot-glue gun, melts and squashes the end into a mushroom rivet-head. Run the filament through your pieces, mushroom the other end, and you’re set. It’s so obvious after seeing the video that we just had to share. (Indeed, a lot of cheap plastic toys are assembled using this technique.) It’s quick, removable, and seems to make a very low-friction pivot, which is something that printed pins-into-holes tends not to. Great idea!
Makerbot is in the gutter, 3D Systems and Stratasys stock is only a shadow of their 2014 glory, but this is the best year 3D printing has ever had. Machines are now good and cheap, there’s a variety of various thermoplastic filaments, and printing useful objects – instead of just plastic trinkets – is becoming commonplace.
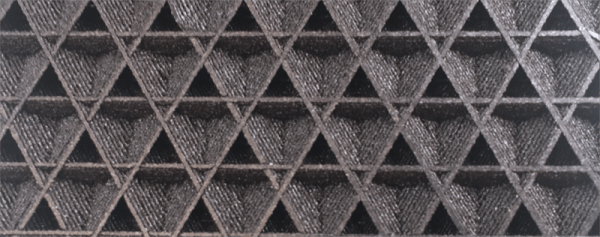
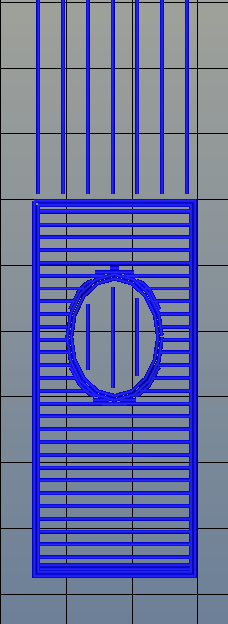
The standard rectilinear infill from Slic3r
There’s one area of 3D printing that hasn’t seen as much progress, and it’s the software stack. Slicing, the process of turning a 3D object into a Gcode file for a printer has been basically the same for the last few years. Dual extrusion is still a mess, and automated bed leveling is still in its infancy.
One aspect of slicing that has been severely overlooked is infill. Obviously, you don’t want to print plastic trinkets completely solid – only the outside surface matters, and a part with 100% infill is just a waste of plastic. Different slicers have come up with different ways of filling the inside of a print, usually with a grid of squares, triangles, or hexagons.
While the most popular methods of filling in a 3D printed objects do the job of adding a little bit of strength to a print and supporting the top layers of a print, it’s not an ideal solution. The desired strength of the finished part is never taken into account, print artifacts are sometimes visible through the side of a print, and the spacing of the infill grid is completely arbitrary. You can only set a percentage of infill, and telling a slicer to make an internal support grid with 10mm spacing is impossible.
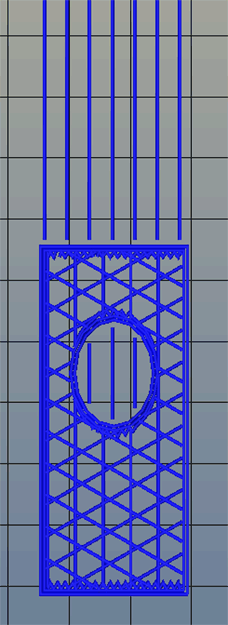
Type A Machines just changed all of this. With the release of their public beta of Cura Type A, the infill for a 3D printed part is also 3D. The dimensions of the infill are predictable, opening the door to stronger and better looking parts.
From the Type A press literature and white paper, this new type of ‘infill’ isn’t; it’s more properly referred to as ‘internal structure’, with proper dimensions between infill features. Instead of a grid of squares or triangles stacked one layer on top of each other, it’s a true structure, with the infill following the perimeter of the 3D printed object.
Generating 3D Infill
Infill generated from Type A Machine’s Cura beta. Note the 3D structure of the infill.
Right now, infill is generated in a slicer by specifying a percentage. Zero percent infill means a hollow object, and 100% infill is a completely solid part. These two edge cases are easy, but anything else means the slicer must fill the part with filament in a grid of tessellating shapes, either rectangles, triangles, or hexagons. With current slicers, the dimensions of this internal structure are, for all practical purposes, random. Printing an object with 20% infill might mean a grid of squares with 5mm or 2mm spacing. Telling the slicer to infill a part with a grid of squares spaced 10mm apart is impossible.
Type A Machine’s latest Cura release changes all of this, allowing a designer to set a precise distance between rows and columns of infill. By defining infill in absolute dimensions, this allows for stronger parts using less infill.
Absolute dimensioning is only one feature of the Type A Machine’s latest release of Cura. Even more exciting is the development of 3D internal structure. Instead of stacking layers of squares, triangles, or hexagons on top of each other, Type A Machine’s Cura uses an infill of cubes turned on their side. While each individual layer of infill looks like a series of triangles and irregular hexagons, when assembled into a printed 3D object, this infill forms a true 3D structure.
The closest comparison to this sort of structure is the difference between graphite and diamond. Both of these materials are made out of the same element, carbon. The physical structure of graphite is just, 1-atom-thick layers of graphene, producing a relatively weak material. Diamond, on the other hand, has a true 3D structure and is one of the hardest materials known to man. While adding 3D structure to the infill of 3D printed objects won’t make the objects any stronger, it will drastically reduce delamination, and be much more resistant to stresses in all three dimensions.
While Type A Machines has done some great work here, it does mean there’s yet another version of Cura to deal with. Type A Machine’s Cura, in addition to the LulzBot edition and the original are now the defacto standard for turning 3D objects into printed parts. Having an open source solution is great, but forking the development this much surely can’t be ideal.