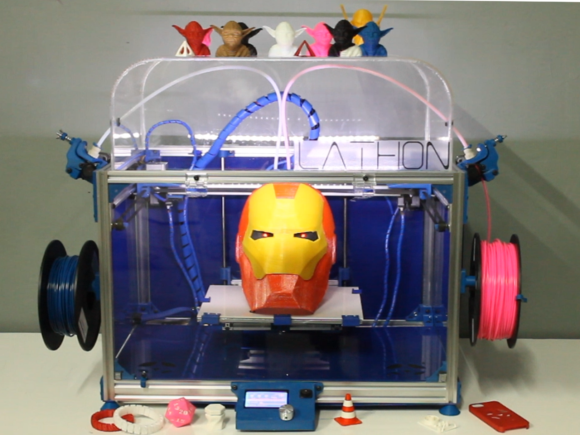
3D Printering: Making A Thing With SketchUp

printering

Imagine for a second it’s the mid-1980s and you’re looking in to desktop publishing setups. Those new LaserJets and LaserWriters are pretty cool, but imagine the desktop publishing world if you couldn’t create your own documents. Yes, it seems absurd to have a printing press that won’t create unique documents.

Now flash forward 30 years to the world of desktop manufacturing and rapid prototyping. There are dozens of repositories for 3D printable objects, but making something of your own design is apparently a dark art and arcane knowledge to everyone buying 3D printers for plastic octopodes and bottle openers.

This week, by popular demand, we’re going to be making a ‘thing’ in SketchUp Make. It’s free, easy, and surprisingly versatile despite its limited tool set. Common sense and Google algorithms dictate I link to previous tutorials in this series below:

And now on with the show. You’re gonna want to click the ‘read more’ link.

Continue reading “3D Printering: Making A Thing With SketchUp”

Creating PCBs With 3D Resin Printers

PCB

The folks over at Full Spectrum Laser are Kickstarting their own 3D printer – a stereolithography machine like the Form 1 and B9 Creator printers. During their testing, they discovered a new application for these SLA printers that should prove to be very useful for the makers and builders using machines – manufacturing PCBs with UV-sensitized copper clad boards.

Full Spectrum Laser’s printer – the Pegasus Touch – uses a near UV laser and a galvo system to build objects in UV-curing resin layer by layer. In retrospect it seems pretty obvious a UV laser would expose UV sensitive boards, but this discovery simply reeks of cleverness and is a nice ‘value added’ feature for the Pegasus printer.

The Pegasus printer has a laser spot size of 0.25mm, meaning the separation between traces on Pegasus-produced PCBs will be just under 10 mils. That’s a bit larger than the limits of laser printer-based PCB fabrication but far, far less complicated. Making a PCB on an SLA printer is as easy as removing the resin tank and putting a sensitized board on the build platform. Draw some traces with the printer, and in a few minutes you have an exposed board.

We’d really like to see if this technique can also be used with other SLA printers. if anyone out there would like to experiment, be sure to send the results into the tip line.

Video from Full Spectrum Laser below.

Continue reading “Creating PCBs With 3D Resin Printers”

Fastening 3D Printed Parts

PC100358

Ever been curious on how to fasten 3D printed parts together? There are lots of ways to do it — but what’s the best way? [Chris Lopez] works in a machine shop and decided to do some testing of how best to tap 3D printed parts, so you don’t have to!

The typical ways to add fasteners in 3D printed parts include designing the thread right into the part (only works for big threads), adding a press-fit insert, drilling and tapping it like any other material, inserting a Heli-Coil, or even by using ultrasonic weld inserts. In fact, this Stratasys blog post actually goes into some good detail on the pros and cons of each!

But, there’s a much easier way. To tap a hole normally you need to locate it accurately, make a pilot hole with a center drill — ensuring it is straight and true — then drill through with the undersized tap drill, and finally, thread it with a tap. Luckily, your 3D printer takes care of almost all these steps. By simply designing your holes to be the tap drill size you can hand tap fairly strong threads in your 3D printed parts. Just make sure your wall thicknesses and or infill settings are high enough to make sure there is material to engage!

[Chris] also goes into some detail on creating captive nut geometry — but for that you’re going to have to check out his blog. And if you’re interested in another style of fastening 3D printed parts, why not inset magnets into them while they are printing?

The 2014 Line Of MakerBots

makerbots

With the Consumer Electronics Show over, it’s finally time to take a look at the new line of MakerBot printers (here’s the press release). Unlike MakerBot’s previous offerings with a one size fits all business model, they’re branching out with a product line that can only be described as, ‘regular, small, and large’.

The new MakerBots include an updated Replicator that’s just slightly larger than the previous version. It includes Ethernet, an option for WiFi, an on-board camera, and a control panel with a 3.5″ LCD and rotary encoder. This new Replicator will retail for $2900, $700 more than the current Replicator (single extruder).

The other new MakerBots include the stripped down and small Replicator Mini. It’s a no-frills machine with a build volume of 10 x 10 x 12.5 cm (~4 x 4 x 5 in) with 200 micron resolution. Also in the new lineup is the Replicator Z18, an impressively large printer with a 30.5 x 30.5 x 45.7 cm (12 x 12 x 18 in) build volume, 100 micron resolution, plastic sides for a heated build volume, and all the bells and whistles on the new Replicator. The Mini will sell for $1375 and the Z18 is expected to sell for $6500.

The updated Replicator is available now, and the Mini and Z18 will be available sometime in the next few months.

3D Printering: Making A Thing With Blender, Part II

printering

So you have a 3D printer and need to print something of your own design. That’s a problem if you don’t know how to create and edit 3D objects.  In this post, we’re continuing our previous misadventures with Blender by making a ‘thing’ torn from a very old book on drafting.

Previously, we’ve made the same part in other 3D design packages. Here’s some links to those other ‘Making a Thing’ posts:

We’ve already done half the work to make a ‘thing’ in Blender, so now it’s time to finish the job. Check out the rest of the tutorial below.

Continue reading “3D Printering: Making A Thing With Blender, Part II”

Delta Laser Engraver Uses Inkscape For G-Code

lazer

[Z LeHericy] has a SeeMe CNC Rostock Max 3D printer, and a 2W WickedLasers Spyder Artic blue laser. Naturally, he had to try strapping them together.

Most of our homemade laser engravers featured here use recycled DVD burner diodes, and while they certainly work, they leave a bit to be desired… Well, if you want more power, let us introduce the Class 4 Artic Spyder 2W blue laser from WickedLasers — a company that sells super high-powered lasers to anyone who can afford them — because that’s a great idea!

Safety concerns aside — wear your darn laser goggles! This pair can etch wood and leather quite well. He’s been using it to etch celtic knots onto pieces of leather. To do this he’s used Inkscape to convert a .BMP of the knot into a vector image, and then using the G-Code tools included with Inkscape he can create a tool path for the printer.

The finished leather looks awesome — Stick around after the break to see the laser in action!

Continue reading “Delta Laser Engraver Uses Inkscape For G-Code”

Ninja-Drillpress-Skills Produced This Glow Plug Extruder

step5_5e1

Still looking to make your own 3D printer? Don’t have many tools or a big budget? Well, [Adam Kemp] has just the hack for you — a DIY extruder that can be made with only a drill press and a few hand tools.

First, a little background. [Adam] loves the nitty gritty side of 3D printing, so he’s managed to build his own printer almost completely out of recycled parts from printers, scanners, etc. Unfortunately, there’s not much of an option when it comes to the extruder. Almost all designs online feature 3D printed parts. Not wanting to admit defeat, he came up with this clever glow plug extruder design.

As you can imagine, it requires a lot of drilling, and it would be a heck of a lot easier on a mill — but that’s not the point here. He even goes into detail on how to hob the extruder feed wheel using nothing but a tap, a drill press, some skateboard bearings, and a few washers and nuts. The entire guide is great, so if you want to feel like MacGyver for a few hours and you need a good extruder, try it out! 

To see the extruder in action, stick around after the break.

Continue reading “Ninja-Drillpress-Skills Produced This Glow Plug Extruder”