One of the more promising 3D printing technologies that hasn’t quite yet had its spotlight is volumetric 3D printing. Researchers from the Department of Automation, Tsinghua University, have developed a new method that uses a high-speed periscope instead of rotating the printing volume — resulting in print times of less than one second.
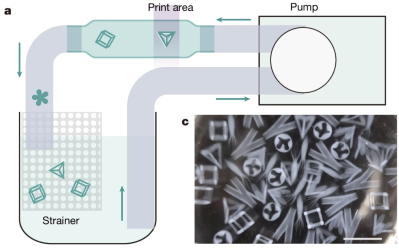 Normal volumetric printing uses a rotating volume of photosensitive resin to print nearly any geometry desired. However, this method presents issues when printing at high speeds. If you rapidly rotate a liquid, it won’t exactly stay still. So why not rotate the projector itself? This change also allows the use of less viscous resins, which is particularly useful if you want to pump fluid around.
Why would you want to pump around liquid? Scalability of course! Printing in seconds while pumping the results into a collection vessel would allow for mass production more flexible than traditional ejection methods. The researchers manage to keep quality high with some fancy algorithmic correction, which allows for accuracy on the scale of μm.
While this technology still doesn’t find a common space among average hobbyists, this may soon change…especially with these mass manufacturing capabilities. For similar volumetric printing capabilities, check out xolography.