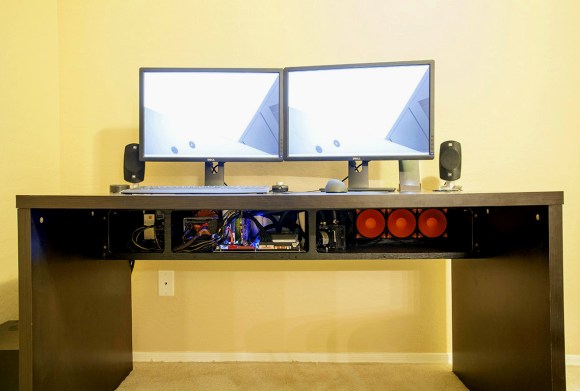
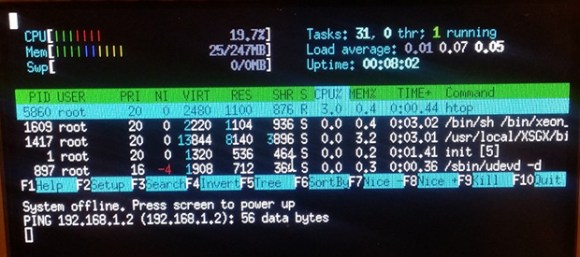
3D Printed Hand-cranked Digital Computer

What a beautiful thing it is to see this digital computer in action. [Chris Fenton] did an amazing job of designing and printing this mechanical digital computer. If you’re interested in one to call your own check out the source files he published this week.

[Chris’] design inspiration came from some research into Victorian Era mechanical looms. He adjusted the concept to build a punch card reader, starting with a capacity of three holes and moving to this design which can read ten holes. It provides just enough bits to address all three of the counters pictured above. Program the computer by inserting a punch card that is the size of a business card and crank away. The video below shows the process from afar… hopefully he’ll post a follow-up video with closer views of each piece in action.

This isn’t his first basic computing machine. Check out the electromechanical version from last year.

Continue reading “3D Printed Hand-cranked Digital Computer”

Laptop Vs Thermite: Slow Motion Destruction

thermitethumb

Years ago we covered using thermite to destroy a hard drive. The idea is that if you melt through the platters, the data is completely unrecoverable.  There are tons of videos of people doing this, but they all have a similar format. There’s a hard drive, with a flower pot or soda can sitting on top full of thermite. They then light this with a strip of magnesium and a torch.

I wanted to do something a little different. I wanted to implement thermite as a self destruct mechanism inside the device. To do this, I had to come up with a way to ignite the thermite. This stuff is very difficult to light. You have to get it really really hot. The easiest way is to use magnesium, which itself isn’t the easiest thing to light.

What I finally landed on was an ignition system that uses model rocket igniters, gun powder, and magnesium to light the thermite.  The model rocket igniter can be set off from the 12v line inside your computer. However, it isn’t hot enough to light magnesium shavings, much less thermite. To get it to work, I needed to add some gunpowder. A small amount of gun powder would get hot enough to light the magnesium shavings, which in turn were hot enough to light the thermite. I had to be careful though, because too much gunpowder would cause a rapid expansion, blowing the thermite everywhere instead of lighting it. You can actually see some red thermite being blown out of the external hard drive and the laptop as the gunpowder ignites.

Effectiveness of external hard drive self destruction:

I wasn’t sure about this one. There isn’t a whole lot of space for thermite and the ignition system inside the box. On top of that, the only space was at the side of the hard drive, where the walls are the thickest. I had no idea if the small amount of thermite I used would penetrate the drive. It did, just barely as you can see in these pictures. It looks as if it pooled in the screw holes  and made it inside. The platters are damaged.

Effectiveness of laptop destruction:

I decided to completely replace the cd rom with thermite. This gave me a ton of space to put things. I was pretty positive this would work. The hard drive is in the center of this laptop, which meant I had to place it on its side for this to be effective. You can see the thermite work its way down toward the drive in the video. As you can see in the pictures below, the drive cover is completely gone and the platters are destroyed. Success!

Since this system can be powered by batteries or the internal power of your computer, it can be put inside a working device only to be used when needed. Obviously it is a ridiculous fire hazard that no one should bother with. It was a fun experiment though and I really feel like it is something that would fit in well in the world of [James Bond]

Chromebook Hack Controls Your Television

chromebook_remote_control1

[Michael Kohn] only accomplished about half of what he set out to, but we still think his TV channel switcher from a Chromebook turned out nicely. When starting the project he wanted to include a grid of listing so that he could choose a specific program, but decided that scraping the data was too much work for this go-round.

The Chromebook doesn’t include an IR transmitter so he built one using an MSP430 chip. He had previously built a little transmitter around an AVR chip and was surprised to find that the internal oscillator on that was quite a bit more accurate than on the MSP430. Timing is everything with the Manchester encoded signals used for IR remote controls so he used his oscilloscope to tune the DCO as accurately as possible.

The app shown on the screen was written in Javascript. Google published some example code on using RS232 with the computer; [Michael] used this resource to provide communications between the computer and the microcontroller.

Continue reading “Chromebook Hack Controls Your Television”

Building RAM Into Veronica – The 6502 Computer

ram-for-veronica

It seems strange that RAM is being added to a computer so late in the build, but [Quinn Dunki] must have had it in the back of her mind the whole time because it turns out to be a rather painless experience. For those of you keeping score, this makes her Veronica project Turing complete.

The brightly colored rats nest pictured above connects the new components to the 6502 computer backplane seen in the upper left. [Quinn] decided to go with two 32K SRAM modules which need very little in the way of drive hardware (it’s hanging out on the breadboard to the left). The RAM module will simply listen for its address and react accordingly. There is one hitch regarding a two-phase clock and the need to protect the RAM from erroneous data during the first of those phases.

Getting this all to work actually pointed out a bug in the ROM module she had long ago completed. After picking up on the problem she was able to correct it simply by cutting traces and soldering in jumper wires.

Used Hard Drive Repurposed As A Cotton Candy Machine

hard-drive-cotton-candy-machine

If you’re reading this website, you’re probably someone who likes to take things apart. As such, you probably also have one or more old computer hard drives just sitting around in a parts bin.  Of all the projects you could have for an old drive, here’s an interesting one – A Chinese engineer who operates a hard drive repair and data recovery center decided to turn a used drive into a cotton candy machine.

Possible sanitary concerns set aside, his creation is very cheap and easy to build. Most hackers probably have all the necessary gear just sitting around already. The only parts he used were: a hard drive that still powered up, a generic plastic basin, an aluminum can, a flat round metal tin, and six bicycle spokes.

It might not be pretty, but it works. If you want to create your own, be sure to check out the above link. There’s a full DIY guide complete with step-by-step photos.

[Thanks Fabien]

DIY PC To Telescope Interface Cable

diy.pc.to.telescope.interface.cable

If you’re serious about astronomy these days, you want to have a computer controlled telescope. Although you can easily purchase a pre-made cable that connects the two devices, where’s the fun in that? [Charles], being an avid Maker, has created a nice step by step guide so you can build your own.

This is a great weekend project, and one that even a novice electronics hobbyist should be able to tackle. It’s straight forward, rather quick, and very easy. Strip some insulation off both ends of the cable, then cut off the unneeded wires. (You’ll only be working with three of them.) Prep everything with heat shrink tubing. Crimp one end of the wires into an RJ10 plug, then solder the other end of the wires into a DB9 connector. Secure the heat shrink tubing in place, attach the housings, and you can call it finished!

[Charles] said the whole procedure only took him around 15 minutes. Total cost? Less than $17 in parts.

NANDputer Is Mostly Wiring

We would wager that by weight this project is mostly wiring. We might go as far as betting that the wire outweighs the rest of the components 2 to 1. We’ll keep our fingers crossed that there’s never a loose connection, but for now it seems that [Kevin Horton’s] NAND-based computer project is up and running. Very nearly ever part of the build is based on NAND gates, which is why the point-to-point wiring is so crazy. There is one peripheral board which uses some non-NAND components, but he eventually plans on replacing that to make the system…. pure?

Now get ready for the crazy part. This is just one half of the program counter! There’s another board that looks just like it. The two join at least a half-dozen other boards of similar size and complexity to make a functioning computer. Crazy! The post shares a ton of details, but you can also just skip down after the break to see a video of it running a program.

If you’re wondering how a NAND-based computer works you should make your way through this online course.

Continue reading “NANDputer Is Mostly Wiring”