Giving An RC Tank A Fire Control Computer

tank

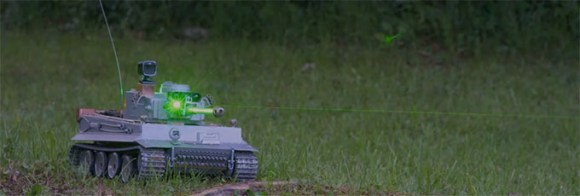
[Vincent] plays around with remote control tanks, and even though his current model is a WWII-era armor piece, he’d still like modern accoutrements such as a fire control computer and laser sighting for his main gun. His latest project did just that (French, Google translation) with the help of an Arduino, a few modifications to the receiver, and an IR rangefinder.

The stock RC tank includes servos to move the turret and the requisite electronics to fire an Airsoft gun. The precision of the mechanical movements inside the turret weren’t very precise, though, so [Vincent] had to gear down the servos to turn large movements into slight adjustments. After that, he installed an IR rangefinder and laser diode onto the barrel that allowed the gun to sight a target and read its distance.

After some experimentation with the rangefinder and laser, [Vincent] plotted data from firing a few BBs at a whole bunch of distances and targets. The graph came out fairly linear, and after plugging this into a graphing calculator, he was able to find an equation that took into account the distance and angle so the Arduino-powered fire control computer would hit its mark.

The accuracy of the gun is very impressive, all things considered. [Vincent] is able to accurately fire BBs downrange and hit an 8×12 cm target at five meters. You can check out that action below.

Continue reading “Giving An RC Tank A Fire Control Computer”

Building A WiFi Enabled Nixie Counter

wifi-nixie-counter

[Kevin Ballard] built this Nixie counter on the company dime. Tubes like this are getting more and more difficult to find since they’re no longer being manufactured. But when the Bossman hands you a corporate credit card those kinds of concerns take a back seat to your parts-shopping impulses. Start to finished this WiFi enabled counter took six weeks to build.

Connecting the board to the internet was very easy thanks to the Electric Imp that drives it. The difficult part comes in building a driver board and sockets for the tubes. We don’t see a lot of detail on how he’s generating the high voltage. But you can get a good feel for the tube connectors from the picture. He’s using an adapter PCB from Kosbo which breaks the tube pins out to two rows of 0.1″ pitch pin headers. The acrylic base has a port for each made of pin sockets spaced by a thick chunk of acrylic. Wiring harnesses wrap around the back side of the base to mate with the driver hardware. It’s programmed to count some type of company metric (it was funded by the corporation after all). They must be fairly successful because those numbers are flying by in the demo video.

Continue reading “Building A WiFi Enabled Nixie Counter”

3D Printed Hand-cranked Digital Computer

What a beautiful thing it is to see this digital computer in action. [Chris Fenton] did an amazing job of designing and printing this mechanical digital computer. If you’re interested in one to call your own check out the source files he published this week.

[Chris’] design inspiration came from some research into Victorian Era mechanical looms. He adjusted the concept to build a punch card reader, starting with a capacity of three holes and moving to this design which can read ten holes. It provides just enough bits to address all three of the counters pictured above. Program the computer by inserting a punch card that is the size of a business card and crank away. The video below shows the process from afar… hopefully he’ll post a follow-up video with closer views of each piece in action.

This isn’t his first basic computing machine. Check out the electromechanical version from last year.

Continue reading “3D Printed Hand-cranked Digital Computer”

Arc Reactor Replica Could Have Been Crafted In A Cave

arc-reactor-replica

Following in the footsteps of [Tony Stark] this Arc Reactor replica was hand crafted using almost no power tools. From what we can tell in his build gallery, a cordless drill was his only departure from using pure elbow grease.

[DJ Maller] started his build by cutting out a disc of acrylic for the base plate. While we might have reached for a hole saw, he grabbed a framing square and laid out a center point and square cuts on the stock. Kudos for his use of an awl (we often take the Luddite approach of hammer and nail) to make an impression for his compass point to rest in. After using a coping saw to rough out the shape he sands the round up to the line with the drill and a sanding wheel.

After drilling holes and inserting LEDs he begins to build up the replica piece by piece. What looks like a recessed handle for a sliding closet doors makes up the center. The spring-like copper coils was produced by wrapping wire around a pen then stretching to the desired shape. He added a bicycle spoke wrench wrapped with copper for some additional visual appeal before finishing the decoration off with some storm door clips.

[via Reddit]

An Interview With Shapeways

shape

It seems [Andrew] is an up and coming historian for the world of 3D printing. We’ve seen him interview the creator of Slic3r, but this time around he’s headed over to Eindhoven, Netherlands to interview the community manager for Shapeways, [Bart Veldhuizen].

Unlike the RepRaps, Ultimkers, and Makerbots, Shapeways is an entirely different ecosystem of 3D printing. Instead of building a machine that requires many hours of tinkering, you can just upload a model and have a physical representation delivered to your door in a week. You can also upload objects for others to buy. Despite these competing philosophies, [Bart] doesn’t see Shapeways as encroaching on the homebrew 3D printers out there; they serve different markets, and competition is always good.

Unfortunately, [Andrew] wasn’t allowed to film on the Shapeways factory floor. Proprietary stuff and whatnot, as well as a few certain ‘key words’ that will speed your customer support request up to the top of the queue.

As for how Shapeways actually produces hundreds of objects a day, [Andrew] learned that individual orders are made in batches, with several customer’s parts made in a single run. While most of the parts made by Shapeways are manufactured in-house, they do outsource silver casting after making the preliminary positive mold.

As for the future, a lot of customers are asking about mixed media, with plastic/nylon combined with metal being at the top of the list. It’s difficult to say what the future of 3D printing will be, but [Bart] makes an allusion to cell phones from 10 years ago. In 2003, nobody had smartphones, and now we have an always-on wireless Internet connection in our pockets. Given the same rate of technological progress, we can’t wait to see what 3D printing will be like in 10 years, either.

Giving Toys An Electronic Voice

sound

Whether it’s a Furby or Buzz Lightyear’s button that plays, ‘To infinity and beyond’, most digital audio applications inside toys are actually simple affairs. There’s no Arduino and wave shield, and there’s certainly no Raspi streaming audio from the Internet. No, the audio inside most toys are one or two chip devices capable of storing about a minute or so of audio. [makapuf] built an electronic board game for his kids, and in the process decided to add some digital audio. The result is very similar to what you would find in an actual engineered product, and is simple enough to be replicated by just about anyone.

[makapuf]’s game is based on Game of the Goose, only brought into the modern world with electronic talking dice. An ATtiny2313 was chosen for the microcontroller and an AT45D 4 Megabit Flash module provided the storage for 8 bit/8khz audio.

The electronic portion of the game has a few functions. The first is calling out numbers, which is done by playing recordings of [makapuf] reading, ‘one’, ‘two’, ‘three’, … ‘twelve’, ‘thir-‘, ‘teen’ and so on. This data is pumped out over a pin on the ATtiny through a small amplifier and into a speaker. After that, the code is a simple matter of keeping track of where the players are on the board, keeping score, and generating randomish numbers.

It’s an exceptional exercise in engineering, making a quite complicated game with a bare minimum of parts. [makapuf] estimated he spent under $4 in parts, so if you’re looking to add digital audio to a project on the cheap, we can’t imagine doing better.

You can see a video of [makapuf]’s project after the break.

Continue reading “Giving Toys An Electronic Voice”

60,000 RPM Vacuum Powered Rotary Tool Was 3D Printed

vacuum-powered-rotary-tool

The whining of the turbines in the 3D printed pneumatic rotary tool might make your teeth hurt. When [Axodus] tipped us off about it he mentioned it sounded like a 747 taking off. But we hear a dentist’s drill when watching the demo video.

[Richard Macfarlane] published his design if you want to try building one for yourself. But you will need to do some machining in addition to printing the enclosure and the pair of turbines. The shaft of the tool needs to fit the bearings precisely. It accepts a center blue spacer with a red turbine on either side. This assembly is encapsulated in the two-part threaded blue body which has a flange to friction fit with the shop vacuum hose. The business end of the machined shaft was designed and threaded to accept the collet from a Dremel or similar rotary tool.

We wonder how much work it would be to re-engineer this to act as a PCB drill press?

Continue reading “60,000 RPM Vacuum Powered Rotary Tool Was 3D Printed”