Repairs You Can Print: Floor Lamp Is Now Several Shades Better

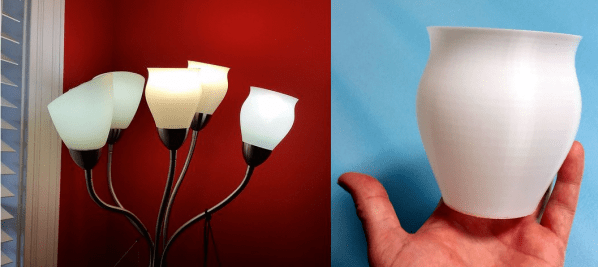
We all have that one possession—maybe more than one—that we’ve had forever and refuse to let go of, even though it has seen better days. When that something is a useful appliance, it can be heartbreaking to watch it deteriorate. For [Elmojo], that thing is a 10+ year old Medusa-style floor lamp. It still looks and works great, but the plastic shades are crumbling. The good news: [Elmojo] has a 3D printer.

Here’s where things get exciting. Not only did [Elmojo] have a pretty good chance of making new shades that would work, he had a chance to change the design, and he did. He could have made ’em look like those twisted or low-poly vases that everybody loves to print. And he still could do that. See, that’s one of the best things about 3D printers. 
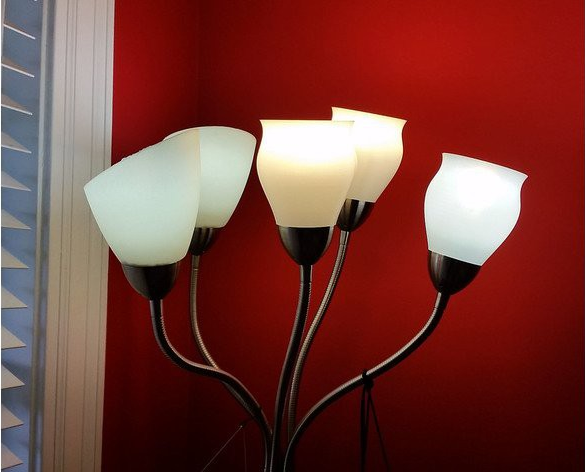
Not only can you rejuvenate beloved objects, you can do it your way. Experiment. You could print out a whole collection and change the shades once a week. Different shapes, different colors. Glow-in-the-dark shades!

[Elmojo] printed the new shades with white BAMTack! (emphasis theirs), and they have been going strong for a while now. The two on the left are the original shades, and the three on the right were printed.

There’s still plenty of time to enter our Repairs You Can Print contest, which runs until high noon Pacific time on February 20th. Don’t forget—we’re giving away TWO Prusa i3 Mk3s plus the multi-material upgrade—one to the best student entry and the other to the best entry from an organization. Isn’t there something you’ve been meaning to fix?

Repairs You Can Print: Fixing A Rat-Attacked Mic Cord

We’ve all been there — a steamy night in the rainforest of Papua New Guinea, sweaty slumber disturbed by the unmistakable sounds of gnawing. In the morning we discover that a rodent of unusual tastes has chewed the microphone cable of our transceiver right half in two, leaving us out of touch with base camp. If we had a nickel for every time that’s happened.

It may sound improbable, but that’s the backstory behind [Marius Taciuc]’s 3D-printed mic cord repair. Even with more mundane failure modes, the retractile cords on microphones are notoriously difficult to fix. Pretty much any of the usual suspects, like heat-shrink tubing or electrical tape, are going to do very little to restore the mechanical stability lost once that tough outer jacket is breached. [Marius]’s solution was to print as small an enclosure as possible to mechanically support the splice. The fit is tight, but there was just enough room to solder the wires and stuff everything back in place. Cable ties provide strain relief where the cord exits the splice, and a liberal squirt of hot glue pots the joint. It’s not perfect — we’ll bet the splice acts as a catch point and gets a little annoying after a while — but if it gets you back on the air fast and cheap, it probably makes sense.

[Marius] entered this rat-race beating hack into the Repairs You Can Print contest. Do you have an epic repair that was made possible by a 3D printer? Let the world know about it and you might just win a prize.

Continue reading “Repairs You Can Print: Fixing A Rat-Attacked Mic Cord”

Repairs You Can Print: Fixing A Chewed Up Remote

What is it about remote controls? They’re like some vortex of household chaos, burrowing into couch cushions while accusations fly about who used it last. Or they land in just the right spot on the floor to be stepped on during a trip to the bathroom. And don’t get us started about the fragility of their battery case covers; it’s a rare remote in a house with kids whose batteries aren’t held in by strips of packing tape.

But [Alex Rich]’s Bose radio remote discovered another failure mode: imitating a dog chew toy. Rather than fork out $90 for a replacement, [Alex] undertook a 3D-printed case to repair the chewed remote. He put an impressive amount of reverse engineering into the replacement case, probably expending much more than $90 worth of effort. But it’s the principle of the thing, plus he wanted to support some special modifications to the stock remote. One was a hardware power switch to disconnect the batteries entirely, hidden in the bottom shell of the case. The second was the addition of a link to his thermostat to adjust the volume automatically when the AC comes on. That required a Trinket inside the remote and a few mods to make room for it.

Yes, this project dates from a few years back, but [Alex] only just brought it to our attention for the Repairs You Can Print contest. Got some special unobtanium part that you were able to print to get out of a jam? Enter and win prizes to add to the glory of fixing something yourself.

Repairs You Can Print: Racing The Clock For A Dishwasher Fix

No matter how mad your 3D printing skills may be, there comes a time when it makes more sense to order a replacement part than print it. For [billchurch], that time was the five-hour window he had to order an OEM part online and have it delivered within two days. The race was on — would he be able to model and print a replacement latch for his dishwasher’s detergent dispenser, or would suffer the ignominy of having to plunk down $30 for a tiny but complicated part?

As you can probably guess, [bill] managed to beat the clock. But getting there wasn’t easy, at least judging by the full write-up on his blog. The culprit responsible for the detergent problem was a small plastic lever whose pivot had worn out. Using a caliper for accurate measurements, [bill] was able to create a model in Fusion 360 in just about two hours. There was no time to fuss with fillets and chamfers; this was a rush job, after all. Still, even adding in the 20 minutes print time in PETG, there was plenty of time to spare. The new part was a tight fit but it seemed to work well on the bench, and a test load of dishes proved a success. Will it last? Maybe not. But when you can print one again in 20 minutes, does it really matter?

Have you got an epic repair that was made possible by 3D printing? We want to know about it. And if you enter it into our Repairs You Can Print Contest, you can actually win some cool prizes to boot. We’ve got multiple categories and not that many entries yet, so your chances are good.

Repairs You Can Print: Broken Glue Gun Triggers Replacement

Picture this: you need to buy a simple tool like a glue gun. There’s usually not a whole lot going on in that particular piece of technology, so you base your decision on the power rating and whether it looks like it will last. And it does last, at least for a few years—just long enough to grow attached to it and get upset when it breaks. Sound familiar?

[pixelk] bought a glue gun a few years ago for its power rating and its claims of strength. Lo and behold, the trigger mechanism has proven to be weak around the screws. The part that pushes the glue stick into the hot end snapped in two.

It didn’t take much to create a replacement. [pixelk] got most of the measurements with calipers and then got to work in OpenSCAD. After printing a few iterations, it fit well enough, but [pixelk] saw a chance to improve on the original design and added a few teeth where the part touches the glue stick. The new part has been going strong for three months.

We think this entry into our Repairs You Can Print contest is a perfect example of the everyday utility of 3D printers. Small reproducible plastic parts are all around us, just waiting to fail. The ability to not only replace them but to improve on them is one of the brightest sides of our increasingly disposable culture.

Still haven’t found a glue gun you can stick to? Try building your own.

Flashing Light Prize 2018: This Time With Neon

The Flashing Light Prize is back this year with a noble twist. And judging from the small set of entries thus far, this is going to be an interesting challenge.

Last year’s Flashing Light Prize was an informal contest with a simple goal: flash an incandescent lamp in the most interesting way possible. This year’s rules are essentially the same as last year, specifying mainly that the bulb itself has to light up — no mechanical shutters — and that it has to flash at 1 Hz with a 50% duty cycle for at least five minutes. But where last year’s contest specified incandescent lamps, this year you’ve got to find a way to flash something with neon in it. It could be an off-the-shelf neon pilot light, a recycled neon sign, or even the beloved Nixie tube. But we suspect that points will be awarded for extreme creativity, so it pays to push the envelope. Last year’s winner used a Wimhurst machine to supply the secondary of an ignition coil and flash a pair of bulbs connected across the primary, so the more Rube Goldberg-esque, the better your chances.

There are only a handful of entries right now, with our favorite being [Ben Krasnow]’s mashup of electricity, mechanics, chemistry, and physics. You’ve got until March 15th to post your flashing neon creation, and there are two categories this year, each with a £200 prize. Get your flash on and win this one for Hackaday.

Continue reading “Flashing Light Prize 2018: This Time With Neon”

3D Printed Battery Pack Keeps Old Drill Spinning

The greatest enemy of proprietary hardware and components is time. Eventually, that little adapter cable or oddball battery pack isn’t going to be available anymore, and you’re stuck with a device that you can’t use. That’s precisely what happened to [Larry G] when the now antiquated 7.2V NiCd batteries used by his cordless drill became too hard to track down. The drill was still in great shape and worked fine, but he couldn’t power the thing. Rather than toss a working tool, he decided to 3D print his own battery pack.

The 3D modeling on the battery pack is impeccable

He could have just swapped new cells into his old pack, but if you’re going to go through all that trouble, why not improve on things a little? Rather than the NiCd batteries used by the original pack, this new pack is designed around readily available AA NiMH batteries. For the light repairs and craft work he usually gets himself into, he figures these batteries should be fine. Plus he already had them on hand, and as we all know, that’s half the battle when putting a project together.

Interestingly, the original battery pack was wired in such a way that it provided two voltages. In older tools such as this one, this would be used for rudimentary speed control. Depending on which speed setting the drill is on, it would either connect to 4 or 6 cells in the original pack. [Larry] didn’t want to get involved with the extra wiring and never used the dual speeds anyway, so his pack only offers the maximum speed setting. Though he does mention that it may be possible to do PWM speed control in the battery itself via a 555 timer if he feels like revisiting the project.

[Larry] tells us the pack itself was rendered completely from scratch, using only the original battery pack and trial-and-error to get the fit perfect. He reused the side-mounted release buttons to save time, but otherwise everything is 3D printed in PETG for its strength and chemical resistance.


This is an entry in Hackaday’s

Repairs You Can Print contest

The twenty best projects will receive $100 in Tindie credit, and for the best projects by a Student or Organization, we’ve got two brand-new Prusa i3 MK3 printers. With a printer like that, you’ll be breaking stuff around the house just to have an excuse to make replacement parts.