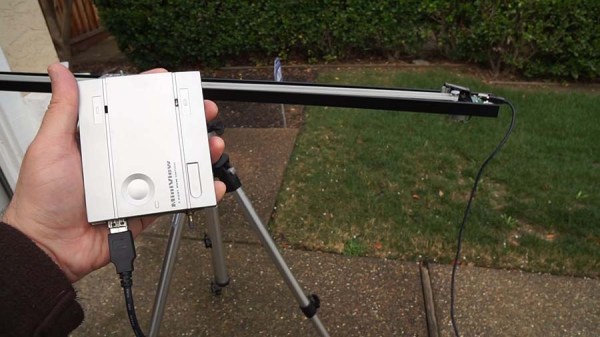
3d printed webcam mount

Repackaging A Webcam In A 3D Printed Enclosure

One of the beauties of having a 3D printer is the ability to print accessories for it to make it better. [Sky] had been using a Logitech C920 webcam to record some of his prints, but it wasn’t really designed to mount off a 3D printers frame. So he designed his own enclosure for it.

He started by taking the webcam apart, getting down to the bare PCB  level and taking some measurements. It turned out to be pretty compact! He modeled a rough outline of it in SketchUp, and then started designing his new enclosure around it. After a few failed prints — thanks to the 3D printer company that shall not be named — he put it altogether and did some test fits. It worked!

The new enclosure is designed to mount off the frame of his 3D printer, allowing for a wide angle view of the print bed. If you print something that makes use of the entire z-axis, you might run into some visibility issues, but [Sky] isn’t too worried about this.

For the full explanation and design, he gives a great walk through on all the details in the video below.

Continue reading “Repackaging A Webcam In A 3D Printed Enclosure”

Plywood Camera Dolly

DIY Plywood Camera Dolly Looks Professional

While [Ted] was poking around the ‘net, he came across a neat little product called a camera dolly. These are used to add an artistic flair to filming. They are similar to a camera slider but can roll around on the floor or a table and do not need to follow a track. [Ted] wanted a camera dolly but the cost of a professional product seemed too expensive for what he’d actually be getting, so he set off to make his own.

[Ted] first designed the dolly in a CAD software and printed out templates for the parts. Those templates were then transferred to plywood and cut out with a jig saw. Three inline skate wheels support the frame and allow the unit to roll around. Mounted in the center of the frame is a pan and tilt camera mount.

The extraordinary part of the build is that the angle of each wheel can be adjusted independently.  This allows the dolly to do anything from rolling in a straight line to gradually traveling around a curve or even just spinning the camera in place. Each wheel mount has degree indications so that they can be adjusted very precisely as well as be returned to a previously recorded position.

Hackaday Prize Entry: Recording RC Planes With Third Person View

With the latest advancements in small, cheap video transmitters, it’s no surprise First Person View remote-controlled aircraft are so popular. It’s the easiest way to get into a cockpit without having to spend thousands of dollars and fifty or so hours on a pilot’s license. Despite all the technical challenges of FPV flying, there’s still one underserved part of recording RC aircraft: third person view, or as it’s more commonly called, ‘handing a camcorder to your friend.’

[Walker Eric] would like to do something about that. He’s always wanted nice videos of him flying his plane, and he can’t film and fly at the same time. He can build a robot, though, and that’s his entry for The Hackaday Prize.

[Walker]’s project uses a base station with a camcorder mounted on a gimbal. The electronics for this setup are surprisingly simple – just a GPS beacon transmitting telemetry down to the base station. By comparing this data to a GPS receiver on the ground station, the direction of the plane can be computed.

There are a few problems with this setup. Altitude measurement with GPS isn’t very accurate, so [Walker] is using a pressure sensor as an altimeter on the GPS beacon. The current setup works great, and is a fantastic improvement over the OpenCV setup [Walker] tested out before moving to GPS.

[Walker] already has some incredible video of him flying some planes and quads around his local field shot with this system. You can check those out below.


The 2015 Hackaday Prize is sponsored by:

Continue reading “Hackaday Prize Entry: Recording RC Planes With Third Person View”

Smile For The Raspberry Pi Powered Photo Booth

[Roo] was tasked with finding a better way to take corporate employee photos. The standard method was for a human resources employee to use a point and shoot camera to take a photo of the new recruits. The problem with this method is many people feel awkward trying to force a smile in front of other people. Plus, if the photo turns out poorly many people won’t ask to have it retaken so as not to feel vain or inconvenience the photographer. [Roo’s] Raspberry Pi powered photo booth solves this problem in a novel way.

The new system has the employee use their own mobile phone to connect to a website running on the Pi. When the employee tells the Pi to snap a photo, the system uses the Raspberry Pi camera module to capture an image. [Roo] actually 3D printed a custom adapter allowing him to replace the standard camera lens if desired. The photo can be displayed on an LCD screen so the user can re-take the photo if they wish.

The system is built into a custom case made from both 3D printed and laser cut parts. The front plate is a frosted white color. [Roo] placed bright white lights behind the front panel in order to act as a flash. The frosted plastic diffuses the light just enough to provide a soft white light for each photo taken. Once the photo is selected, it can then be uploaded to the company database for use with emails, badges, or whatever else.

[Roo] also mentions that the system can easily be changed to send photos via Twitter or other web applications. With that in mind, this system could be a great addition to any hackerspace or event. The code for an older version of the project can be found on the project’s github page.

Continue reading “Smile For The Raspberry Pi Powered Photo Booth”

Spin DIY Photography Turntable System

A motorised turntable is very handy when taking product pictures, or creating animated GIF’s or walk around views. [Tiffany Tseng] built Spin, a DIY photography turntable system for capturing how DIY Projects come together over time. It is designed to help people share their projects in an engaging way through creating GIF’s and videos which will be easy to post on social networks like Twitter and Facebook.

The device is a lazy susan driven by a stepper motor controlled via an Arduino and an Easy Driver motor driver shield. The Spin system utilizes the Soft Modem library to send signals from an iPhone to the Arduino. This connects the Arduino to the iPhone via the audio socket on the phone. The Spin iOS app is currently in Beta and is invite only. After you’ve built your own Spin turntable, take a picture of it and request the app. Of course, there are many different ways of controlling the motor so if you are handy, you can build your own controller. But [Tiffany]’s iOS app provides a way to stitch the various images to form an animated GIF and then share them easily. Building the turntable should be straightforward if you grab the design files from the github repo, follow the detailed instructions on the build page, and have access to a laser cutter and a 3D printer.

Check out a few similar turntable hacks we’ve featured in the past, such as one that uses the motor from a scanner, an attempt that just didn’t end up working smoothly, and one that uses a belt-drive system. There’s a video of the turntable in action after the break.

Continue reading “Spin DIY Photography Turntable System”

Vintage Lens On A Modern Camera

Sometimes you get plain lucky in multiple ways, enabling you to complete a hack that would otherwise have seemed improbable. [Mario Nagano] managed to attach a vintage 1950’s lens to a modern mirrorless camera (translated from Portuguese).

Photographers tend to collect a lot of gear and [Mario] is no exception. At a local fair in Sao Paolo, he managed to pick up a Voigtlander Bessa I – a bellows camera (or folding camera). It came cheap, and the seller warned him as much, commenting on the bad external shape it was in. But [Mario] had a sharp eye, and noticed that this was a camera that would have remained closed most of the time, due to its construction.

Inspection showed that the bellows was intact. What excited and surprised him was the excellent Color-Skopar objective mounted on a Prontor-S trigger, which is considered premium compared to the entry level Vaskar lens. His plan was to pick up another Voigtlander Bessa-I with a better preserved body, but the cheaper lens and do a simple swap. He never did find another replacement though. Instead, he decided to fix the excellent vintage lens to a DSLR body.

He’d read about a few other similar hacks, but they all involved a lot of complicated adapters which was beyond his skills. Removing the lens from the vintage camera was straightforward. It was held to the body by a simple threaded ring nut and could not only be removed easily, but the operation was reversible and didn’t cause any damage to the old camera body. The vintage lens has a 31.5mm mounting thread while his Olympus DSLR body had a standard 42mm thread. Fabricating a custom adapter from scratch would have cost him a lot in terms of time and money. That’s when he got lucky again. He had recently purchased a Fotodiox Spotmatic camera body cap. It’s made of aluminium and just needed a hole bored through its center to match the vintage lens. There’s no dearth of machine shops in Sao Paolo and it took him a few bucks to get it accurately machined. The new adapter could now be easily fixed to the old lens using the original 31.5mm ring nut.

The lens has a 105mm focal length, so the final assembly must ensure that this distance is maintained. And he got lucky once again. He managed to dig up a VEB Pentacom M42 macro bellows from an old damaged camera. Was it worth all the effort ? Take a look at these pictures here, here and here.

Extracting Lightning Strikes From HD Video

Lightning photography is a fine art. It requires a lot of patience, and until recently required some fancy gear. [Saulius Lukse] has always been fascinated by lightning storms. When he was a kid he used to shoot lightning with his dad’s old Zenit camera — It was rather challenging. Now he’s figured out a way to do it using a GoPro.

He films at 1080@60, which we admit, isn’t the greatest resolution, but we’re sure the next GoPro will be filming 4K60 next. This means you can just set up your GoPro outside during the storm, and let it do it what it does best — film video. Normally, you’d then have to edit the footage and extract each lightning frame. That could be a lot of work.

[Saulius] wrote a Python script using OpenCV instead. Basically, the OpenCV script spots the lightning and saves motion data to a CSV file by detecting fast changes in the image.

graph of lightning

The result? All the lightning frames plucked out from the footage — and it only took an i7 processor about 8 minutes to analyze 15 minutes of HD footage. Not bad.

Now if you feel like this is still cheating, you could build a fancy automatic trigger for your DSLR instead…