Using Over 3000A To Rapidly Charge An IPhone

Earlier this week I had the pleasure of doing something very stupid with another YouTuber. We wanted to see what would happen if you push over 3000A through an iPhone. The result? Fire. You get fire.

To perform this experiment we prepared a few different setups for maximum electrocution. The first was with the tried and true technique of re-wrapping a transformer to put out low volts at high current — essentially, a DIY spot welder. Now while most of those use a little transformer taken out of a microwave, I happened to have an industrial transformer about four times the size. Once re-wrapped to become a step-down transformer, it can produce approximately 1000A @ 1V … Or if you plug it into a 240V outlet, upwards of 2000A @ 2V — all depending on the resistance of whatever you’re putting in-between the contacts.

During the actual test we read about 1400A going through the iPhone with an ammeter. Which puts an iPhone 6 at a resistance of about 0.0014 ohms.

Continue reading “Using Over 3000A To Rapidly Charge An IPhone”

A CNC Build Log From The Not So Distant Past

2007 wasn’t that long ago, but [Adam Ziegler’s] build log is, nevertheless, a pleasant romp through a not so distant past. From beginning to the end of the build, we enjoyed reading [Adam]’s progress and struggles as he worked through the build. Sometimes it’s hard to see the very normal daily work that goes into a project when it’s all polished up at the end.

He designed the mechanics himself, but after some less-successful attempts, decided to just buy the electronics. The machine is a well executed MDF gantry mill with conduit rails and 6000-series ball bearings on angle stock. It’s a good example of what you can do with cheap materials and careful planning.

[Adam] ran a few jobs on the machine, some of which he took on before it was even built (which he doesn’t recommend doing). After his adventure with this gateway machine, he’s put it up for sale and is purportedly working on a new model. The standard pattern of CNC addiction is a live alive and well.

If you’re looking to get into CNC machining on the cheap, we’ve seen similar affordable builds for your inspiration.

Learning And Failing At Digital Electronics

[spencerhamblin] is starting his explorations into digital electronics the hard way: reproducing a “simple” IC’s functionality by wiring up a board full of discrete transistors. In this case, the end product is a binary-to-seven-segment decoder built from scratch.

In engineering circles, this circuit is better known as a 7447 BCD to seven-segment decoder/driver, but just using a single chip has little pedagogical value. Building a simple circuit with 39 transistors, 31 resistors, and a handful of diodes is a good introduction to digital electronics, and after two attempts, [spencerhamblin] knocked it out of the park.

The build began with a piece of copper clad board, a bunch of cheap FETs from fleabay, and an incorrect schematic. While the first version of the project looked fantastic with Manhattan-style construction, and jumper wires everywhere, the schematic was fundamentally flawed and [spencer] got a little confused when converting the circuit to a common anode display.

Version two used a more standardized construction. This circuit was plotted in DipTrace, and the resulting PCB was sent off to OSHPark. The build was cleaner, but in capturing the schematic, [spencer] reversed the footprint of the seven segment display. That was easy enough to fix with a few short wires, and after a little bit of work [spencer] had a device that would convert binary to a seven segment display.

Introducing The BeagleBone Blue

The BeagleBone is a board that doesn’t get a lot of attention in a world of $5 Raspberry Pis, $8 single board computers based on router chipsets, and a dizzying array of Kickstarter projects promising Android and Linux on tiny credit card-sized single board computers. That doesn’t mean the BeagleBone still isn’t evolving, as evidenced by the recent announcement of the BeagleBone Blue.

The BeagleBone Blue is the latest board in the BeagleBone family, introduced last week at CES. The Blue is the result of a collaboration between UCSD Engineering and TI, and with that comes a BeagleBone built for one specific purpose: robotics and autonomous vehicles. With a suite of sensors very useful for robotics and a supported software stack ideal for robots and drones, the BeagleBone Blue is the perfect board for all kinds of robots.

On board the BeagleBone Blue is a 2 cell LiPo charger with cell balancing and a 6-16 V charger input. The board also comes with eight 6V servo outputs, four DC motor outputs and inputs for four quadrature encoders. Sensors include a nine axis IMU and barometer. Unlike all previous BeagleBones, the BeagleBone Blue also comes with wireless networking: 802.11bgn, Bluetooth 4.0 and BLE. USB 2.0 client and host ports are also included.

Like all of the recent BeagleBoards, including the recently released BeagleBone Green, the Blue uses the same AM3358 1 GHz ARM Cortex 8 CPU, features 512 MB of DDR3 RAM, 4GB of on board Flash, and features the main selling point of the BeagleBoard, two 32-bit programmable real-time units (PRUs) running at 200 MHz. The PRUs are what give the BeagleBone the ability to blink pins and control peripherals faster than any other single board Linux computer, and are extremely useful in robotics, the Blue’s target use.

Right now, the BeagleBone Blue isn’t available, although we do know you’ll be able to buy one this summer. Information on pricing and availability – as well as a few demos – will come in February.

Drinking With Your Robot

We’ve seen tons of bartending robots before, but we’re not sure we’ve ever seen a robot that actually drinks with youUntil now anyway.

Designed and built by a South Korean inventor, [Eunchan Park], he built this robot to drink with, quite literally.

The story goes that he tried drinking alone in 2012 because he did not have a girlfriend at the time. He didn’t enjoy drinking alone and promptly stopped. But then recently he tried drinking with two glasses on the table, and cheers himself when drinking. According to him, the alcohol tasted much better that way, which drove him to build Drinky, the Alcohol Drinking Robot.

Continue reading “Drinking With Your Robot”

Hacking Online Reviews

For this post, I want to return the word hacking to its nefarious definition. We prefer the kinder definition of a hacker as someone who creates or modifies things to fit some purpose or to improve its function. But a hacker can also be someone who breaks into computer systems or steals phone service or breaks encryption.

There are some “hacker battlefields” that are very visible. Protecting credit card numbers from hackers is a good example. But there are some subtle ones that many people don’t notice. For example, the battle for online reviews. You know, like on Amazon when you rate the soldering iron you bought and leave a note about how it works. That might seem like a strange place for hacking until you stop and think about why people do bad hacking.

Continue reading “Hacking Online Reviews”

3D Printed Tourbillon Clock

3D printed clocks have been done before, but never something like this. It’s a 3D printed clock with a tourbillon, a creative way to drive an escapement developed around the year 1800. Instead of a pendulum, this type of clock uses a rotating cage powered by a spring. It’s commonly found in some very expensive modern watches, but never before has something like this been 3D printed.

3D Printed Clock
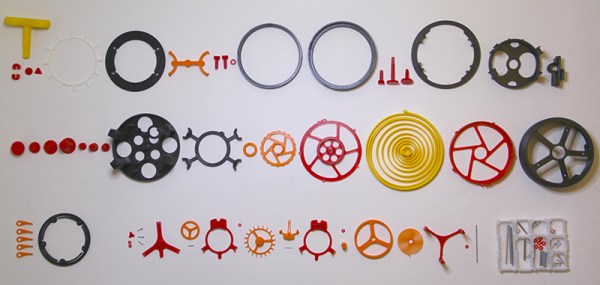
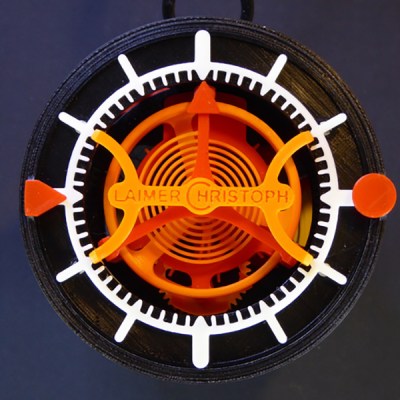
[Christoph Lamier] designed this tourbillon clock in Autodesk Fusion 360, with 50 printable parts, and a handful of pins, screws, and washers. The most delicate parts – the hairspring, anchor, escapement wheel, and a few gears were printed at 0.06 layer height. Everything else was printed at a much more normal resolution with 0.1mm layer height.

Because nearly the entire clock is 3D printed, this means the spring is 3D printed as well. This enormous 2 meter-long spiral of printed plastic could not have been printed without altering a few settings on the printer. The setting in question is Cura’s ‘combing’ or the ‘avoid crossing perimeters’ setting. If you don’t disable this setting, the print time increases by 30%, and moving the print head causes the plastic to ooze out over the spring.

There’s a 26-minute long video of the 3D printed tourbillon clock in action that is horrendously boring. It does demonstrate this clock works, though. You can check out the more interesting videos below.

Continue reading “3D Printed Tourbillon Clock”