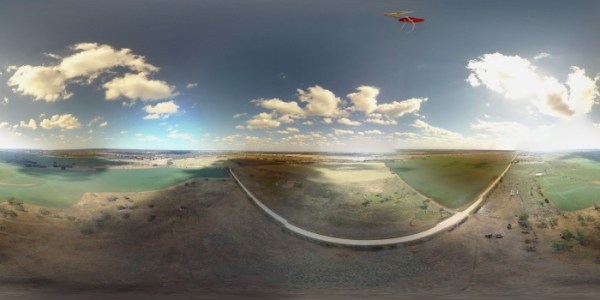
High Speed Photography Controller Built To Catch Water Droplets

One high-speed photography controller to rule them all. If you’re looking to photograph droplets of water splashing on a still reservoir this is the ticket. But if you’re not, it still offers an incredible amount of flexibility for other high-speed needs. Inside you’ll find an Arduino Mega, which has plenty of room to bend to your will.

[Michael Ross] is the man behind this box. He wanted a system that did it all; timings, droplet control, camera shutter, etc. What you can’t see in the image above is the interface panel on the back of this enclosure (this shot shows the top of the box). The video after the break will give you a look at the overall setup. It has ports to control two different light sources, detectors to snap the images using an infrared sensor or via sound (we’re thinking bullet photography), and four ports to control solenoid valves.

He produced a mammoth PDF tutorial which will guide even the biggest noob through the entire build process. Find it at his site linked above.

Continue reading “High Speed Photography Controller Built To Catch Water Droplets”

Optical Fiber Twin-flash Adapter

[Marcell] has always been turned off by the price tag of commercially available double flash adapters. He decided to see what kind of performance he could get out of a flash adapter which he built himself.

The raw materials used should seem quite familiar. The optical fibers act as a conduit to redirect the light from the flash, but he needed a way to hold them in place. He chose to use locline. It’s a product we often see in CNC mill builds to blow debris away from the cutter head. It’s hollow, and holds its position. This is perfect because it allows for easy adjustment and provides a channel through which the fibers can be routed. The Y adapters used here run to a hard board base which connects to the mounting lug on the bottom of the camera. [Marcell] suggests using a T-piece if available because the Y fitting made it a bit more difficult to push the fibers through.

Laser Light Painting Includes Camera Control

This laser light painting setup can even control the camera. But it probably will not work with your average point-and-shoot. The exposure time used is somewhere around 2 seconds long, a feature which is hard to find on anything but DSLR cameras.

The setup relies on a red laser diode to do the painting. When viewed in real time you only see a dot tracing out a cryptic pattern and occasionally switching on and off. But with a long exposure the intense light persists to achieve an image like the one seen above. Note the ghosting around the rig as it has moved while the shutter was open.

The Arduino controlled device consists of a base which pivots the diode horizontally, with a servo for aiming on the vertical axis. Since the sketch is divided up by letter, we wonder how hard it would be to adapt this for use with a point-and-shoot? Perhaps you could capture one letter at a time and layer the frames in post production?

It seems this is a lot easier to build than some of the LED plotters we’ve looked at. If you do make your own don’t forget to send a link our way.

Continue reading “Laser Light Painting Includes Camera Control”

F/stop Printer For Analog Printing Black And White Photos

This beautifully crafted device is a timer used for getting the perfect exposure when making film prints of photos. But in addition to keeping time, it also does logarithmic calculations that are based on the f-stop values used for each exposure. It does this in 1/100th of a stop increments. While he was at it, [William] also decided to pack in a bunch of other features like dry down correction, and support for making test strips. This is a little hard to understand when discussed in the abstract, but just take a look at his video after the break where [William] walks us through an example exposure and all will become clear.

You can see from the construction page that the device is basically an Arduino shield. It provides a relay for controlling the exposure lamp, a keypad, rotary encoder, and character LCD. Slap it in a fancy case, connect it to the equipment you’re using, and you’ll be creating perfect prints in no time flat!

Continue reading “F/stop Printer For Analog Printing Black And White Photos”

Safe-Sync Protects Your Camera From Older High-voltage Flash Modules

Since we’re not high-end camera aficionados it was a surprise to us that the hot shoe that allows a camera to interface with a flash module has changed rather dramatically over the years. Apparently the interface used to be mchanical-electrical in that the camera would use mechanical means to connect two electrodes from the hot shoe. It didn’t matter the voltages it was switching because the camera didn’t have an electrical system connected to the interface. The problem is that connecting a modern camera to what [David Cook] calls ‘legacy’ flash hardware could damage it. So he developed the Safe-Sync to interface modern cameras with older flash modules.

You can see the board which he’s holding up in the image. It includes a lot of nice features, like the ability to be powered from the external flash, or from a battery. There’s also an optional momentary push switch which can be used to test the flash control (or hack it for other purposes). In addition to providing protection with older equipment, this could also be used to interface flash modules from different manufacturers with your camera.

Head-mounted Memory Catcher

A picture’s worth a thousand words so what is a hat that can take 360 degree pictures worth? Just make sure you put it on whenever leaving the house and capturing that next memorable moment will be just one click of a button away.

[Mikeasaurus] recently put together this… special… headgear. He used film-based disposable cameras and this choice presented a few interesting challenges. But the choice is not necessarily a bad one, as you can get six of these without really blowing your budget. He cut the top off of a plastic garbage can to serve as a headband on which to mount the hardware (zip-ties to the rescue). But things get hairy when it comes to triggering all of the shutters at once. These are spring-loaded shutter releases and you can’t just patch into them electrically like you could a digital camera. His solution is a group of six servo motors which do the button pushing for him.

A thirty-six exposure trial run turned out okay. Several times the shots didn’t come out, but at the end of his post he shares a few of the good ones that did. We’re going to stear clear of this one as we can’t abide manually winding all six cameras between each shot. But it does give us an idea for a single-camera hat that uses a 45-degree mirror which swivels. We’ll just put that one in the growing pile of ideas we need to make time for.

Simple Power Adapter Thumbs Its Nose At Proprietary Connectors

[Mike Worth] wanted to use his camera for some time-lapse photography. Since it’s used to take many pictures over a long period of time, he doesn’t want to deal with batteries running low. But there’s no standard power jack on the side; instead the official charger consists of an adapter that is inserted in place of the batteries. Rather than break the bank with the special cable, [Mike] made his own battery compartment A/C adapter.

You can see that it is made up of two parts. The first is a standard wall wart that outputs the correct voltage and has an acceptable current rating. The other part is the adapter cable that connects to the camera on one end, and has a barrel jack on the other. [Mike] rolled some paperboard around a pencil until it matched the diameter of a AA battery. Once of the cylinders has a thumb tack for the negative lead, and the other uses a screw and washer for the positive side. He soldered some wire to these and he’s in business.

He must be snapping photos frequently enough to avoid the auto-shutoff feature. That or he’s disabled it with the use of some custom firmware.