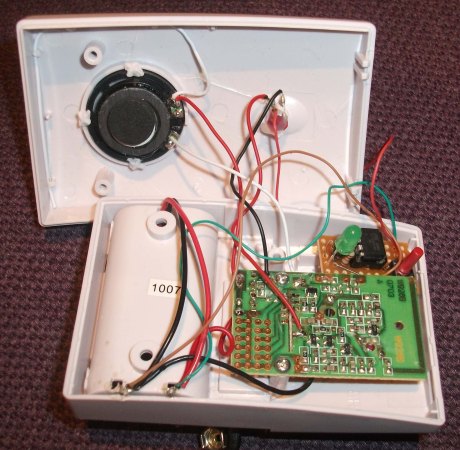
Cardboard Lampshade Makes Ordinary Recycling A Centerpiece Of Your Room

This cube lamp was assembled using common cardboard. Not only does it look interesting, but it’s basically free with every Ikea purchase since all you need is a source of cardboard, cutting implements, and glue.

[Lindarose92] fabricated the shade out of narrow strips of corrugated cardboard. This particular lamp also has a cardboard base but we’re sure you could use it for just about any light source with doesn’t generate enough heat to cause problems. The build starts out with the tedious process of cutting 5mm by 8cm strips, and you’re going to need a lot of them. Each strip is cut perpendicular to the corrugation, which allows the light to shine through the wave pattern. The strips are then glued into 8cm x 8cm squares, which are in turn glued together into the four by four panels that make up each side of the cube.

Boom, you’re done. And if you get tired of it, just toss the thing in your recycling bin.

[via Hacked Gadgets]

Coffee Pot Aquarium Keeps Fish Warm Without Cooking Them (hopefully)

coffee-pot-aquarium

Beta fish are one of the easiest pets to care for. So when [Derek] gave his girlfriend one for Valentine’s day he thought the job was done. Turns out these tropical pets want 75-80 F water and that’s not going to happen in a plain old bowl when you keep your home thermostat in the mid sixties during the winter. While looking for a simple heating solution he stumbled across the idea of using a cheap drip coffee maker as an aquarium.

The two main components are already in place: a clear glass vessel for the water and a way to heat it. The real trick is to use the heating element to gently warm the water to the appropriate temperature. Perhaps the key piece of the project is that the device already had a timer that shut off the heating element. This translates to easy control with his MSP430 microcontroller as it means there’s a relay present. He also patched into the two seven-segment displays to give him feedback on the temperature currently being read by the RL1003 thermistor which is submerged in the water. You’ll also note that he added a few LEDs to the lid to give the aquarium some inner glow.

Wireless Doorbell Battery Monitor

wireless-doorbell-battery-monitor

We know exactly what [Dan] is going through. We also bought a cheap wireless doorbell and are plagued by the batteries running down. When that happens, the only way you know is when people start pounding on the door because you’re not answering the bell. Well no more for [Dan]. He built a backup system which monitors the voltage of the batteries on the chime unit.

You can see the small bit of protoboard he used to house the microcontroller and the UI. It’s an ATtiny13 along with a green LED and a single push button. The idea is to use the chip’s ADC to monitor the voltage level of the pair of batteries which power the chime. When it drops below 3V the green LED will come on.

First off, we wish these things would come with better power supply circuits. For instance, we just replaced the CR2032 in an Apple TV remote and measured the voltage at 2.7V. That remote and the chime both run from a 3V source. Can’t they be made to work down to 1.8V? But we digress.

In addition to monitoring voltage [Dan’s] rig also counts the number of times the chime has rung. Every eight seconds it flashes the count in binary, unless he presses the red button to clear the count. This is shown in the video after the break. We guess he wants to know how many times this thing can be used before running the batteries down.

Seriously though, for a rarely used item like this how hard would it be to use ambient light harvesting to help save the batteries? Looking at some indoor solar harvesting numbers shows it might be impossible to only power this from PV, but what if there was a super-cap which would be topped off with a trickle from the panels but would still use the batteries when that runs down?

Continue reading “Wireless Doorbell Battery Monitor”

Scratch-built Bottle Cap Coffee Table Pulses To The Music

scratch-build-bottlecap-coffe-table

This isn’t a thrift-store coffee table modified as a craft project. [Dandujmich] built it from the ground-up using framing lumber, bottle caps, plastic resin, and some electronics for bling.

The first step was to see if he had enough caps on hand for the project. It’s hard to grasp how many were used just by looking at it, but the gallery description tells us there’s about 1700 which went into the design! From there he grabbed some 2x4s and began construction. The table legs started with two end assemblies built by doweling the legs to the end cross pieces. From there he cut a rabbit on the side rails and screwed them to the leg assemblies from the inside.

The tabletop includes a frame with a recessed area deep enough to keep the caps below the surface. After spending about ten hours super gluing all of the caps in place he mixed and poured two gallons of the resin to arrive at a glass-like finish. The final touch is some custom hardware which pulses two rows of embedded LEDs to music being played in the room. The video after the break isn’t fantastic, but it gives you some idea of how that light rig works.

Continue reading “Scratch-built Bottle Cap Coffee Table Pulses To The Music”

Viscerally Pleasing Electromechanical Doorbell

steam-punk-doorbell

Sure, we could just slap the steam-punk label on this doorbell hack, but we think that cheapens it. The rig uses a combination of mercury switch and creative mechanics to form a doorbell. And we think it goes beyond aesthetics to a statement of who you are starting with the front door of your house. No wonder [Nick Normal] has moved it along with him from home to home over the years.

The portion to the right is the ringer itself. Pulling on the lever moves the chain through an eyelet to affect the mercury switch mounted above. That switch completes the circuit which drives the motor on the “bell” unit. We use quotes because instead of ringing a bell it’s striking the large valve control wheel which looks like it came straight from the same industrial plant where The Joker took his unfortunate fall into a vat of acid.

This certainly gives you something to aspire to. And if you think you’ve already achieved a doorbell setup on similarly-geeky footing why haven’t you tipped us off about it?

Warming Seeds In An Outdoor Garden

resistor-string

Spring is almost here and with that the green thumbs out there are preparing for their summer gardens. It’s usually a good idea to get a jump on all your gardening activities by starting seeds indoors, but with this comes the problem of making sure juvenile plants get enough sunlight. Putting a few seeds on a window sill will keep seeds warm enough to start germinating, but that will drastically reduce the amount of sunlight available for any given day. The best solution is to make sure the seeds are kept warm outside, but for wont of a properly placed clothes dryer vent [Tim] decided to make a solar soil heater using junk he had lying around.

[Tim] constructed a simple heater cartridge using a few 5 and 10 Ω resistors. These were sealed inside a piece of copper pipe with heat shrink tubing and silicone. The solution to powering this heater cartridge, though, is an impressive display of thinking outside the box.

The cartridge is powered by a solar lantern – the same kind you’d find illuminating a garden path at night and recharging during the day. After inserting the cartridge in a hill of seeds, the heater provides a little bit of warmth to get the seeds through the night. During the day, the battery in the solar lantern recharges, providing just enough power to cycle through another night.

It works for [Tim] in his native New England, so we’re betting it’s good enough for just about any growing region.

A Respectable Electronics Bench That’s Not A Pain To Move

electronics-workstation-that-moves

Apartment dwellers who are living the nomadic lifestyle take note. You don’t need to live your tinkering lifestyle out of a toolbox. Here is a great example of a respectable electronics bench which breaks down when it’s time to move (translated). We’re sure you already belong to your local hackerspace for the big projects, but this corner office will let you take some of your creations home for continued tweaking.

The bench uses slotted aluminum rails as the support structure. The slots accept small nuts, which have a spring-loaded ball bearing to keep them from sliding freely ([Nerick] mentions this is especially nice for working with the vertical runs). These fasteners ended up being the most costly component.  The desktop itself is the largest solid piece. It was machined using a CNC mill (we already mentioned having a hackerspace membership) so that the mounting screws are countersunk to leave a perfectly flat surface. It’s clean, has a small footprint, and gives you a place to dump all of your gear. What else could you ask for?