Adding An LCD Screen Terminal For TP-Link Routers

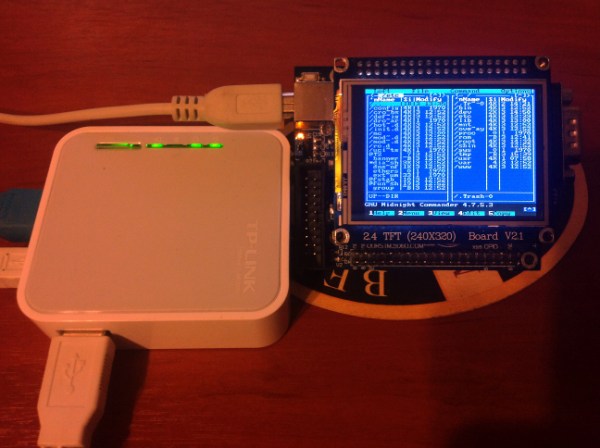
Routers running embedded Linux offer quite a bit of power depending on what you need to do. To extend the usefulness of his TP-Link router [Roman] built a rig that adds an LCD screen to display the terminal. But it ended up being quite a bit more powerful than that.

The first portion of the project was to build a USB video card for the display. [Roman] went with an STM32 development board which resolves the USB device end with the QVGA screen driver (translated). This seems like it would be the lion’s share of the project, but he still needed a driver on the router to interface with the device. This thrust him into the world of USB-class drivers (translated). It even included building graphics support into the kernel of OpenWRT. The final piece of the puzzle was to write a frame buffer (translated) that would help regulate the output to the screen. The result works so well he is even able to play games using ScummVM. See for yourself in the clip after the break.

Continue reading “Adding An LCD Screen Terminal For TP-Link Routers”

Home Built Stun Baton Turns You Into A Cop From Demolition Man

It seems much like a cattle prod, but [Pode Coet] definitely had people in mind when he built this stun baton. It’s not for the faint of heart — especially since a wrong move could stop your ticker cold. But the design and fabrication are top-notch, and he didn’t hold back when it comes to build images and details.

The enclosure is a hunk of PCV pipe with a cap on each end. The business end includes two electrodes separated by a 10mm air gap. The spark has no trouble jumping across that gap, and if you get it close enough to the victim it’ll use their body as a path of least resistance. The butt end of the baton features the charging port which takes 5VDC power and a pair of LEDs for feedback. This power port feeds a charger stored within to top off the Lithium cell which itself only puts out about 3.8V. This potential is fed into a boost circuit to ramp up to 16V before feeding a Royer circuit which jumps it up to 900V. That is connected to the final stage which gets it to the target of 10kV!

You can see and hear a demonstration of the baton in the clip after the break. To bad [Caleb] wasn’t around to take the thing for a proper test drive.

Continue reading “Home Built Stun Baton Turns You Into A Cop From Demolition Man”

Reverse Engineering ST-Link/V2 Firmware

reverse-engineering-stlink-v2

The chip seen just above the center of this image is an ARM Cortex-M3. It provides the ability to interface and program the main chip on the STM32F3 Discovery board. The protocol used is the ST-Link/V2 which has become the standard for ST Microelectronics development boards. The thing is, that big ARM chip near the bottom of the image has multiple UARTs and bridging a couple of solder points will connect it to the ST-Link hardware. [Taylor Killian] wanted to figure out if there is built-in firmware support to make this a USB-to-serial converter and his path to the solution involved reverse engineering the ST-Link/V2 firmware.

The first part of the challenge was to get his hands on a firmware image. When you download the firmware update package the image is not included as a discrete file. Instead he had to sniff the USB traffic during a firmware update. He managed to isolate the file and chase down the encryption technique which is being used. It’s a fun read to see how he did this, and we’re looking forward to learning what he can accomplish now that’s got the goods he was after.

Google Talk Used For Home Automation Communications Via Android

home-automation-using-instant-messaging

To call [Carnivore’s] home automation project impressive would be an understatement. He’s pulled together a system that is fast, well presented, and easy to use. To interface with items in his home he’s using X10 modules, and this example simply switches some table lamps. But the underlying setup seems incredibly polished and should be a snap to extend for just about any purpose.

The guide linked above has all the gritty details, but the best overview is provided in the video after the break. [Carnivore] shows off the Windows 8 machine that acts as the server. It has am X10 transceiver connected to communicate with the appliances. He can control the system from the screen seen above, but everything can also be accessed from his Android phone. Communication between the two is handled by Google Talk, an instant messaging application — but the commands are home screen shortcuts and don’t need to be typed into the Google Talk app. He modified the source code of a program called TweetMyPC to use the Google Talk API which looks for keywords in received messages. The lag on an instant message is far lower compared to SMS or Email so commands are received very close to real-time. Feedback is sent from the server to the phone using a text message.

Continue reading “Google Talk Used For Home Automation Communications Via Android”

Versatile Motion Dolly For Time Lapse Photography

time-lapse-motion-system

This beautiful build is a motion dolly for making time-lapse videos. It is at a point where you could consider it complete. After all, the segments featured in the video after the break look marvelous. But [Scottpotamas] has a few additions planned and it sounds like it won’t belong before he accomplishes his goals.

The build is a linear rail on which the camera rides. In the image above you can see the stepper motor which moves the camera mounted at the far end of the rig. This is controlled by an Arduino. Currently the camera is responsible for timing the capture of the images, but [Scottpotamas] says the firmware is nearly ready to hand this responsiblity over to the Arduino. The system is modular, with a simple setting for the length of the track. This way he can swap out for a longer or shorter rail which only takes about five minutes. He also included support for a panning mount for the camera. It allows the control box can be programmed to keep the subject centered in the frame as the camera slides along the track.

Continue reading “Versatile Motion Dolly For Time Lapse Photography”

Bubble Wrap Cure For Nexus 7 Speaker Distortion

nexus-7-bubble-wrap-fix

[Home Brand Cola] is quite happy with his Nexus 7 with the exception of the built-in speaker. It produces fairly good audio quality until he reaches about 50% volume level. Anything above that produces distortion. He figured out how to fix it using a small piece of bubble wrap.

The eureka moment came when he was using his Nexus 7 and discovered he could fix the distortion by gripping the top and bottom parts of the case strongly between his finger and thumb. This led him to realize that the speaker unit is a bit loose and the unwanted noise is produced when it vibrates against the case. The video after the break shows the fix, which places a strip of bubble wrap (looks to be about 1″ by 3″) on top of that speaker unit. When the case is snapped back together the packing material helps hold everything in place and now he can use his tablet at full volume without any problems. One of the comments on the Reddit thread asks about heat problems with the addition of this plastic. He’s been using it for a few weeks and so far no issues there.

Continue reading “Bubble Wrap Cure For Nexus 7 Speaker Distortion”

Signing Your 3D Prints

print

For all the 3D models out on the Internet, including the STL files on Thingiverse that are copied by other makers every day, there hasn’t been a good way to put your John Hancock on a three-dimensional piece of plastic you’ve designed. [Chris] has been thinking about the fact that an STL file released on the Internet is completely out of the creator’s hands for a while now, and he finally came up with a good solution to signing 3D prints.

[Chris] had been looking into ‘stamping’ a maker’s mark on the first few layers of a print, but this wasn’t always practical. Sometimes the bottom of a print needs to be a smooth surface, so [Chris] moved his initials up a few layers into the main body of the print.

By subtracting a 1.0 mm-thick version of his initials from the interior of a print, [Chris] is able to put his maker’s mark on the inside of a 3D object, visible only for a short time during the production process.

The signature isn’t impossible to remove, but it does give a little bit of credit to the original designer, all without some strange DRM scheme or metadata attached to an STL file.

You can check out [Chris]’ printer laying down a few layers of his logo after the break.

Continue reading “Signing Your 3D Prints”