7-Foot DIY Wind Turbine Proves Size Matters

7ft-wind-turbine

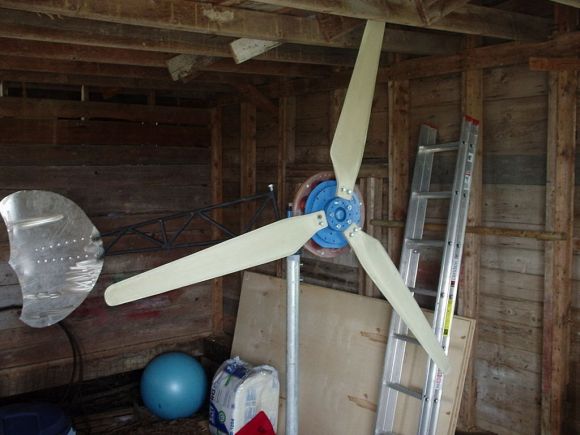
When [brokengun] decided to build a 7 ft diameter wind turbine, he had no idea how to even start, so he did as most of us would do and read some books on the topic. His design criteria was that it would be simple to construct and use as many recycled parts as possible. This wind turbine charges a 12 volt battery which can then be used to power a variety of gadgets.

Although made from recycled components, this isn’t a thrown together wind turbine. A lot of thought went into the design and build. [brokengun] discusses matching the blade size to that of the generator in order to maximize power and efficiency.  The design also incorporates a feature that will turn the turbine perpendicular to the wind if the wind-speed gets to high. Doing this prevents the turbine from being damaged by strong gusts.

For the main support/hub assembly, a Volvo 340 strut was used because they are widely available, cheap and known for being long-lasting. The tail boom is made from electrical conduit and it’s length is determined by the size of the main fan rotor. The tail vane is made from steel sheet metal and its surface area is also dependent on the fan rotor size to ensure that the turbine functions properly. The blades are made from wood but instead of making them himself, [brokengun] felt these were worth ponying up some cash. [brokengun] also scored a 30 ft high lattice tower an airport was getting rid of. This worked out great as it’s just the right height for a turbine of this size.

Continue reading “7-Foot DIY Wind Turbine Proves Size Matters”

Robot Dominates Air Hockey, Frightens John Connor, Wayne Gretzky

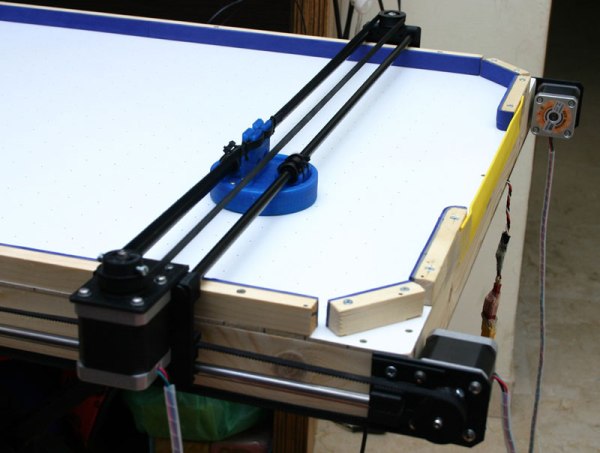
We’ve all been disappointed at some point in our lives after yearning to play air hockey and not finding anyone to play against. This is no longer a problem at [Jose]’s house. He has built a very amazing Air Hockey Playing Robot. This robot moves in 2 directions, can predict the movements of the puck and also decide to block, shoot or a do a combination of both.

Surprisingly, most of the ‘robotics’ parts are 3D printer left overs, which includes: NEMA17 stepper motors, an Arduino Mega, a RAMPS board, motor drivers, belts, bearings and rods. The bracketry, puck and paddle are all 3D printed. The air hockey table itself was built from scratch using off-the-shelf wood. Two standard 90mm PC fans are all that are responsible for creating the air pressure used to lift the puck. A PS3 camera monitors the action and is literally this robot’s eye in the sky.

Check out the video and learn more about this project after the break.

Continue reading “Robot Dominates Air Hockey, Frightens John Connor, Wayne Gretzky”

Laser-Based PCB Printer

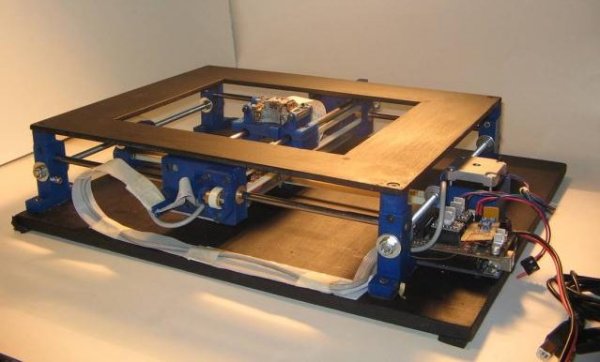
Being able to create PCB’s at home is a milestone in the DIYer’s arsenal. Whether you physically mill or chemically etch boards, it’s a tricky task to perfect. [Charlie & Victor] are working towards a solution to this complicated chore. They call their machine the DiyouPCB. DiyouPCB is an open source PCB etching project consisting of both hardware and software components.

The project is based on using a Blue Ray optical pickup. The pickup was used in its entirety, without any modification, to simplify the build process. In order to use the stock pickup, [Charlie & Victor] had to reverse engineer the communication protocol which also allowed them to take advantage of the auto-focus feature used while reading Blue Ray discs. The frame of the machine is reminiscent of a RepRap, which they used to do preliminary testing and laser tuning. The X and Y axes run on brass bushings and are belt driven by stepper motors which are controlled by an Arduino through a specially designed DiyouPCB Controller Shield.

Continue reading “Laser-Based PCB Printer”

Collin’s Lab Is Coming Back

Collin

We would like to share a bit of good news; Collin’s Lab is back on the airwaves of the Internet. If you didn’t know, [Collin Cunningham] previously created excellent short videos, sometimes entertainingly tongue-in-cheek, for Make Magazines on the subjects of electronic components and fundamental electronics. In 2012 he was hired at Adafruit as a Creative Engineer to help with software development and video production.

Going forward Collin’s Lab videos will be a regular feature on Adafruit’s Blog and their YouTube channel. We’re sure there is going to be tons of entertaining learning from Collin with his unique video production skills and presentation delivery.

This first release of Collin’s Lab on Adafruit is a primer review covering fundamental multimeter functionality and measurements. Not much here for the medium to advanced electronics hacker but for the beginner this is an excellent and quick way to learn the basics on using your multimeter.

If you want to checkout Collin’s older video productions you can find them on his Narbotic Instruments site under – “Make Presents” and “Collin’s Lab” or watch them all with this convenient playlist. Just after the break you can also watch his latest edition of Collin’s Lab.

Continue reading “Collin’s Lab Is Coming Back”

This Space Saver Puts The Squeeze On Your Keys

MultiKey

Keys? Who needs them? Well, pretty much everyone. You can’t deny that there are some ridiculously crowded key chains out there. It’s clear that [Robb] wanted to hit the other side of that spectrum when he started working on his latest multi-key project.

The term “multi-key” may be a little misleading as there are more than just keys on this tool. In addition to the bike lock, locker, work and house keys, there is a USB drive, bottle opener, screw driver and a couple of Allen wrenches. The side frames started out as part of an Allen key combo set; one not of the highest quality.  The Allen keys started snapping off during use which left [Robb] with a set of otherwise useless side frames. These became the platform of which [Robb’s] project is based. Adding a couple new bolts, nuts and a few modified keys got him the rest of the way there. A lot of thought went into which items to put into this tool and [Robb] explains his thought process in his step-by-step instructions.

The simple nature and potential for customizing makes this a great utilitarian DIY project. Although this may not be Janitor worthy, it will certainly consolidate some of the bulk in our pockets.

PVC Cryptex Keeps Your Stuff Safe

Apparently we’ve never shared a Cryptex before! Made popular (and coined) by the Da Vinci Code, a Cryptex is a combination style lock originally used to store secret messages. You can make your very own using a few pieces of PVC pipe, some epoxy, and nuts and bolts!

Cryptexes have a clever design that cannot really be lock picked, without simply breaking it. In [Dan Brown’s] novel, it was said that some Cryptexes stored a fragile vial of vinegar with the message written on papyrus — that way, if it was forcibly opened the vile would break, dissolving the thin papyrus note.

They work similar to a bicycle’s combination lock, where if the correct password is guessed, the tumblers inside align, allowing the two halves of the cylinder to come apart. It’s actually a very simple design on the inside, and the whole mechanism can easily be made by yourself with minimal tools.

Continue reading “PVC Cryptex Keeps Your Stuff Safe”

This SMD Reflow Hot Air Gun Hangs Around Your Workbench

smd_reflow_hot_air_gun_nc_80

Has reflowing surface mount components got you down? [Giorgos] is currently working on a project that will lift your spirits…. well at least your hot air gun. Tired of manually holding his heat gun in one hand and IR thermometer in the other, [Giorgos] set out to create a device to alleviate just that. Although not completed yet, it appears the machine’s intent is to hold the heat gun at an appropriate height above the work piece in order to achieve the correct reflow temperature. He doesn’t say how the height of the hot air gun will be controlled. We’d like to see a microcontroller adjust the height of the hot air gun depending on the temperature of the component to be reflowed. [Giorgos] gives an extremely detailed account of his build process. Make sure to check out all four pages of the project post!

We’ve seen a lot of interesting work from [Giorgos] over the years like this capacitive touch-pad entry system.

[via Dangerous Prototypes]