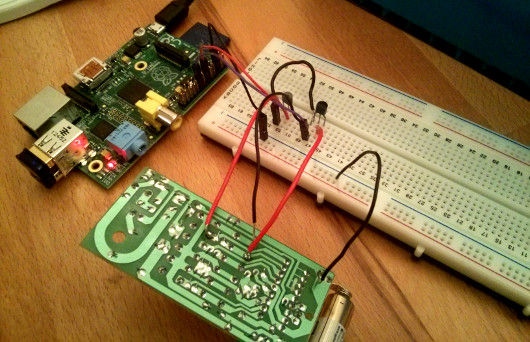
Build A Sensorless Brushless DC Motor Controller

[Davide Gironi] shows us how to implement a sensorless brushless DC motor controller (sensorless BLDC) using an ATmega8 microcontroller. In order to control a BLDC motor you need to know its rotational sequence position and speed so you can calculate and apply the correct current phase sequence to the motor windings at just the right time.

Simply said, sensorless BLDC means you’re not using a purpose built sensor to determine the motor’s position and speed, however, you are sensing the motor’s sequence position using the back EMF signal coming from one of motor’s coils that is not currently receiving power. When this back EMF signal crosses zero voltage a microcontroller can calculate the rotational speed and when to switch to the next power sequence. This technique is not good for position control motors but is great for continuous motors like computer fans and drives were the slightly reduced wiring costs make this type of BLDC control favored.

If you want to build a BLDC controller we recommend starting with [Davide’s] last project on sensor controlled BLDC motors. You can also checkout these interactive demonstrations for more understanding on the different BLDC configurations.

Follow along after the break to watch the video demonstration of [Davide’s] sensorless BLDC controller controlling a motor from CD-ROM drive.

Continue reading “Build A Sensorless Brushless DC Motor Controller”

DIY HHO Mini Torch

Fascinated by hydrolysis apparatuses? Me too. Here’s a cool how-to that might convince you to make one! It’s a very simple and easy to build HHO torch using plumbing parts from the hardware store.

The entire build uses almost all standard readily available parts — except for the nozzle assembly. It’s an easy modification though, under the copper pipe endcap is a brass M6 nut that has been soldered in place – this allows you to switch out the MIG welding tips at any time.

[Peter] also shows off another useful tip that allows you to reduce the orifice size of the MIG welding tip – simply hammer a ball bearing into it. Seriously, check out the Instructable and see for yourself! This allows him to reduce the orifice size down to non-standard sizes which in turn allows him to increase the intensity of his HHO flame.

Now all you need is a source of HHO — but don’t worry, we’ve covered that before too!

[via Reddit]

GuruBrew’s 15 Minute Windows 8 Survival Guide

GuruBrew Windows 8 Survival Guide

One thing very common to all of us is our reliance on operating systems in our hobby life. If that OS is Windows then you could be in for quite a shakeup with Windows 8. Many readers are Linux or Apple users and couldn’t care less if Microsoft is releasing an entire paradigm shift in desktop navigation. However, you just might find yourself facing this new OS and you’ll look like you’re on training wheels if you don’t get acquainted now, and considering the number of computers being released with Windows 8 its inevitable that day will come soon.

So if you haven’t been behind the wheel of Windows 8 then checkout [Steve’s] Windows 8 Survival Guide from the Guru Brew Tech Show. This is an excellent overview of the new touch screen navigation methods you’ll find in the Windows 8 desktop including hotspots, charms and tiles to name just a few. You’ll also learn tips to get around with a mouse and keyboard. It’s not a complete tutorial on using Windows 8 but you’ll at least know how to navigate, search for apps, work with multiple apps and find tools like task manager, control panel, file explorer as well as your familiar desktop.

Follow the break to watch the short survival guide video.

Continue reading “GuruBrew’s 15 Minute Windows 8 Survival Guide”

Talkbot: An Arduino-driven Robot For Beginners

talkbotguts

It isn’t exactly WALL-E, but [Bithead’s] affordable introduction to robots — Talkbot — is made out of a trash can. This little guy runs off an Arduino and comes packed with features, including a voice chip, a motor shield, and a pair of bump sensors. Talkbot will cruise around until a bump sensor slams into an obstacle. One of his prerecorded messages will then play through the speaker while he backs up, turns, and tries to find a clearer path.

According to [Bithead’s] build log, tracking down the right bargain voice chip was a bit of a hassle; he skipped over the text-to-speech options only to be stalled by vendor issues. He finally settled on a clone of Sparkfun’s WTV020SD chip sourced from eBay, which allows you to access pre-recorded WAV files stored on a Micro-SD card. The robot’s body comes straight off the hardware store shelf, with PVC pipe for arms and a polystyrene base to hold all the parts.  At the bargain price of $110, [Bithead’s] students will have a true hacker experience cobbling the Talkbot together rather than using a prefab kit.

Be sure to see Talkbot  in a video below, performing either his green-eyed “friendly mode” or red-eyed “grumpy mode,” which dictates how pleasantly he responds to obstacles. Need something more advanced? Check out the tentacle robot, just in time for Halloween.

Continue reading “Talkbot: An Arduino-driven Robot For Beginners”

High Pressure Air Compressor Using A Pair Of Refrigeration Compressors

[Ed] from Ed’s Systems, aka [Aussie50] took some time to demo his high pressure Frankenstein air compressor he stitched together from two refrigeration compressors. The two Danfoss SC15 compressors can produce upwards of 400psi and can run all day at the 300 psi range without overheating. The dual units may get up to pressure quickly considering the small accumulator “tank”, but high CFM isn’t the goal with this build. [Ed] uses the system to massacre some LCD panels with lead, ball bearings, and other high speed projectiles shot from a modified sandblasting gun. Just a bit of air at 400 psi is all you need for this terminator toy.

Don’t think the destruction is wasteful either; [Ed] strives to repair, rebuild, reuse, repurpose and a few other R’s before carefully separating and sorting all the bits for recycling. This modification included lots of salvaged hardware from older teardowns such as high pressure hoses, connectors, accumulator and pressure cutoff switches.

At first it seems strange to see something engineered for R22 refrigerant working so well compressing air. Morphing refrigeration systems into air compressor service is something [Ed] has been doing for a long time. In older videos, “fail and succeed”,  [Ed] shows the ins and outs of building silent air compressors using higher capacity storage tanks. Being no stranger to all variations of domestic and commercial refrigeration systems, [Ed] keeps home built air compressors running safe and problem free for years.

Don’t think this is the only afterlife for old refrigeration compressors, we’ve seen them suck too. You’ll get a few more tidbits, and can watch [Ed’s] video overview of his home built compressor after the break.

Continue reading “High Pressure Air Compressor Using A Pair Of Refrigeration Compressors”

Repurposing A Ceiling Fan Into A Pottery Wheel

The wheel goes round and round as does [Lou Wozniak]. He’s come back to us, this time hacking together a pottery wheel from a cheap ceiling fan. This is a great use for a discarded or inexpensive fan and the build should cost less than $50. As you watch the video you learn that repurposing the ceiling fan was no simple feat. Lucky for us [Lou] spins through detailed construction procedures and doesn’t fail to cover every tip and trick. He really does think outside the box or should we say inside the bucket and peanut butter jar. The fan gets dismantled as well as rewired inside a 5 gallon bucket which is used as the pottery wheel housing and stand. A plastic peanut butter jar was used as a makeshift electrical junction box inside the bucket. He remounted the motor’s string operated speed switch on the side of the jar and routed the pull string out the side of the bucket. The fan motor should have three or four switch speed settings which might be enough control. If continuous variable speed control is desired he could add in a controller similar to [Ben Krasnow’s] AC controller using one pin on a microcontrollerUPDATE: [AKA the A] tells us in a comment below that this controller won’t work with a ceiling fan, but we still really like [Ben’s] project so we’re leaving this link here.

Most potters use significant amounts of water to wet the clay while they throw, so we have reservations about having the high voltages and open motor design directly under the wheel with no shielding. We know [Lou] could easily hack in a splash pan and of course always plug into a ground fault protected receptacle when using electrical appliances around water.

We do get to see the wheel in operation at the end of the video, which you can watch after the break. However, [Lou] makes no claims at being a pottery artisan.

Continue reading “Repurposing A Ceiling Fan Into A Pottery Wheel”

DIY Heatsinking PCBs

pcb heatsink

We have covered many do it yourself PCBs before, but this video guide adds an easy way to sink heat from high power devices, which we think you might find handy.

It is a very simple process that [CNLohr] uses to keep his small RGB LED projects from overheating. It starts by using a readily available silicone thermal sheet as the substrate by applying it to copper foil. He then applies a toner-transfer circuit pattern to the copper by running the pair through a modified laminator a few times. He makes note that you have to apply the plastic backing side of the silicone sheet to the copper foil to prevent the laminator from chewing it up.

After the typical ferric chloride etching process is complete, he then uses 220 grit sandpaper to remove the toner pattern. Often steel wool is used, but because of the sensitive nature of the silicone, sandpaper works better to avoid peeling up traces.

We have featured [CNLohr] before, as he does some top-notch tutorials in his workshop — which makes for both a fascinating and distracting backdrop for the videos. This one is a bit long (~20 minutes), but is very thorough and goes through the entire process from start to finish. Check it out after the break.

Continue reading “DIY Heatsinking PCBs”