Slow Motion Frame Will Be The New Magic Mirror

[Paul] created a frame that uses an Arduino and LEDs to create a slow motion illusion of a delicate item (like a flower or a feather). The effect is striking as you can see in the video below.

[Paul] had seen similar projects (both one-offs and sold as a product), but wanted to do his own take on it. The principle is simple: The device vibrates the objects at one frequency and strobes LEDs at a slightly different frequency (80 and 79.5 Hz, in this case). The difference between the frequencies (the beat frequency) is what your eye perceives as a very slow (0.5 Hz, here) motion.

Continue reading “Slow Motion Frame Will Be The New Magic Mirror”

Schematic of Diode Level Shifter for WS2812

Cheating At 5V WS2812 Control To Use 3.3V Data

If you’re looking to control WS2812 (or Neopixel) LEDs using a microcontroller running at 3.3 volts, you might run into some issues. The datasheet tells us that a logic high input will be detected at a minimum voltage of 0.7 * Vcc. If you’re running the LED at 5V, this means 5 V * 0.7 = 3.5 V will be needed for the WS2812 to detect a ‘1’ on the data line. While you might get away with using 3.3 V, after all the specification in the data sheet is meant to be a worst case, it’s possible that you’ll run into reliability issues.

So usually we’d say “add a level shifter to convert 3.3V to 5V” and this post would be over. We even have a whole post on building level shifters which would work fine for this application. However [todbot] at CrashSpace came up with a nifty hack that requires fewer components yet ensures reliability.

bigbutton-front-backFor the Big Button project at CrashSpace, [todbot] used an ESP8266 running at 3.3 volts and WS2812 LEDs running at 5 V. To perform the level shift, a signal diode is placed in series with the power supply of the first LED. This drops the first LED to 4.3 V, which means a 4.3 V * 0.7 = 3.01 V signal can be used to control it. The logic out of this LED will be at 4.3 V, which is enough to power the rest of the LEDs running at 5 V.

This little hack means a single diode is all that’s needed to control 5 V LEDs with a 3.3 V microcontroller. The first LED might be a little less bright, since it’s operating at a lower voltage, but that’s a trade off [todbot] made to simplify this design. It’s a small part of a well-executed project so be sure to click-through and enjoy all the thought [todbot] put into a great build.

LED Strip Display Gives You Two Ways To See The Music

What to call this LED strip music visualizer is a puzzler. It lights up and pulsates in time with music similar to the light organs of 1970s psychedelia fame, but it’s more than that. Is it more like the Larson Scanner that graced the front of [David Hasselhoff]’s ride on Knight Rider? A little, but not quite.

description-croppedWhatever you decide to call this thing, it looks pretty cool, and [Scott Lawson] provides not one but two ways to build it. The business end is a simple strip of WS2812b addressable LEDs. It looks like the first incarnation of the project had an ESP8266 driving the LEDs in response to commands sent to it from a PC running the visualization code, written in Python. That setup keeps the computationally intensive visualization code separate from the display, but limits the display to 256 pixels and probably has to deal with network latency. The Raspberry Pi version both crunches the numbers and drives the display, but the Pi doesn’t have the oomph to run both the LEDs and the GUI, which is pretty interesting to look at by itself. The video below shows the different visualization modes available — we’re partial to the “energy effect” at the end.

Take your pick of hardware and throw a couple of these things together for your next rave. And if you need a little more background on the aforementioned Larson Scanner, we’ve got you covered.

Continue reading “LED Strip Display Gives You Two Ways To See The Music”

Smoothly Modernized Nixie Display

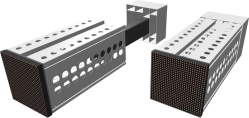
The renaissance of Nixie tube popularity amid the nostalgia surrounding older tech has made them almost prohibitively expensive for individual projects. Seeing an opportunity to modernize the beloved devices, [Connor Nishijima] has unleashed this new, LED edge-lit display that he has dubbed Lixie.

We featured his prototype a few years ago. That design used dots to make up each character but this upgrade smooths that out with sleek lines and a look one would almost expect from a professional device — or at the very least something you’d see in a cyberpunk near-future. The color-changing Neopixel LEDs — moderated by a cleverly designed filter — allow for customization to your heart’s content, and the laser-cut acrylic panes allow for larger displays to be produced with relative ease.

The image above (and the video below) show two revisions of the most recent Lixie prototypes. There is a huge improvement on the right, as the digits are now outlines instead of single strokes and engraved instead of cut completely through the acrylic. The difference if phenomenal, and in our opinion move the “back to the drawing board” effect to “ready for primetime”. [Connor] and his team are working on just that, with a Tindie preorder in place for the first production-ready digits to roll off their line.

Continue reading “Smoothly Modernized Nixie Display”

High-Power LED + 3D Printer = Mega Flashlight

If you remember old computer magazines (or browse them today), you’ll see that back in the late 1970s and early 1980s, you weren’t always sure what you were going to do with a computer. Games were a staple, but they weren’t very exciting. Visionaries talked about storing recipes, writing Christmas letters (to send via snail mail), and keeping home inventories. You probably don’t do any of those things with your computer today, unless you count e-mailing instead of sending Christmas cards. We think sometimes 3D printers fall into that category today. Sure, you want one. But what are you really going to do with it? Print keychains?

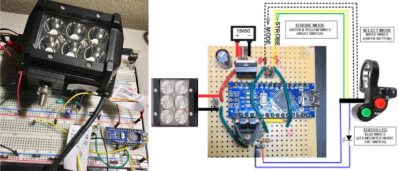
That’s why we always like seeing practical designs for 3D printed items. Like this 100W flashlight. The electronics part of the build is simple enough: a 100W LED module, an off-the-shelf driver board, plus an old PC cooler and some batteries. But the 3D printed parts makes it all come together and it looks great!

Continue reading “High-Power LED + 3D Printer = Mega Flashlight”

Engineer’s Primer On DIY Christmas Light Shows

Each year brings new Christmas light shows, with synchronised music and wild blinking decorations to light your eyeballs ablaze. Now, many of us have dabbled in the dark arts of blinken, tinkering with LEDs or flashing a neon bulb or two. There’s plenty of tutorials on how to control all manner of lights, but they’re often written for novices. Learning the basics of electronics for the nth time when you just need to know the specifics of a protocol or what IC you need can be a total drag. That’s why [Bill Porter] has written the Engineer’s Guide to DIY Computer Controlled Holiday Lights.

[Bill] covers the topic from start to finish – not just the technical side of things, but practical considerations about where to source components, and timescales for keeping your project on track. It’s no coincidence this is coming out in January – if you want to get something big up and running for Christmas, it’s time to start now! The guide gives links to forum communities that put in large group orders for parts early, and ship them slow to save money.

Other areas covered include software for creating advanced sequences for your lighting setup, which allow you to map animations over your entire layout. There’s also tips on which controller hardware to use for incandescent lights and the now-ubiquitous WS2811 strings. Even better, [Bill] shares specific tips on how to avoid common problems like voltage drop over long pixel runs and communication issues.

It’s a testament to [Bill] and his experience – the guide is an excellent way to get right up to speed with the state of the art in DIY Christmas light shows, and will save you from all manner of pitfalls. If you need to build something big this year and don’t want to reinvent the wheel, this is for you.

It’s not the first time we’ve heard from [Bill] either – check out his stunning wedding invitations or his repair of a science museum exhibit.

Candle with flicker led that you blow out

Blowing Out A Candle Flicker LED: The Death Of Flame

One day there will be no more need for flames. [slider2732] has put yet another nail in the coffin of this most ancient of all technology by making a candle that uses a flicker LED that you blow out. A little more miniaturization and we’ll have them fully integrated into the size of birthday cake candles (Hint hint, hackers!).

You may have seen these candle flicker LEDs.  They have a small chip inside them that modulates the LED’s light to flicker like a candle. We’ve even reported on what [Cpldcpu] found when he reverse engineered them first here and then here.

What [slider2732] did was to buy an electronic candle that used one of the LEDs actually shaped like a flame, and to drill a hole near the ‘flame’. He them embedded a microphone behind the hole. That goes to an LM386 amplifier circuit and from there to an Arduino Pro Mini all powered by a LiPo. As you’d expect, the Arduino code is very simple, just watch the pin from the amplifier and based on an internal variable, turn the LED on or off. We really like how none of the electronics is visible and how you actually have to lean over and blow into the top of the candle to blow it out. You can see this demonstrated in the video below.

Continue reading “Blowing Out A Candle Flicker LED: The Death Of Flame”