Building The OhSillyScope

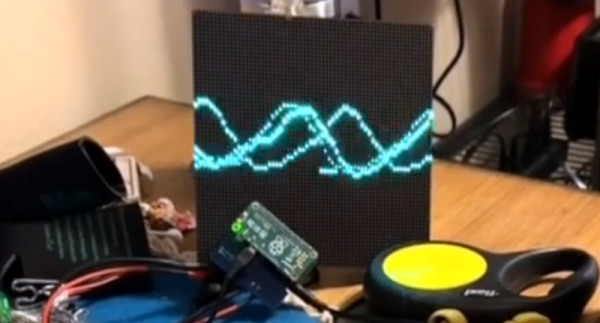
If you have a Raspberry Pi connected to an LED matrix, you might think about creating a simple oscilloscope. Of course, the Pi isn’t really well-suited for that and neither is an LED matrix, so [Thomas McDonald] decided to create the OhSillyScope, instead.

The device isn’t very practical, but it does add some flash to live music performances or it makes a cool music visualizer. The matrix is only 64×64 so you can’t really expect it to match a proper scope. Besides that, it pulls its data from the Pi’s ALSA sound system.

You can find a video of the device on [Thomas’] Reddit post and a few additional videos on his Instagram account. Looks like a fun project and it also serves as a nice example if you need to read data from the sound card or drive that particular LED matrix.

We might have opted for PortAudio if we had written the same code, but only because it is more portable, which probably doesn’t matter here. Of course, you could also use GNURadio and some Python to drive the display. As usual, plenty of ways to solve any given problem.

An Easy Music Visualizer With The Arduino Nano

Flashing LEDs are all well and good, but they’re even better if they can sync up with ambient sounds or music. [mircemk] has built the LUMAZOID visualizer to do just that, relying on some staple maker components to do so.

The build is open-source, and designed to work with strings of 60, 120, or 180 WS2812B LEDs. An Arduino Nano is charged with running the show, capturing audio via its analog-to-digital converter. A sensitivity pot enables the input level to be set appropriately.

From there, a Fast Fourier Transform is taken, providing data on the intensity of the audio in various frequency bins. The LUMAZOID can be set up to respond to just bass or to all frequencies as a whole. This data is then used to pulse the LEDs in time with the beat.

It’s a fun project that demonstrates the basic techniques required to build an audio-reactive visualizer. We’ve seen some other great builds in this space before, too. Video after the break.

Continue reading “An Easy Music Visualizer With The Arduino Nano”

Kinect Music Visualizer Program Demo

Kinect Visualizer Demo Gives Winamp A Run For Its Money

Winamp eat your heart out, because thanks to the Microsoft Kinect in the hands of [Samarth] there’s a new way to make your screen dance along with you. He created a music visualizer demo that takes advantage of the 3D depth camera on Kinect by outputting a fun pixelated silhouette and color changing strobe. When there are big high-hat hits or bass thumps the camera feed reacts accordingly (as any good visualizer would). He even uploaded his code for the project just in case anyone would like to take a look at it.

The visualizer utilizes the OpenKinect-Processing library which has provided the backbone to many other similar Kinect art projects. It was specifically created to provide a quicker way for coders to access the raw color and depth data output by Kinect. It’s creator, Daniel Shiffman, has posted a number of tutorials to aid anyone looking to create their own real-time animations as well.

The visualizer demo (see video below) was created as part of Maker Faire Hyderabad which is happening over the weekend. The expo is the city’s first Maker Faire and is set to feature over 200 maker exhibits across multiple disciplines. It’s always great to see maker communities outside of the ones that are closest to you geographically speaking, so hopefully we’ll see many more like [Samarth] taking part in more maker events in the future.

Continue reading “Kinect Visualizer Demo Gives Winamp A Run For Its Money”

Musical string shooter

Musical String Shooter Makes Sound Visible

One reason we really like [Rulof]’s hacks is that he combines the most unlikely things to create something unexpected. This time he makes a fast-moving loop of cotton string undulate in time to music.

To do this he uses cotton string, hard drive parts, two wheels from a toy Ferrari, two DC motors, a plastic straw,  a speaker, and an amplifier.  The loop of string sits in the air by being rapidly rotated in between the two wheels. The hard drive parts, driven by the amplifier, give the string a tap with an amplitude, and at a time determined by the music. The result is music made visible in the air in front of you, or in his living room in this case. Check out how he made it, and see it in action in the video below the break.

Continue reading “Musical String Shooter Makes Sound Visible”

LED Strip Display Gives You Two Ways To See The Music

What to call this LED strip music visualizer is a puzzler. It lights up and pulsates in time with music similar to the light organs of 1970s psychedelia fame, but it’s more than that. Is it more like the Larson Scanner that graced the front of [David Hasselhoff]’s ride on Knight Rider? A little, but not quite.

description-croppedWhatever you decide to call this thing, it looks pretty cool, and [Scott Lawson] provides not one but two ways to build it. The business end is a simple strip of WS2812b addressable LEDs. It looks like the first incarnation of the project had an ESP8266 driving the LEDs in response to commands sent to it from a PC running the visualization code, written in Python. That setup keeps the computationally intensive visualization code separate from the display, but limits the display to 256 pixels and probably has to deal with network latency. The Raspberry Pi version both crunches the numbers and drives the display, but the Pi doesn’t have the oomph to run both the LEDs and the GUI, which is pretty interesting to look at by itself. The video below shows the different visualization modes available — we’re partial to the “energy effect” at the end.

Take your pick of hardware and throw a couple of these things together for your next rave. And if you need a little more background on the aforementioned Larson Scanner, we’ve got you covered.

Continue reading “LED Strip Display Gives You Two Ways To See The Music”

No Frame Buffer For FPGA VGA Graphics

Usually, when you think of driving a VGA–in software or hardware–you think of using a frame buffer. The frame buffer is usually dual port RAM. One hardware or software process fills in the RAM and another process pulls the data out at the right rate and sends it to the VGA display (usually through a digital to analog converter).

[Connor Archard] and [Noah Levy] wanted to do some music processing with a DE2-115 FPGA board. To drive the VGA display, they took a novel approach. Instead of a frame buffer, they use the FPGA to compute each pixel’s data in real-time.

Continue reading “No Frame Buffer For FPGA VGA Graphics”