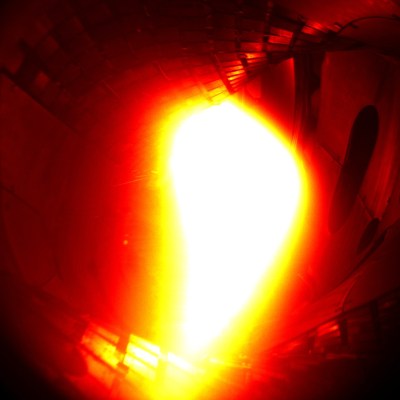
Hey There Little Plant. Let’s Be Friends!

poster_01_01

Perhaps, you’re circle of friends is getting too small. Or maybe, you just want to communicate with the leafy, green beings that have rooted themselves in the soil inside your house. If so, this environmental monitoring system will be perfect for you!

Created by [Dickson], this project monitors soil moisture, air temperature, and air humidity of your indoor plants and will alert you via email and SMS when your plants are thirsty. No longer will your sprouts shrivel up in the sun, but rather, they will be well-hydrated ready to produce their veggie goodness.

The system is battery operated, wireless, Arduino and Raspberry Pi based and comes with an Android app, which in turn allows you to view real-time and historical data, thus giving you the option to check in on your crew of Chlorophyll-embedded friends.

3116051405904844105

Let’s look at the sensors which are at work on the project.

Continue reading “Hey There Little Plant. Let’s Be Friends!”

Solar Powered DIY Plant Watering System

Solar Powered Watering System

It’s great having fresh vegetables just a few steps away from the kitchen, but it takes work to keep those plants healthy. [Pierre] found this out the hard way after returning from vacation to find his tomato plant withering away. He decided to put an end to this problem by building his own solar-powered plant watering system (page in French, Google translation).

An Arduino serves as the brain of the system. It’s programmed to check a photo resistor every ten minutes. At 8:30PM, the Arduino will decide how much to water the plants based on the amount of sunlight it detected throughout the day. This allows the system to water the plants just the right amount. The watering is performed by triggering a 5V relay, which switches on a swimming pool pump.

[Pierre] obviously wanted a “green” green house, so he is powering the system using sunlight. A 55 watt solar panel recharges a 12V lead acid battery. The power from the battery is stepped down to the appropriate 5V required for the Arduino. Now [Pierre] can power his watering system from the very same energy source that his plants use to grow.

DIY Hydroponic System Grows Herbs On The Wall

Wall-Mounted Hydroponic Garden

Everyone knows that you should eat healthy, but it’s not always easy. Fresh and healthy foods are often more expensive than processed foods. When money is tight, sometimes it’s best to just grow your own produce. What if you don’t have room for a garden, though?

When [Matthew] returned home from the 2014 San Mateo Maker Faire, he found himself in a similar situation to many other faire attendees. He saw something awesome and was inspired to build it himself. In this case, it was a wall-mounted hydroponic garden. [Matthew] started out with some basic requirements for his project. He knew which wall he wanted to cover with plants, so that gave him the maximum possible dimensions. He also knew that they may have to remove the garden temporarily to perform maintenance on the wall in the future. And as for what to grow, [Matthew] loves lots of flavor in his foods. He chose to grow herbs and spices.

[Matthew] purchased most of the main components from Amazon and had them shipped to his doorstep. Everything else was found at the local hardware store. The base of the build is an off-the-shelf planter box. The drainage hole in the bottom was plugged up to prevent water from leaking out. A different hole was drilled in the side of the box to allow a garden hose to be mounted to the box. The hose is connected through a float valve, keeping the water level inside the box just right.

[Matthew] then built a frame out of dimensional lumber. The frame ended up being about 4.33 feet wide by 8 feet tall. The boards were fastened together with metal braces and mounting plates. A full sheet of plywood was then nailed to the front of the frame. Thick plastic sheet was then wrapped around the frame and stapled in place.

[Matthew] purchased giant planter pockets to actually hold the plants. He tried stapling them to the front of the frame, but discovered that staples were not strong enough to hold the weight of the plants, soil, and water. He instead used screws and washers.

Next, a submersible pump was mounted inside the bottom planter box. This pump is used to circulate the water and nutrients up to the plants above. Two hoses were connected to the pump and run up the sides of the upper frame. These hoses evenly distribute the water to the plants.

The final step was to mount the unit in place against the wall. [Matthew] didn’t want to screw into the wall and cause any damage. Instead, he placed a couple of bricks inside of the planter box and rested the bottom of the frame on top of those. The top of the frame is essentially hung from a railing up above with some thin steel wire.

The whole unit looks very slick and takes up little space. With some more ingenuity, one could likely build something similar with even more DIY components to save some more money.

DIY Coffee Maker Filters Out Manufacturer Specificity

Coffeemaker made from 3D-printed parts and scrap aluminium

This DIY electric coffeemaker prototype uses an assemblage of 3D-printed parts and cast aluminium. [siemenc]’s main goal with this project was to utilize and demonstrate recycling and re-usability. He used Filabot filament exclusively and melted down scrap aluminium such as cans, foil, and CNC mill waste in an oven he fashioned from an old fire extinguisher. He also cast the aluminium parts himself from 3D-printed positives.

Of course, he had to buy the things that make this a coffeemaker such as the hoses, the fuse, and the heating element. If you’re wondering why he didn’t salvage these parts from yard sale machinery, it’s because he wanted to be able to replace any part of it and have it last as long as he needs it to last. The innards he used are not specific to any model, so he should be able to easily find a replacement.

Just like a pour over set up, [siemenc] has fine control over the strength and quantity of the brew. We particularly like this machine’s exotic bird looks as well; it may be a prototype, but it’s quite stylish. If you’re looking to go all the way with DIY coffee, why not grow your own beans and then roast the beans yourself?


Home Made Cargo Bicycle Makes Use Of Scraps!

Recycled DIY Bicycle!

Ever heard of a cargo bike? If you need to carry a lot of stuff around (or maybe even your kid!), then they’re super handy — unfortunately, they aren’t exactly cheap — or common. So you could just make your own…

[Matthew Venn] was inspired by Tom’s cargo bikes, recently featured in issue 12 of Boneshaker magazine. He collected a few scrap bicycles, some steel, and started fabrication — lucky for him, his friend [Eric] has a full metal working shop complete with plasma cutting, MIG welding, and a lathe.

They started by cutting the front end of the bicycle off and replacing it with a much longer steering column. This connects to the only new part they had to buy — a pair of Ford Escort tie rods, which allow you to steer the tiny front wheel. They continued welding the rest of the frame together, testing it as they went — once satisfied with its handling (it still needs brakes) they built the cargo platform and called it a day.

There’s a complete gallery of the process over on [Matthew’s] Flickr, so if you’re hoping to make your own, take a gander!

A Low Cost, Solar-Powered Swamp Cooler

A looming, torturous summer is preparing to bear down on many of us, making this dirt-cheap swamp cooler build an attractive hack to fend off the heat.

Though this is a pretty standard evaporative cooler, the design comes together in a tidy and transportable finished product. The base is a ~$3, 5-gallon bucket from a local hardware store with its accompanying Styrofoam liner. Three 2 1/8″ holes carved into the side of both the bucket and liner will snugly fit some inch-and-a-half PVC pipe with no need for glue.

One last cut into the lid to seat a small desk fan rounds off this build—or you can chop into the styrofoam liner’s lid if you prefer. The video demonstrates using a 15W solar panel to run the fan, and we have to admit that the cooler seems to be an excellent low-cost build. It does, however, require a frozen gallon jug inside to pump out the chilled air for around 5-6 hours per jug. Maybe one of our frugal and mathematically-inclined readers can throw out some guesstimations for the cost of stocking the bucket with a jug of frozen water a couple times a day? Video after the jump.

Continue reading “A Low Cost, Solar-Powered Swamp Cooler”

Go On A Power Trip With Powerduino

powerduinoThings don’t always run the way we want them to or operate at the ideal temperature out of the box. Instead of spending extra for power controls that may or may not meet your needs, wouldn’t it make more sense to dial in the ideal level from the source? That’s what [dekuNukem] had in mind when he decided to make Powerduino, an arduino-compatible programmable power strip.

With Powerduino, [dekuNukem] can control the electrical consumption of all kinds of things without ever worrying about the irreversible deadliness of mains voltage. It actually uses a Teensy 3.1 which can be programmed with the Arduino IDE through the micro USB connector. He’s really tricked it out to the point of putting Kill A Watt meters to shame. A wi-fi module lets him control any of the outlets from anywhere, and the RTC module lets him make customized schedules for them. Powerduino has an SD card slot for logging energy consumption, and a 20 x 4 LCD screen makes it easy to directly interface with the power strip.

The Powerduino code is up on GitHub, and [dekuNukem]’s walkthrough video is after the jump.

Continue reading “Go On A Power Trip With Powerduino”