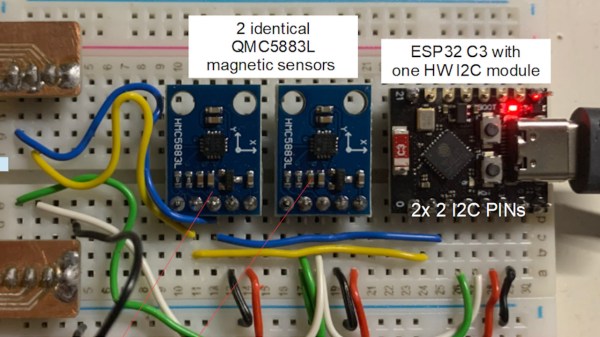
A RISC-V Supercluster For Very Low Cost

As ARM continues to make inroads in the personal computing space thanks to its more modern and streamlined instruction set architecture (ISA) and its reduced power demands especially compared to x86 machines, the main reason it continues to become more widespread is how easy it is to get a license to make chips using this ISA. It’s still not a fully open source instruction set, though, so if you want something even more easily accessible than ARM you’ll need to find something like these chips running the fully open-source RISC-V ISA and possibly put them to work in a custom supercluster.

[bitluni] recently acquired a large number of CH32V003 microcontrollers and managed to configure them all to work together in a cluster. The entire array is only $2 (not including all of the other components attached to the board) so a cluster of arbitrary size is potentially possible. [bitluni] built a four-layer PCB for this project with an 8-bit bus so the microcontrollers can communicate with each other. Each chip has its own ADC and I/O that are wired to a set of GPIO pins on the sides of the board. The build is rounded out with a USB interface for programming and power.

There were a few quirks to get this supercluster up and running, including some issues with the way the reset and debug pins work on these specific microcontrollers. With some bugs like this out of the way, the entire cluster is up and running, and [bitluni] hints that his design could be easily interfaced with even larger RISC-V superclusters. As for a use for this build, sometimes clusters like these are built just to build them, but since the I/O and ADCs are accessible in theory this cluster could do anything a larger microcontroller might be able to do, only at a much lower price.

Continue reading “A RISC-V Supercluster For Very Low Cost”

3D printed Hagrid's lantern with a magic wand

Micro:bit Brings 3D Printed Magic Lanterns To Life

[Elenavercher] loves engaging her primary school students, inspiring their imagination as well as teaching them the design thinking process. She has found that the very accessible rapid prototyping culture of 3D printing, micro:bit, and the like are perfect for teaching her students problem-solving and teamwork, and is always coming up with new lessons that will catch their attention. That brings us to her latest design, an interactive lantern and wand, which you could say is of the wizarding variety.

The lantern and the wand each have an integrated micro:bit serving as their brains. When the user shakes the wand, releasing a spell, the micro:bit in the wand, sends a user-defined number to the micro:bit in the lantern. The lantern has NeoPixels built-in, which then turn on, illuminating the lantern. When the user presses a button on the micro:bit instead of shaking it, the wand sends a signal to the lantern that tells it to “turn off.” Pretty simple, right?

The design itself is something any seasoned hacker could recreate; however, the magic in this build is how [Elenavercher] beautifully engages her elementary-aged students in the engineering design process. She starts off by encouraging her students to prototype the lantern and wand using paper which is a very inexpensive way to help them visualize the final product before investing too much time into the 3D design, a critical engineering design step — prototype fast and cheap with whatever you have on hand.

She then helps them design the lantern and wand in Tinkercad, a very beginner-friendly, yet increasingly capable CAD program. We really appreciate her detailed steps for the design as well as for navigating Tinkercad, both of which will help teach any tiny tikes in your life how to recreate the design. What’s really handy about Tinkercad is you can do mechanical CAD as well as write code for the micro:bit all within the same program. But [Elenavercher] also provides the final .hex file if you’d rather just get the build up and running.

Continue reading “Micro:bit Brings 3D Printed Magic Lanterns To Life”

Interlaken Want To Connect All The Chips

One of the problems with designing things on a chip is finding a good way to talk to the outside world. You may not design chips yourself, but you care because you want to connect your circuits — including other chips — to the chips in question. While I2C and SPI are common solutions, today’s circuits are looking for more bandwidth and higher speeds, and that’s where Interlaken comes in. [Comcores] has an interesting post on the technology that blends the best of SPI 4.2 and XAUI.

The interface is serial, as you might expect. It can provide both high-bandwidth and low-latency multi-channel communications. Interlaken was developed by Cisco and Cortina Systems in 2006 and has since been adopted by other industry-leading companies. Its latest generation supports speeds as high as 1.2 Tbps.

Continue reading “Interlaken Want To Connect All The Chips”

Timeframe: The Little Desk Calendar That Could

Usually, the problem comes before the solution, but for [Stavros], the opposite happened. A 4.7″ E-Ink screen with integrated battery management and ESP32 caught his eye, and he bought it and started thinking about what he wanted to do with it. The Timeframe is a sleek desk calendar based around the integrated e-ink screen.

[Stavros] found the device’s MicroPython support was a little lackluster, and often failed to draw. He found a Platform.io project that used an older but modified library for driving the e-ink display which worked quite well. However, the older library didn’t support portrait orientation or other niceties. Rather than try and create something complex in C, he moved the complexity to a server environment he knew more about. With the help of CoPilot, he got some code that would wake up the ESP32 every half hour, download an image from a server, and then display it. A Python script uses a headless browser to visit Google Calendar, resize the window, take a screenshot, and then upload it.

The hardest part of the exercise was getting authentication with Google working reliably. A white sleek 3D printed case wraps the whole affair in an aesthetically pleasing shell. So far, this has been a great story of someone building something for themselves and using their strengths. Where’s the hack?

The hack comes when [Stavros] tried squeezing his calendar into a case that was too tight and cracked the screen. Suddenly a large portion of the screen wouldn’t draw. He turned what was broken into something new by mapping out the area that didn’t draw and converting the Python to draw weather information with Pillow rather than screenshot a webpage: clever reuse and a way to make good out of a bad accident.

The code is up on GitLab, and the 3D files for the case are available on Printables. You can also find the project on Hackaday.io, as it was an entry into our recently concluded Low-Power Contest. Unfortunately, while the Timeframe is pretty power efficient, it doesn’t last as long as this calendar with a 50-year battery life.

PicoCray - Raspberry Pi Pico Cluster

Parallel Computing On The PicoCray RP2040 Cluster

[ExtremeElectronics] cleverly demonstrates that if one Raspberry Pi Pico is good, then nine must be awesome.  The PicoCray project connects multiple Raspberry Pi Pico microcontroller modules into a parallel architecture leveraging an I2C bus to communicate between nodes.

The same PicoCray code runs on all nodes, but a grounded pin on one of the Pico modules indicates that it is to operate as the controller node.  All of the remaining nodes operate as processor nodes.  Each processor node implements a random back-off technique to request an address from the controller on the shared bus. After waiting a random amount of time, a processor will check if the bus is being used.  If the bus is in use, the processor will go back to waiting.  If the bus is not in use, the processor can request an address from the controller.

Once a processor node has an address, it can be sent tasks from the controller node.  In the example application, these tasks involve computing elements of the Mandelbrot Set. The particular elements to be computed in a given task are allocated by the controller node which then later collects the results from each processor node and aggregates the results for display.

The name for this project is inspired by Seymore Cray. Our Father of the Supercomputer biography tells his story including why the Cray-1 Supercomputer was referred to as “the world’s most expensive loveseat.” For even more Cray-1 inspiration, check out this Raspberry Pi Zero Cluster.

Debouncing For Fun And… Mostly, Just For Fun

In our minds and our computer screens, we live in an ideal world. Wires don’t have any resistance, capacitors don’t leak, and switches instantly make connections and break them. The truth is, though, in the real world, none of those things are true. If you have a switch connected to a lightbulb, the little glitches when you switch are going to be hard to notice. Hook that same switch up to a processor that is sampling it constantly, and you will have problems. This is the classic bane of designing microcontroller circuits and is called switch bounce. [Dr. Volt] covers seven different ways of dealing with it in a video that you can see below.

While you tend to think of the problem when you are dealing with pushbuttons or other kinds of switches for humans, the truth is the same thing occurs anywhere you have a switch contact, like in a sensor, a mechanical rotary encoder, or even relay contacts. You can deal with the problem in hardware, software, or both.

Continue reading “Debouncing For Fun And… Mostly, Just For Fun”

Pi Microcontroller Still Runs A Webserver

At first glance, the Raspberry Pi Pico might seem like a bit of a black sheep when compared to the other offerings from the Raspberry Pi Foundation. While most of the rest of their lineup can run Linux environments with full desktops, the Pico is largely limited to microcontroller duties in exchange for much smaller price tags and footprints. But that doesn’t mean it can’t be coerced into doing some of the things we might want a mainline Pi to do, like run a web server.

The project can run a static web page simply by providing the Pico with the project code available on the GitHub page and the HTML that you’d like the Pico to serve. It can be more than a static web page though, as it is also capable of running Python commands through the web interface as well. The server can pass commands from the web server and back as well, allowing for control of various projects though a browser interface. In theory this could be much simpler than building a physical user interface for a project instead by offloading all of this control onto the web server instead.

The project not only supports the RP2040-based Raspberry Pi Pico but can also be implemented on other WiFi-enabled microcontroller boards like the ESP8266 and ESP32. Having something like this on hand could greatly streamline smaller projects without having to reach for a more powerful (and more expensive) single-board computer like a Pi 3 or 4. We’ve seen some other builds on these boards capable of not only running HTML and CSS renderers, but supporting some image formats as well.

Continue reading “Pi Microcontroller Still Runs A Webserver”