When you buy a chip, how can you be sure you’re getting what you paid for? After all, it’s just a black fleck of plastic with some leads sticking out of it, and a few laser-etched markings on it that attest to what lies within. All of that’s straightforward to fake, of course, and it’s pretty easy to tell if you’ve got a defective chip once you try it out in a circuit.
But what about off-brand chips? Those chips might be functionally similar, but still off-spec in some critical way. That was the case for [Kevin Darrah] which led to his forensic analysis of potentially counterfeit MCU chips. [Kevin] noticed that one of his ATMega328 projects was consuming way too much power in deep sleep mode — about two orders of magnitude too much. The first video below shows his initial investigation and characterization of the problem, including removal of the questionable chip from the dev board it was on and putting it onto a breakout board that should draw less than a microamp in deep sleep. Showing that it drew 100 μA instead sealed the deal — something was up with the chip.
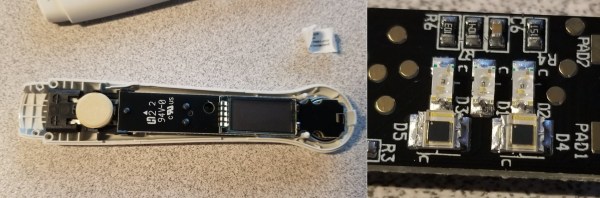
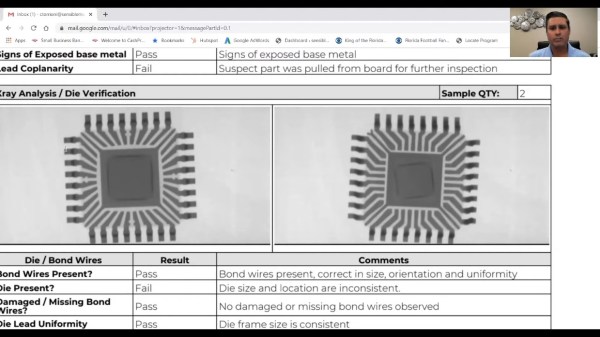
[Kevin] then sent the potentially bogus chip off to a lab for a full forensic analysis, because of course there are companies that do this for a living. The second video below shows the external inspection, which revealed nothing conclusive, followed by an X-ray analysis. That revealed enough weirdness to warrant destructive testing, which showed the sorry truth — the die in the suspect unit was vastly different from the Atmel chip’s die.
It’s hard to say that this chip is a counterfeit; after all, Atmel may have some sort of contract with another foundry to produce MCUs. But it’s clearly an issue to keep in mind when buying bargain-basement chips, especially ones that test functionally almost-sorta in-spec. Caveat emptor.
Counterfeit parts are depressingly common, and are a subject we’ve touched on many times before. If you’d like to know more, start with a guide.
Continue reading “Deep-Sleep Problems Lead To Forensic Investigation Of Troublesome Chip”