Reverse Engineering The Charge Pump Of An 8086 Microprocessor

You’d think that the 8086 microprocessor, a 40-year-old chip with a mere 29,000 transistors on board that kicked off the 16-bit PC revolution, would have no more tales left to tell. But as [Ken Shirriff] discovered, reverse engineering the chip from die photos reveals some hidden depths.

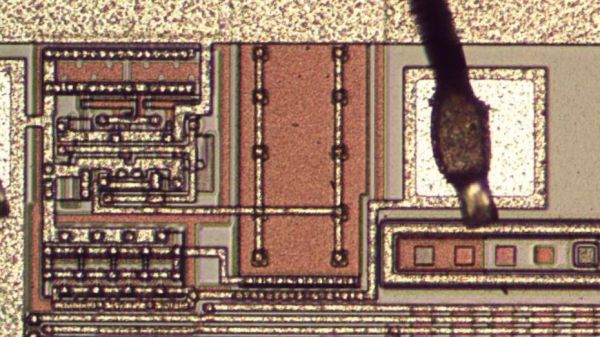
The focus of [Ken]’s exploration of the venerable chip is the charge pump, a circuit that he explains was used to provide a bias voltage across the substrate of the chip. Early chips generally took this -5 volt bias voltage from a pin, which meant designers had to provide a bipolar power supply. To reduce the engineering effort needed to incorporate the 8086 into designs, Intel opted for an on-board charge pump to generate the bias voltage. The circuit consists of a ring oscillator made from a trio of inverters, a pair of transistors, and some diodes to act as check valves. By alternately charging a capacitor and switching its polarity relative to the substrate, the needed -5 volt bias is created.

Given the circuit required, it was pretty easy for [Ken] to locate it on the die. The charge pump takes up a relatively huge amount of die space, which speaks to the engineering decisions Intel made when deciding to include it. [Ken] drills down to a very low level on the circuit, with fascinating details on how the MOSFETs were constructed, and why eight transistors were used instead of two diodes. As usual, his die photos are top quality, as are his explanations of what’s going on down inside the silicon.

If you’re somehow just stumbling upon [Ken]’s body of work, you’re in for a real treat. To get you started, you’ll want to check out how he found pi baked into the silicon of the 8087 coprocessor, or perhaps his die-level exploration of different Game Boy audio chips.

Sanitizer Dispenser Does It Hands-Free

Hand sanitizer is the hot product of 2020, and it seems nobody can get enough. In the same way that touching a dirty tap takes the shine off washing your hands in a public bathroom, one wishes to avoid touching the hand sanitizer bottle entirely. To get around this, [makendo] whipped up a quick solution.

The solution consists of a 3D printed caddy which holds a typical bottle of hand sanitizer. This is affixed to a wall with either screws or double sided tape. A long string is then attached to the dispenser nozzle, and passes down to a foot pedal. By depressing the pedal, it pulls on the string, pulling down the dispenser nozzle and delivering the required sanitizer to the hands.

It’s by no means an advanced hack, but one that can be whipped up in a short time to make sanitizing one’s hands just that little bit more pain-free. If you’re still short on sanitizer, you might want to make your own. If you do, let us know how it goes. Otherwise, consider alternate methods of automating the delivery!

Electric Skateboard With Tank Tracks, From A Big 3D Printer

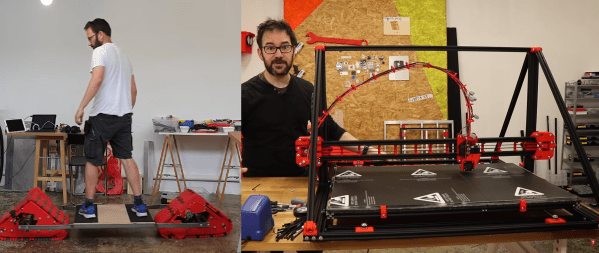
One of the basic truths of ground vehicles is that they are always cooler with tank tracks. Maybe not better, but definitely cooler. [Ivan Miranda] takes this to heart, and is arguably the king of 3D printed tank projects on YouTube. He has built a giant 3D printed electric skateboard with tank tracks with the latest version of his giant 3D printer. Videos after the break.

The skateboard consists of a large steel frame, with tracked bogies on either end. Most of the bogie components are 3D printed, including the wheels and tracks, and each bogie is driven by a brushless motor via a belt. Some bends were added to the steel frame with just 3D printed inserts for his bench vice. The bogies are mounted to the frame with a standard skateboard truck, which allows it to steer like a normal skateboard, by tilting the deck. It looks as though this works well on a smooth concrete floor, but we suspect that turning will be harder on rough surface where the tracks can’t slide. We’ll have to wait for the next video for a full field test.

The large components for this skateboard were printed on [Ivan]’s MK3 version of his giant 3D printer. Although it’s very similar to the previous version, improvements were made in key areas. The sliding bed frame’s weight was reduced by almost 50%, and the wheels were rotated, so they ride on top of the extrusion below it, instead of on it’s side, which helps the longevity of the wheels. This also allows bed levelling to be done by turning the eccentric spacers on each of the wheels. The rigidity of base frame and x-axis beam were increased by adding more aluminium extrusions. Although he doesn’t explicitly mention the print volume, it looks to be the same as the previous version, which was 800x500x500. For materials other than PLA, we suspect a heated build chamber will be required have any chance of making big prints without excessive warping.

[Ivan] really likes big prints, with a number of 3D printed tanks, a giant nerf gun, and a sand drawing bot. Continue reading “Electric Skateboard With Tank Tracks, From A Big 3D Printer”

Producing A Prop Gun That Actually Ejects Cases

With the movie Man of War shooting in Cyprus, there was a problem. They needed prop guns that looked realistic and ejected cases when fired, but that were also allowed under the country’s firearm laws. The task fell on [Paradym’s] shoulders, and he set to work producing a prop capable of doing the job.

With the laws in Cyprus, using anything off-the-shelf like an Airsoft pistol was simply not allowed. Instead, he had to start from scratch, creating a design outwardly similar to the Colt 1911 to suit the era of the film. Using green gas canisters for power, the first focus was on getting a realistic semi-automatic firing cycle happening. With that done, the next goal was to get the cases to eject from the weapon on each shot. To achieve this, a lever was used, actuated by the slide moving back after a shot, pushing the “spent” cartridge out of the port.

[Paradym] goes into great deal, covering the design of the 3D printed parts, the machining of springs, as well as the final assembly of the prop. We’ve seen other prop gun builds before, too. Video after the break.

Continue reading “Producing A Prop Gun That Actually Ejects Cases”

Transform Kicad Design To Patchwork For Isolation Routing

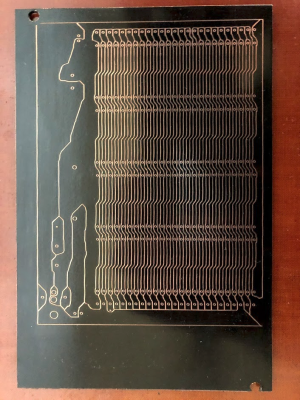
Tuning a desktop router and your board designs for isolation routing can be a bit tricky, with thin traces usually being the first victim. For simple prototype boards you usually don’t need tightly packed traces, you just want to isolate the nets. To do this with a minimum amount of routing, [Michael Schembri] created kicad-laser-min, a command-line utility that takes a Kicad PCB design and expands all the tracks and pads to their maximum possible width.

Laser scribed PCB with maximum track widths

The software takes one layer of the PCB layout, converts it to black and white, and then runs a C++ Voronoi algorithm on it to dilate each track and pad until it meets another expanding region. Each region is colourised, and OpenCV edge detection is used to produce the contours that need to be milled or etched. A contour following algorithm is then used to create the G-code. The header image shows the output of each step.

Full source code is available on GitHub. [Michael] has had good results with his own boards, which are scribed using a laser cutter before etching, but welcomes testing and feedback from other users. He has found that OpenCV doesn’t always completely close all the contours, but the gaps are usually smaller than the engraving width of his laser, so no shorts are created.

This is basically “Scribble style” prototyping with CAD and CNC tools. If you prefer scribe and etch, you might consider building a simple PCB shaker for faster etching. If you have a router but want to avoid the dust, you can use a carbide scribe to scratch out the tracks without needing to etch.

CampZone 2020 Badge Literally Speaks To Us

The pandemic has left my usual calendar of events in shambles this year. Where I’d have expected to have spent a significant portion of my summer mingling with our wonderful and diverse community worldwide, instead I’m sitting at home cracking open a solitary Club-Mate and listening to muffled techno music while trying to imagine myself in a field somewhere alongside several thousand hackers.

As a knock-on effect of the event cancellations there’s another thing missing this summer, the explosion of creativity in the world of electronic conference badges has faltered. Badges are thin on the ground this year, so the few that have made it to production are to be treasured as reminders that life goes on and there will be another golden summer of hacker camps in the future. This year, the CampZone 2020 badge was given its own voice and perform neat tricks like presenting a programming interface via WebUSB!

Continue reading “CampZone 2020 Badge Literally Speaks To Us”

Hackaday Podcast 078: Happy B-Day MP3, Eavesdropping On A Mars Probe, Shadowcasting 7-Segments, And A Spicy Commodore 64

Hackaday editors Elliot Williams and Mike Szczys go down the rabbit hole of hacky hacks. A talented group of radio amateurs have been recording and decoding the messages from Tianwen-1, the Mars probe launched by the Chinese National Space Administration on July 23rd. We don’t know exactly how magnets work, but know they do a great job of protecting your plasma cutter. You can’t beat the retro-chic look of a Commodore 64’s menu system, even if it’s tasked with something mundane like running a meat smoker. And take a walk with us down MP3’s memory lane.

Take a look at the links below if you want to follow along, and as always, tell us what you think about this episode in the comments!

Take a look at the links below if you want to follow along, and as always, tell us what you think about this episode in the comments!

Direct download (60 MB or so.)

Continue reading “Hackaday Podcast 078: Happy B-Day MP3, Eavesdropping On A Mars Probe, Shadowcasting 7-Segments, And A Spicy Commodore 64”