Circuit Bent Toy Keyboard Is MIDI Controlled

tymkrsKeyboard
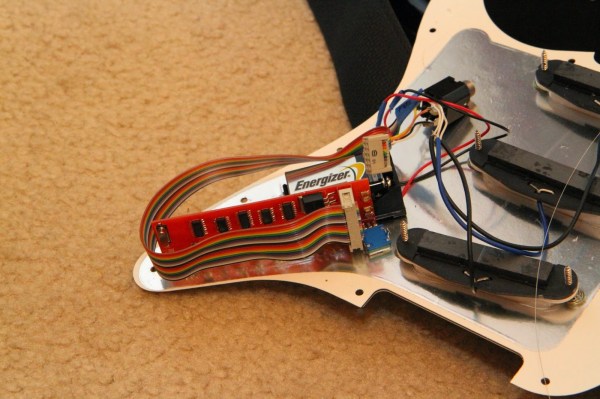
The [Tymkrs] crew has come up with a pretty neat circuit bent toy keyboard hack. It’s been a while since we’ve seen a good circuit bending hack. This project started as a way to demo the [Tymkrs] “MIDI In Me” kit. A cheap toy keyboard was sacrificed for its sound generator board. Like many cheap mass-produced toys, this board is based upon a COB (chip on board) package. The silicon die of the main ASIC is placed directly on the PCB and bonded out to pads. A round epoxy blob keeps everything protected.

The [Tymkrs] found a number of the chip’s pads were unused in their keyboard. The inputs appeared to trigger drums, possibly for use in a different toy. These inputs, coupled with the ‘demo song’ buttons turned out to be the basis of this hack. MIDI input is sent to a Parallax Propeller. The prop runs a program that will set its I/O pins based upon MIDI Note On/Off commands. The I/O pins then drive transistors which inject signals into the button inputs of the keyboard.

The [Tymkrs] even went so far as to use a voltage divider on the main clock circuit of the keyboard. Changing the main clock causes a sort of pitch bend effect often heard with circuit bent toys. As with the buttons, a MIDI signal commands the prop to enable or disable oscillator signal injection. A potentiometer is used to tweak the oscillator frequency.

Continue reading “Circuit Bent Toy Keyboard Is MIDI Controlled”

LED-Guided Piano Instruction

LEDpianoGuide

[Kay Choe] can’t play the piano. Rather, he couldn’t, until he converted his keyboard to include LED-guided instruction. [Kay] is a microbial engineering graduate student, and the last thing a grad student can afford is private music lessons. With $70 in components and a cell phone, however, he may have found a temporary alternative.

The build works like a slimmed-down, real-world Guitar Hero, lighting up each note in turn. We’ve seen a project like this before, with the LEDs mounted above the keys. [Kay]’s design, however, is much easier to interpret. He embedded the LEDs directly into the keys, including ones above each black key to indicate the sharps/flats. An Android app takes a MIDI file of your choice and parses the data, sending the resulting bits into an IOIO board via USB OTG. A collection of shift registers then drives the LEDs.

For a complete novice, [Kay] seems to benefit from these lights. We are unsure whether the LEDs give any indication of which note to anticipate, however, as it seems he is pressing the keys after each one lights up. Take a look at his video demonstration below and help us speculate as to what the red lights signify. If you’re an electronics savant who wants to make music without practicing a day in your life, we recommend that you check out [Vladimir’s] Robot Guitar.

Continue reading “LED-Guided Piano Instruction”

Time-lapse Synthesizer Build Will Blow Your Mind

[themonkeybars] recently uploaded a time-lapse video of his DIY synthesizer build. First off the video itself is a pretty neat hack. An iPhone time-lapse app was used to capture one frame every 5 seconds. By the time the build was complete, approximately 46,000 frames had been snapped. This boiled down to over 43 minutes of youtube footage. [themonkeybars] didn’t work full time on the project, so the video covers about a year’s worth of work which we think makes it even cooler. The synth is also featured in much of the video’s soundtrack.

The synthesizer itself would be classified as an analog modular synth, a type we’ve seen before. Modular synthesizers are one of the earlier forms of electronic music. The synthesizer is composed of discrete modules such as oscillators, modulators, and filters. The modules may be housed in the same box, but they are not internally connected. All connections are made via front panel patch cables. This is where the term “Patch” came from. Continue reading “Time-lapse Synthesizer Build Will Blow Your Mind”

Musical Pencil Synthesizer

ScreenShot031

Here’s another fun weekend project for the hacker younglings, a musical synthesizer that plays different musical tones based on the resistance of your conductive graphite drawing!

Like our recent post on a DIY Metal Detector, this project makes use of the ever relevant 555 timer. Except in this case they are using a more modern TLC555 timer which only requires 3V instead of the typical 4.5V. It’s a fairly simple project that you should be able to complete in just a few hours.

The circuit is quite basic. The 555 timer outputs in astable mode, which means there is a continuous stream of pulses from pin 3 which go right into the speaker circuit. The rest of the circuit monitors the resistance of whatever the pencil is touching, including you! Changes in resistance result in the variation of pulses outputted by the 555 timer.

As always, the video guide is after the break.

Continue reading “Musical Pencil Synthesizer”

Breadboard Sequencer Does A Lot With Very Little Hardware

breadboard-sequencer

[Jan Cumpelik] squeezes a lot of performance out of very few components with his breadboard sequencer which he calls Lunchbeat. We really like his awesome breadboard which has a series of trenches perpendicular to the bus strips framing the long sides. All of our breadboards have just one trench down the middle. This, combined with his mad breadboard skills, results in a really clean prototype.

The chip nearest his hand is the ATmega328 which drives the sequencer. It takes inputs from that row of 10k trimpots as well as a series of tactile switches. Feedback is given with the row of eight LEDs. Those are driven from a 595 shift register to save pins on the microcontroller. The remaining chip is an OpAmp which works in conjunction with a 3-bit R2R ladder DAC to output audio. Turn your speakers down just a bit before taking in the demonstration below. There you will also find an image version of his schematic that we made for your convenience. It is only available as a PDF in the code repository he posted.

Continue reading “Breadboard Sequencer Does A Lot With Very Little Hardware”

OneTesla Electrifies Maker Faire NY 2013

onetesla

Throughout the maker pavilion, the siren song of a musical Tesla coil could be heard. Those who followed their ears found themselves at the oneTesla booth. OneTesla is a hobby Tesla coil, with the added twist of polyphonic MIDI input.

Started by three MIT students, oneTesla had a successful Kickstarter campaign last year. Like many kickstarters, they are a bit behind in the shipping department. They are shipping out their third run of kits to backers now. The group had a small number of oneTesla coils for sale at the show, which appeared to have sold out by midday Sunday.

The actual process of generating sound with a Tesla coil is fascinating. All Tesla coils are resonant at high frequency. In oneTesla’s case, this is 220kHz. Human hearing ends around 20kHz, so this is well beyond the range of perception. Since the coil is locked in at this frequency, the power to the coil is modulated at the desired sound frequency. Playing an A note for example, would mean modulating the coil at 440Hz.

Continue reading “OneTesla Electrifies Maker Faire NY 2013”

Mario Plays Piano With A Little Help From Raspberry Pi

mario-piano

[David] has created his own live robot band to play live versions of the music and sound effects of NES games. Most of us who grew up in the 80’s and 90’s have the music of Nintendo games burned into our brains. While there have been some amazing remixes created over the years, [David] has managed to do something truly unique. Armed with an emulator, some software prowess, and a pair of Raspberry Pis, [Dave] created a system that plays game music and sound effects on analog instruments. A Yamaha Disklavier player piano handles most of the work through a connection to a Raspberry Pi. Percussion is handled by a second Pi.  Snare drum, wood block, and tambourine are all actuated by a custom solenoid setup.

The conversion process all happens on the fly as the game is played. [Dave] says the process has about ½ second of lag when played live, but we’re sure that could be fixed with some software tweaks. Continue reading “Mario Plays Piano With A Little Help From Raspberry Pi”