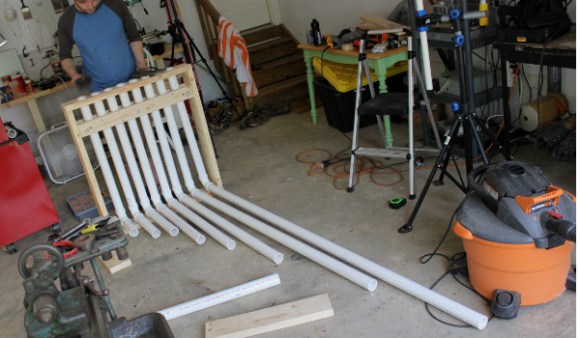
Building A Wooden Air Raid Siren

siren

A while back, [Matthias] was working on a dust collector for his shop. Being the master woodsmith he is, he decided to build a dust collection system out of wood. Everything worked out in the end, but in creating wooden impellers and blowers, he discovered his creations made a lot of noise. For this project, instead of trying to quiet his blower, he decided to make one as loud as possible in the form of an air raid siren.

The basic idea behind [Matthias]’ air raid siren is to make two impellers that force air through two stators along the perimeter of the rotor. As the siren spins, the air coming from the impellers is either blocked or passes through the stators, creating an alternating high and low pressure; to be more accurate, it creates a ton of noise. Stack two of these impellers together and you’ve got a two-tone air raid siren made out of wood.

For something that’s spinning very fast, we’re surprised [Matthias] didn’t have more problems with balancing his siren than he did. There are a few useful tricks to be picked up from his tutorial, though: balancing everything on a marble really seemed to help with the build.

As for how loud the siren is, [Matthias] can’t give us a decibel volume. From the video after the break, though, we can tell you it’s really, really loud.

Thanks [Dimitar] for sending this in. [Matthias], it’s alright if you send projects in yourself. You’ve earned the right to say, “I am so cool!”

Continue reading “Building A Wooden Air Raid Siren”

Hammond Organ Sends Messages Which Can Be Decoded By A Spectrogram

hammond-organ-encodes-messages-spectrogram

Here’s an interesting use for an old organ. Let it get in on your Ham radio action. [Forrest Cook]  is showing off his project which uses a Hammond Organ to encode messages which can be displayed by a Spectrogram. We’ve seen this type of message encoding before (just not involving a musical instrument). It’s rather popular with Hams in the form of the fldigi program.

An Arduino was connected to the organ via a UNL2003 darlington array chip. This chip is driving some reed relays which make the organ connections to create the sine wave tones. With that hardware in place it’s a matter of formatting data to generate the target audio. [Forrest] wrote his own Arduino sketch which takes characters from the serial port (pushed over USB by the laptop), maps then to a stored 5×7 character font set, then drives the pins to produce the tones. As you can see in the clip after the break the resulting audio can be turned into quite readable text.

Continue reading “Hammond Organ Sends Messages Which Can Be Decoded By A Spectrogram”

Hi-Hat MIDI Controller

midi-hi-hat-controller

Drumming hackers take note, if you’ve got an extra bass drum pedal it’s cheap and simple to use it as a MIDI controller. This rig was thrown together to supplement a DIG DRUM electric drum set. That piece of equipment has a pedal add-on that didn’t come with it. Turns out all it does is feed a resistance value to the set.

To get this up and running a frame was built from a metal base and acrylic side piece. The acrylic hosts a trimmable potentiometer which connects to an 1/4″ stereo jack right beside it. This facilitates connecting the pedal to the drum set using an audio patch cable. Interface with the pedal is accomplished with a few bits from the hardware store. The axle of the pedal sticks out one side, and is clamped between two washers. The other side of the washer grip the timpot causing it to move when the pedal does.

This hardware is a snap to use with your own MIDI device. We’d suggest giving the HIDUINO package a try.

Making A Propane Tank Hank Drum

all-hank-drum-notes-laid-out

A [Hank Drum], as explained here, is a steel drum-type instrument made out of a propane tank. The name comes from the [Hang] or [Hang Drum] which is significantly more expensive than that $40 or so an empty propane tank costs. Of course, you’ll have to do some work to get it to play beautiful music, which can be seen in a time-lapse construction video after the break.

The details of how this instrument was made can be found here, including how to lay everything out and cut out eight relatively neat “tongues” for producing different tones. I used a Dremel tool, but this can also be done using saber saw for a curved top. This method is explained here with a template, but the results may not be as neat.

If you want to try this yourself, make sure to use an empty, unused propane tank. This is extremely important. For another entirely different homemade instrument, why not check out the [Whamola] that we made a year or so ago? Continue reading “Making A Propane Tank Hank Drum”

Arduino-controlled MIDI Sequencer

am808vx3-arduino-synth

[Christian] wrote in to tell us about his third-generation Arduino MIDI sequencer (translated) called the AM808 VX3. He had already laid a strong base for the project in his previous versions. But the user interface was still frustrating at times and that’s where this version comes in. it features a nice clean dashboard like interface, but also includes a configurable virtual interface.

The obvious components seen above include the slider and potentiometer band, as well as the repository of buttons mounted below that. But in the center of the board is a touchpad which [Christian] pulled out of an old Laptop. It interfaces as a PS2 device which makes it pretty simple to use in conjunction with the Arduino. But that’s not the only touch-enabled input device. The rectangle to the right of the touch pad is an LCD screen with a touch overlay. As you can see (and hear) in the clip after the break, the touch screen made it possible for him to rework the controls until they became simple and intuitive.

Continue reading “Arduino-controlled MIDI Sequencer”

Pair Of Musical Hacks Use Sensor Arrays As Keyboards

sensor-driven-musical-keyboards

This pair of musical keyboard hacks both use light to detect inputs. The pair of tips came in on the same day, which sparks talk of consipiracy theory here at Hackaday. Something in the weather must influence what types of projects people take on because we frequently see trends like this one. Video of both projects is embedded after the jump.

On the left is a light-sensitive keyboard which [Kaziem] is showing off. In this image he’s rolling a marble around on the surface. As it passes over the Cadmium Sulfide sensors (which are arranged in the pattern of white and black keys from a piano keyboard) the instrument plays pitches based on the changing light levels. [Thanks Michael via Make]

To the right is [Lex’s] proximity sensor keyboard. It uses a half-dozen Infrared proximity sensor which pick up reflected light. He calls it a ‘quantised theremin’ and after seeing it in action we understand why. The overclocked Raspberry Pi playing the tones reacts differently based on distance from the keyboard itself, and hand alignment with the different sensors.

Continue reading “Pair Of Musical Hacks Use Sensor Arrays As Keyboards”

Making A Better, MIDI Controlled Leslie Stompbox

mint

Way back before the advent of commercial DSP, musicians had really cool looking gear. One of these devices to change the sound of organs, guitars, and other electronic instruments was a Leslie speaker – a speaker cabinet with rotating horns that gives that wonderful warm warble heard on so many classic recordings. [Nigel] doesn’t have an original Leslie, but he does have a much less expensive and lighter digital effect that emulates the original Leslie sound very well. The only problem, though, is the requirement for a proprietary footswitch. No problem, then, because a transistor, a resistor, and a mint tin can take care of that.

[Nigel]’s Leslie simulator – a Neo Instruments Ventilator – has a foot switch to control the speed of the emulated rotary speakers. There are three possible states for the speakers, fast, slow, and brake, all controlled with a TRS phono connector. Possibly in an attempt to price gouge consumers on a proprietary footswitch, Neo Instruments decided they would use the ring and tip of the phono connector to control the speed. They did so in a way that made it impossible for a single relay or switch to change the speed, however.

No problem for [Nigel], then, because with a very simple circuit consisting of just a transistor and resistor he can use any footswitch he wants with his Leslie simulator. The build doesn’t support the brake function, but he doesn’t use that anyway. Not bad for less than a dollar in parts, and a buck fifty in mint tins.