Hi-Hat MIDI Controller

midi-hi-hat-controller

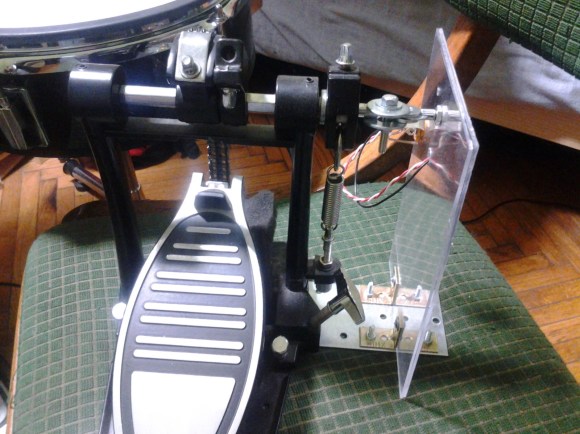
Drumming hackers take note, if you’ve got an extra bass drum pedal it’s cheap and simple to use it as a MIDI controller. This rig was thrown together to supplement a DIG DRUM electric drum set. That piece of equipment has a pedal add-on that didn’t come with it. Turns out all it does is feed a resistance value to the set.

To get this up and running a frame was built from a metal base and acrylic side piece. The acrylic hosts a trimmable potentiometer which connects to an 1/4″ stereo jack right beside it. This facilitates connecting the pedal to the drum set using an audio patch cable. Interface with the pedal is accomplished with a few bits from the hardware store. The axle of the pedal sticks out one side, and is clamped between two washers. The other side of the washer grip the timpot causing it to move when the pedal does.

This hardware is a snap to use with your own MIDI device. We’d suggest giving the HIDUINO package a try.

Making A Propane Tank Hank Drum

all-hank-drum-notes-laid-out

A [Hank Drum], as explained here, is a steel drum-type instrument made out of a propane tank. The name comes from the [Hang] or [Hang Drum] which is significantly more expensive than that $40 or so an empty propane tank costs. Of course, you’ll have to do some work to get it to play beautiful music, which can be seen in a time-lapse construction video after the break.

The details of how this instrument was made can be found here, including how to lay everything out and cut out eight relatively neat “tongues” for producing different tones. I used a Dremel tool, but this can also be done using saber saw for a curved top. This method is explained here with a template, but the results may not be as neat.

If you want to try this yourself, make sure to use an empty, unused propane tank. This is extremely important. For another entirely different homemade instrument, why not check out the [Whamola] that we made a year or so ago? Continue reading “Making A Propane Tank Hank Drum”

Arduino-controlled MIDI Sequencer

am808vx3-arduino-synth

[Christian] wrote in to tell us about his third-generation Arduino MIDI sequencer (translated) called the AM808 VX3. He had already laid a strong base for the project in his previous versions. But the user interface was still frustrating at times and that’s where this version comes in. it features a nice clean dashboard like interface, but also includes a configurable virtual interface.

The obvious components seen above include the slider and potentiometer band, as well as the repository of buttons mounted below that. But in the center of the board is a touchpad which [Christian] pulled out of an old Laptop. It interfaces as a PS2 device which makes it pretty simple to use in conjunction with the Arduino. But that’s not the only touch-enabled input device. The rectangle to the right of the touch pad is an LCD screen with a touch overlay. As you can see (and hear) in the clip after the break, the touch screen made it possible for him to rework the controls until they became simple and intuitive.

Continue reading “Arduino-controlled MIDI Sequencer”

Pair Of Musical Hacks Use Sensor Arrays As Keyboards

sensor-driven-musical-keyboards

This pair of musical keyboard hacks both use light to detect inputs. The pair of tips came in on the same day, which sparks talk of consipiracy theory here at Hackaday. Something in the weather must influence what types of projects people take on because we frequently see trends like this one. Video of both projects is embedded after the jump.

On the left is a light-sensitive keyboard which [Kaziem] is showing off. In this image he’s rolling a marble around on the surface. As it passes over the Cadmium Sulfide sensors (which are arranged in the pattern of white and black keys from a piano keyboard) the instrument plays pitches based on the changing light levels. [Thanks Michael via Make]

To the right is [Lex’s] proximity sensor keyboard. It uses a half-dozen Infrared proximity sensor which pick up reflected light. He calls it a ‘quantised theremin’ and after seeing it in action we understand why. The overclocked Raspberry Pi playing the tones reacts differently based on distance from the keyboard itself, and hand alignment with the different sensors.

Continue reading “Pair Of Musical Hacks Use Sensor Arrays As Keyboards”

Making A Better, MIDI Controlled Leslie Stompbox

mint

Way back before the advent of commercial DSP, musicians had really cool looking gear. One of these devices to change the sound of organs, guitars, and other electronic instruments was a Leslie speaker – a speaker cabinet with rotating horns that gives that wonderful warm warble heard on so many classic recordings. [Nigel] doesn’t have an original Leslie, but he does have a much less expensive and lighter digital effect that emulates the original Leslie sound very well. The only problem, though, is the requirement for a proprietary footswitch. No problem, then, because a transistor, a resistor, and a mint tin can take care of that.

[Nigel]’s Leslie simulator – a Neo Instruments Ventilator – has a foot switch to control the speed of the emulated rotary speakers. There are three possible states for the speakers, fast, slow, and brake, all controlled with a TRS phono connector. Possibly in an attempt to price gouge consumers on a proprietary footswitch, Neo Instruments decided they would use the ring and tip of the phono connector to control the speed. They did so in a way that made it impossible for a single relay or switch to change the speed, however.

No problem for [Nigel], then, because with a very simple circuit consisting of just a transistor and resistor he can use any footswitch he wants with his Leslie simulator. The build doesn’t support the brake function, but he doesn’t use that anyway. Not bad for less than a dollar in parts, and a buck fifty in mint tins.

Turning An IPhone Into A Karaoke Machine

setup

Instead of booking an MC for your next karaoke party, take a look at [Paulo]’s build that turns any iPhone into a karaoke machine.

There are thousands of YouTube videos out there of songs with lyrics – a much more advanced version of the mainstay of any karaoke get together, suitcase full of CDs and a video monitor. The only problem in turning these YouTube videos into a karaoke party is putting a drunken slob into the mix. [Paulo] recently solved this problem with a karaoke mixer that adds a microphone input to any analog audio feed.

But this is only halfway to a karaoke machine. To finish the build, [Paulo] created an amplifier (with a fabulous Manhattan-style PCB) for an iPhone’s audio output. The video output can be sent directly to a monitor, allowing for the full karaoke experience.

Since [Paulo]’s karaoke mixer uses an XLR jack for the mic, it’s still possible to make karaoke worse by adding vocal and other miscellaneous effects.

Making Karaoke Worse

kaoss belt

Karaoke just isn’t fair. Not only do you have people who can’t sing choosing to belt out extremely difficult to sing songs, but the variety of songs generally isn’t that great. In an effort to make the karaoke situation at the pubs he frequents better – or worse, depending on how you look at it – [cosmic blooper] is now bringing a vocal effects processor to karaoke. Yes, now he’s got pitch shifting that takes him into [Bieber] territory, and auto tune to emulate the [T-Pain] and the Black Eyed Peas.

To bring the world of synths and effects to a karaoke party, [cosmic blooper] took a battery-powered Kaoss Pad and attached it to his belt with the help of some sheet metal. An RCA to XLR adapter connects the Kaoss Pad to the karaoke microphone, while a mic of questionable quality takes [blooper]’s voice to be transmuted into a horrifying display of effects and pitch shifters.

There’s no video of [cosmic blooper]’s karaoke machine in action, but he tells us he’ll be getting one up soon.