Pocket-Sized Workstation Sports Pi Zero, Pop-Up Screen

Many of us could use a general-purpose portable workstation, something small enough to pocket but still be ready for a quick troubleshooting session. Terminal apps on a smartphone will usually do the job fine, but they lack the panache of this pocketable pop-top Raspberry Pi workstation.

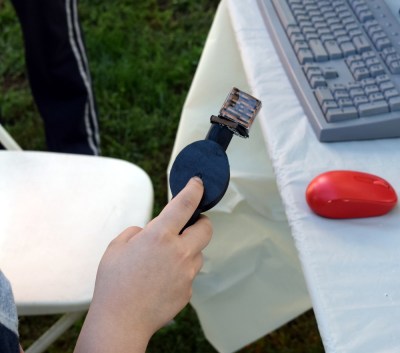
It doesn’t appear that [Michael Horne] has a specific mission in mind for his tiny Linux machine, but that’s OK — we respect art for art’s sake. The star of the show is the case itself, a unit intended for dashboard use with a mobile DVD player or backup camera. The screen is a 4.3″ TFT with a relatively low-resolution, so [Michael] wasn’t expecting too much from it. And he faced some challenges, like dealing with the different voltage needs for the display and the Raspberry Pi Zero W he intended to stuff into the base. Luckily, the display regulates the 12-volt supply internally to 3.3-volts, so he just tapped into the 3.3-volt pin on the Pi and powered everything from a USB charger. The display also has some smarts built in, blanking until composite video is applied, which caused a bit of confusion at first. A few case mods to bring connectors out, a wireless keyboard, and he had a nice little machine for whatever.

No interest in a GUI machine? Need a text-only serial terminal? We’ve seen that before too. And here’s one with a nice slide-out keyboard built in.

Continue reading “Pocket-Sized Workstation Sports Pi Zero, Pop-Up Screen”

Beautiful Pi-Powered Cocktail Machine

Science fiction has long had the idea that a good drink should just appear from a sliding panel in a wall. Bartending is to be the preserve of robots and AIs – manual control is for the past, and in an effort to continue our progress to towards that sci-fi future, Reddit user [HighwingZ] has built a beautiful machine that mixes and serves drinks.

Instead of a sliding wall panel, [HighwingZ] has built a hexagonal container. Five of the six sides contain bottles to fill the drink with, the last panel contains the spigot and a spot for the glass. The machine works by weighing the liquid that gets poured into the glass using a load cell connected to a HX711 load cell amplifier. An aquarium pump is used to push air into whichever bottle has been selected via some magnetic valves which forces the liquid up its tube and into the glass. A simple touch screen UI is used so the user can select which drink and how much of it gets poured. All of this is connected to a Raspberry Pi to control it all.

The whole thing is built into a great looking wooden showcase with see-through sides, so you can see the bottles to be used to make the drinks. [HighwingZ] put the Python code that controls everything on github for anyone wanting to make their own. There are a few cocktail making hacks on the site, like this one, or this one if you need some inspiration.

Continue reading “Beautiful Pi-Powered Cocktail Machine”

The Better RetroPie Handheld

The Raspberry Pi has become the best video game console on the planet. With RetroPi, anyone can play Super Mario 3, Doctor Mario, and even Doki Doki Panic. Adafruit’s PiGRRL Zero and [Wermy]’s reconfabulation of an old brick Game Boy to house a Raspi Zero and display have made the Raspberry Pi portable, along with all those retro games we love so dearly.

There’s a problem with these builds, though. They only use the Raspberry Pi Zero, and with that the limitations on emulation performance, and the Raspi 3 is far too big for a portable console. What’s the solution? It’s the greatest homebrew console ever created. For this year’s Hackaday Prize, [DeanChu] is building the Retro-CM3. It’s a retro handheld with a 3D printed enclosure, that’s powered by the Raspberry Pi Compute Module 3. Stand back, folks. We have a winner that will top the Raspberry Pi and 3D printing subreddits.

The key feature for this build is, of course, the raw processing power of the Raspberry Pi Compute Module 3. This is a Raspberry Pi 3 with 4 GB of eMMC stuffed onto a board that fits into an SODIMM socket. The pins on this device give you access to the GPIOs and the DSI connector. All you really need to turn this into an amazing vintage emulation console is a breakout board with a few buttons, power supply, and a display.

The extra components for this build include a 3.2 inch LCD using the DPI interface. There’s a speaker, and a 2000mAh battery. The real tricky part here is the custom PCB, breaking out the DPI pins on the Compute Module, adding a small speaker, and throwing a small STM32 to read the buttons. It’s an entire system, ready to be housed in a 3D printed enclosure.

This is, simply, the best Raspberry Pi portable you’ll ever see, at least until we get a Rasberry Pi Zero with the capabilities of the Pi 3. It’s an excellent use of the very small Compute Module, and one of the most polished Hackaday Prize entries we’ve seen thus far.

Circuit-Sword Delivers Retro Justice

You can’t search for “retro gaming” without hitting a plethora of single board computers attached to all manner of controls, batteries, etc. Often these projects have an emphasis on functionality above all else but [Kite]’s Circuit-Sword is different. The Circuit-Sword is the heart of a RaspberryPi-based retro gaming machine with an enviable level of fit and finish.

Fundamentally the Circuit-Sword is a single board computer built around a Raspberry Pi Compute Module 3. We don’t see many projects which use a Compute Module instead of the full Pi, but here it is a perfect choice allowing [Kite] to useful peripherals without carrying the baggage of those that don’t make sense for a portable handheld (we’re looking at you, Ethernet). The Circuit-Sword adds USB-C to quickly charge an onboard LiPo (rates up to 1.5A available) and the appropriate headers to connect a specific LCD. The Compute Module omits wireless connectivity so [Kite] added an SDIO WiFi/Bluetooth module. And if you look closely, you may notice an external ATMega mediating a familiar looking set of button and switches.

Optional Drill Holes

We think those buttons and switches are the most interesting thing going on here, because the whole board is designed to fit into an original GameBoy enclosure. It turns out replacement enclosures are available from China in surprising variety (try searching for “gameboy housing”) as are a variety of parts to facilitate the installation of different screen options and more. One layer deeper in the wiki there are instructions for case mods you may want to perform to make everything work optimally. The number of possible options the user can mod-in are wide. Extra X/Y buttons? Shoulder buttons on the back? Play Station Portable-style slide joysticks? All detailed. For even more examples, try searching the SudoMod forums. For example, here’s a very visual build log by user [DarrylUK].

The case mod instructions are worth a glance even if you have no intent to build a device. There are some clever techniques to facilitate careful alignment of buttons and accurate hole drilling. Predicting their buyers might want a variety of options, [Kite] added reference drill holes in the PCB for the builder to re-drill for mounting buttons or joysticks. To facilitate adding status LEDs externally there is a tiny PCB jig included. There are even instructions for adding a faux game cartridge for the complete look.

If you want to buy one (we certainly do!) [Kite] does group buys periodically. Check out the wiki for links to the right interest form.

Thanks [Speednut Dave] for the tip!

Filter Your Pi And Be A Responsible Pirate

At this point it’s pretty well-known that you can tack a long wire to the Raspberry Pi’s GPIO, install some software, and you’ve got yourself the worlds easiest pirate FM radio station. We say that it’s a “pirate” station because, despite being ridiculously easy to do, broadcasting on these frequencies without a license is illegal. Even if you had a license, the Raspberry Pi with a dangling bit of wire will be spewing out all kinds of unintentional noise, making it a no-go for any legitimate purposes.

Unfiltered output of Pi broadcasting on 107.3 MHz

In an effort to address that issue, [Naich] has written up a couple posts on his blog which not only discuss why the Pi is such a poor transmitter, but shows how you can build a filter to help improve the situation. You’ll still be a lawless pirate if you’re transmitting on FM stations with your Pi, but you won’t be a filthy lawless pirate.

In the first post, [Naich] shows us exactly what’s coming out of the wire antenna when the Pi is broadcasting some tunes on the default 107.3 MHz, and it ain’t pretty. The Pi is blasting out signals up and down the spectrum from 50 MHz to 800 MHz, and incredibly, these harmonics are in some cases stronger than the intentional broadcast. Definitely not an ideal transmitter.

[Naich] then goes on to show how you can build a DIY filter “hat” for the Pi that not only cuts down a lot of the undesirable chatter, but even boosts the intended signal a bit. The design is surprisingly simple, only costs a few bucks in components, and conveniently is powered directly from the Pi’s GPIO. It even gives you a proper antenna jack instead of a bare wire wound around a header pin.

We’ve seen plenty of projects utilizing the Raspberry Pi FM transmission hack, and while this mod still doesn’t make it perfect, it’s always nice to see an awesome hack made even better.

It Looks Like A Nintendo, But It’s Running A Pi: A Gamer’s Long-Sought Dream Handheld

[Christopher Foote] didn’t play quite as many games as he wanted to as a child. After years of catching up using the RetroPie and the PiGRRL 2, it was when he first picked up a Switch’s joy-cons that inspiration struck. Behold: the PiSwitch!

Realizing they operated on Bluetooth tech, [Foote] spent a fair chunk of time getting the joy-cons to properly pair to the Raspberry Pi 3 and function as one controller. Once done, he relied on Linux Joystick Mapper to manage the keybindings with some extra legwork besides to get the analog sticks working properly.

To make this console mobile, he’s packed a 6600mAh battery and Adafruit Powerboost 1000c into the device, added a second headphone jack and speaker for commuting and home enjoyment, and a Pi V2 camera module. A 3D printed case, encapsulating these components and a seven-inch touchscreen, also allows the joy-cons to be detached — though he plans on updating its design in the future.

The PiSwitch boots into a custom UI  that lets you select different services — RetroPie, Kodi, Debian, and the terminal — while the joy-cons seamlessly function together or individually regardless of the activity. Check out the quick intro tour for this project after the break!

Continue reading “It Looks Like A Nintendo, But It’s Running A Pi: A Gamer’s Long-Sought Dream Handheld”

Iron Man Mask With A HUD!

At some point, a child will inevitably dream of being a superhero. Not all children get the chance to see that dream made manifest, but a few take that destiny into their own hands. Redditor [Lord_of_Bone] — seizing at that goal — has built himself an Iron Man mask with an integrated HUD!

Relying on a conceptually similar project he’d previously built, much of the code was rehashed for this ‘Mark II’ version. Pieces of a smartphone holo pyramid act as projection surfaces — using a lens to focus the image to be viewed at such close distances — and a pair of OLED screens displaying the information. It’s a happy bonus that the lack of backlight results in only the text showing in the user’s field of view.

Instead of speaking with J.A.R.V.I.S., [Lord_of_Bone] is using a Raspberry Pi Zero W as the mask’s brain. Working past some I2C troubles between the OLED screens and an Enviro pHat required a whipped-up veroboard and a bit of hardware hacking. Cramming everything into the mask was no easy task — using Blutack and Sugru to bind them in the limited space — but the pHat had to be surface-mounted in the open anyways for atmospheric and light data.

Continue reading “Iron Man Mask With A HUD!”