Raspberry Pi As A Spotify Server With MPD Control

The Raspberry Pi has been very popular as a streaming music player. Sure, the only audio out option on the board is an analog stereo jack, but you can use a USB audio device to improve upon that if you wish. [Wouter van Wijk] wanted to use his RPi as a Spotify server. It’s a bit tricky to get everything configured for this, so he decided to give back by publishing a ready to use Spotify server image for the Raspberry Pi.

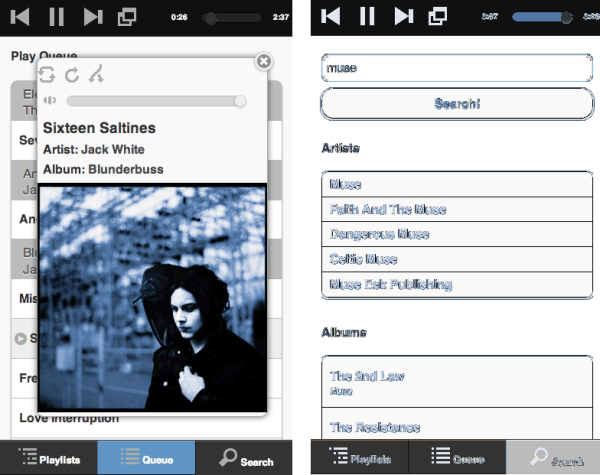
The project is call the Pi MusicBox. Like some of the RPi Pandora setups we’ve seen he included the ability to use the hardware as an AirPlay device too. To connect to the Spotify service he uses the Mopidy package. It can also play tracks from local storage (including the home network). It’s even capable of mixing the two sources in the same queue. Possibly the best part is that it can be controlled with any Music Player Daemon (MPD) client like the smart phone screenshots seen above.

If you’re interested, check out his GitHub repo for the project.

Minimalist User Interface For Headless Raspberry Pi Applications

minimial-ui-for-headless-rpi

[Jason Birch] just finished building a beautifully simple user interface for the Raspberry Pi. The goal was to keep it small and intuitive while still providing a range of functionality. His add-on hardware gives feedback using several LEDs and a four-line character LCD screen. It provides control using just four momentary press switches.

The base for the add-on hardware is a chunk of protoboard the same size as the Pi itself. This is just slightly wider than the LCD screen, leaving room along the top for the row of buttons with different colors of LEDs in between them. Look closely in that nest of point-to-point wiring and you’ll find the dual pin-socket which mates with the RPi GPIO header. One important note from [Jason] mentions that the LCD screen R/W pin must be tied to ground. This keeps it from going into read mode, which would push 5V over the I/O pins, potentially damaging the 3.3V tolerant header on the RPi.

Throw in a battery and that pretty much covers the hardware. To see how he’s using it you’ll want to view the video clip after the break.

Continue reading “Minimalist User Interface For Headless Raspberry Pi Applications”

Wiimote Controlled RPi Robot

Wiimote RPi Robot

[Brian] has brought together a powerful collection of hardware to build a robot. The end goal is to have a robot that’s controlled by a Wiimote.

The Wiimote communicates over Bluetooth with a Raspberry Pi, which is running a Python script. This script uses the CWiid Python module to communicate with the controller, and [Brian] has detailed instructions on getting the Wiimote working with a RPi. The RPi controls an ATmega based development board over SPI, which drives an h-bridge to control the two DC motors that move the robot.

[Brian]’s code for this could be helpful for anyone looking to control their RPi with a Wiimote. Since Wiimotes and Bluetooth dongles are fairly cheap nowadays, this is a great way to drop in wireless control to any RPi project, or even to control your media center from the couch.

After the break, check out a video of the build in action

Continue reading “Wiimote Controlled RPi Robot”

Dynamic Bicycle Headlight Uses The Open Road As A Display

This thing is so cool it almost looks fake. But [Matt Richardson] isn’t a hoaxster. He actually built what might be called a heads-down display for your bicycle. He refers to it as a headlight because it borrows a similar function. It mounts on the handlebars and shoots light off the front of the bike. But it’s more than just a battery and a bulb, this uses a pico-projector to give that light some meaning. In the video after the break he shows it off on the streets of NYC.

So far he’s only displaying information that has to do with the speed of travel, but the proof is there just waiting for a brilliant new use. Feeding the projector is a Raspberry Pi board. For this prototype [Matt] mounted it, along with the portable cellphone charger which plays the role of the power source, on a hunk of hardboard strapped inside the bike frame.

If you’re thinking of doing this one yourself beware of the BOM price tag. That projector he’s using runs upwards of $400. We wonder if you could hack together a rudimentary replacement with an old cellphone screen and this diy film projector?

Continue reading “Dynamic Bicycle Headlight Uses The Open Road As A Display”

Audiobook Player Used Only NFC Tags For Control

no-button-nfc-audiobook-reader

[Martynas Mickevičius] has a Grandmother who is visually impaired. She enjoys listening to audiobooks and has been doing so using a DVD player for quite some time. The problem is that there is no way for her to save her position in between listening session. He set out to help by building a dedicated audiobook reader that doesn’t have any buttons.

The project was inspired by a one-button reader we featured back in November. Like that project, [Martynas] chose to use the inexpensive, yet powerful Raspberry Pi. The main difference comes in the control method. He’s using an NFC tag reader, which is mounted in the top portion of the RPi case. The image above shows the rig during prototyping, but his final version is all bundled up in the pink enclosure and only needs the power and audio cables connected to it. See for yourself in the demo after the jump.

Each book has its own NFC tag. When she’s done reading she can simply cut the power and it will resume in the same place the next time it is plugged in. The tag setup is a vast improvement since it allows an entire library to be stored on the SD card and chosen using a different tag. With this hardware in place it should be trivial to code extensions to the system, like a script that uses text-to-speech to announce which book is being played before playback starts.

Continue reading “Audiobook Player Used Only NFC Tags For Control”

Using OpenCV With The Raspberry Pi

When we first heard of the Raspberry Pi we were elated that projects that once required a full-blown computer could now be done on a tiny, and cheap board running Linux. Unfortunately, we haven’t seen much in the way of using computer vision algorithms on the Raspi, but thanks to [Lentin] the world of OpenCV is now accessable to Raspberry Pi users everywhere.

[Lentin] didn’t feel like installing OpenCV from its source, a process that takes the better part of a day. Instead, he installed it using the synaptic package manager. After connecting a webcam, [Lentin] ssh’d into his Raspi and installed a face detection example script that comes with OpenCV.

It should be noted that [Lentin]’s install of OpenCV isn’t exactly fast, but for a lot of projects being able to update a face tracker five times a second is more than enough. Once the Raspberry Pi camera module is released the speed of face detection on a Raspi should increase dramatically, though, leading to even more useful computer vision builds with the Raspberry Pi.

Building A Touchscreen XBMC Setup With The Raspberry Pi

rapsberry-pi-based-touchscreen-xbmc-tablet

[Andrei Istodorescu] has been hard at work building a 7″ touch-screen rig which runs XBMC. It may be upside-down, but the Raspberry Pi board which is front and center is still easily recognizable. There’s a lot of stuff connected to it in order to pull this off, and even more software configuration. But as you can see in the clip after the break he did get it working!

The screen is an eGalaxy 7″ touch sensitive module he picked up on eBay. It sounds like it was meant for a backup camera in the dashboard of a car. He compiled his own Linux kernel to add support for the screen. It uses HDMI for the video interface with the driver board, and the touchscreen connects to one of the USB ports. The rest of the setup involves compiling XBMC with touchscreen support and calibrating the screen to accurately sense input.

Continue reading “Building A Touchscreen XBMC Setup With The Raspberry Pi”