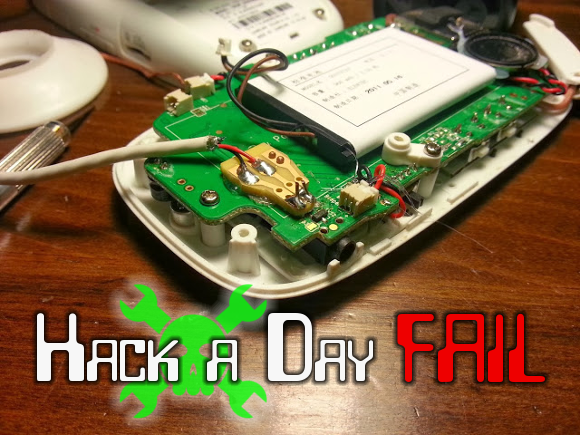
CD/DVD Polisher May Save Your Backups Someday

CD and DVD payers can often keep the music or movie going despite a small scratch. But occasionally you’ll have to skip to the next chapter/track or the player will just give up. But with data back-ups, a scratch can bork a whole set of files. We think that most of the time these headaches can be cured with this simple polisher.

[Wotboa’s] thrift store finds yielded almost all of the components needed to build the device. It’s made up of a couple of motors and a jig. One motor slowly rotates the upturned optical disc while the other spins the polishing pad. That pad is made from felt weather-stripping and is helped along with some plastic polishing compound. [Wotboa] asserts that five minutes in the noisy contraption will work wonders on any disc. You can get an idea of what it’s capable of by watching the video clip after the break.

Continue reading “CD/DVD Polisher May Save Your Backups Someday”

Repairing A Thermal Imaging Camera

[Mike] got his hands on this thermal imaging camera which is designed for use by Firefighters. As he’s demonstrating in the image above, it clips to a helmet and has a display what will let rescuers see through heavy smoke. But this one isn’t working right so he cracked it open and repaired the damaged board.

The hour-long video (embedded after the break) is quite interesting. He starts with a disassembly of the unit, before diving head-first into trouble shooting. There is a PCB inside that fills the entire U-shaped enclosure. The thermal sensor’s habit of cutting out seems to be a symptom of this design. There is one weak point where the board is very narrow. Flexing or vibrating that section will reset the sensor, and [Mike] ends up replacing a couple of components before the thing is fixed. These include a resistor and a ferrite bead both of which are suspected of having cracks due to that board flexing. The rest of the video is spent with an EEVblog-style look that the components and the construction.

Continue reading “Repairing A Thermal Imaging Camera”

Hacking Together Two Shop Vacuums

Unfortunately the result of hacking together two shop vacuums isn’t a double-power monstrosity. This is actually the story of combining broken and substandard parts into one usable machine. The guys at the Shackspace originally bought a cheap shop vacuum whose motor gave up the ghost way too quickly. The replacement had only a tiny container for rubbish. So they did what any group of hackerspace members would and combined the two.

Since they wanted to use the voluminous enclosure from the broken vacuum the first order of business was to remove the dead motor assembly. Quick work was made of this by melting away the plastic using an old soldering iron. The motor assembly from the small machine was then mounted in place with screws, and sealed with caulk. It was now working, thanks to salvaged hoses and attachments from other long-lost vacuums.

But a boring hack this might have been if they stopped there. The team added a wall outlet to the top, and adorned the beast with RGB LEDs which are powered from a wall wart (hence the added wall outlet). It can double as a mood light when not in use.

[Thanks Momo]

Rebuilding A Fried Fan Motor

The fan motor on [Pete’s] oscillating tower fan conked out on him. It’s a shame to throw away the whole thing, but it’s near impossible to source parts for a small appliance like this one. So he set out to rebuilt the motor and get the thing working like new.

The motor in question is of the brushless AC variety. [Pete’s] gut told him that the failure was due to bad lubrication of the bearings at the factory. It stopped working because the commutator could no longer rotate freely. A check of the continuity of each of the coils led him to this thermal fuse. When the motor seized the AC current built up a lot of heat. This fuse is made to burn out before a fire can start but now it needs to be replaced. With a new one in place he reassembled the motor, making sure to pack the bearings with some quality lubricant. Now he’s once again ready for a long hot summer.

Simple Trick For Replacing Game Boy Cart Batteries While Retaining Game Saves

[Adr990] wants to make sure his Game Boy game saves aren’t lost to aging batteries. They’re stored in SRAM with a small coin cell inside the cartridge to keep the memory energized when the game is not being played. But if you pull out the battery in order to replace it the data will be lost in the process. It turns out that you can hot-swap the battery without too much effort. As shown in the video after the break, he disassembled the case of the cartridge, then replaced the battery while the Game Boy is switched on. The edge connector feeds power which will keep the SRAM active while the backup battery is removed. We’re sure this could be done with a bench supply as well, but you’ll need to do your own testing before risking those prized game saves.

The other option is to backup your SRAM before replacing the batteries. We’ve seen an AVR-based cartridge dumper, and also one that uses an Arduino. Both should be able to read and write SRAM data. Continue reading “Simple Trick For Replacing Game Boy Cart Batteries While Retaining Game Saves”

Separating A Working Scanner From Its Broken Printer

The laser printer portion of this all-in-one machine gave up the ghost and [Entropia] couldn’t get it working again. But the scanner was still functioning so he decided to separate the scanner from its dead printer module.

The model in question is a Samsung SCX-4200. The design is actually perfect for separation because the scanner sits on top of the out feed tray of the printer. It can even be lifted to allow more room for printed pages to pile up. All he has to do is separate the hinged connector and reroute the flat cables. But the real question in [Entropia’s] mind was whether or not the control board would work without the laser printer components connected to it.

He carefully disassembled the unit, spilling toner here and there which is left over from a catastrophic knock-off toner cartridge incident. A quick test showed him that although the drivers complain that the paper tray is open, the scanner does still work. He glued the controller board seen on the left to the bottom of the scanner enclosure, and added some felt feet. Now his scanner is closer to the size you’d expect. And on the plus side he gained a geared stepper motor, laser scanning unit, exhaust fan, and a couple of solenoids to use in future projects.

Resurrecting A Cellphone With Blown USB Circuitry

[Script] is pretty lucky. One of the engineers who designed his cellphone included over-voltage protection in the circuit. Of course you probably wouldn’t know about this if there wasn’t a service schematic available. But a bit of searching around let him resurrect the fried USB segment of his Nokia N900.

Now [Script] has been experimenting with portable solar power like the system featured at 25C3 a few years back. Unfortunately he made an error which routed 12V into the USB connector’s 5V rail. After this unfortunate mistake the phone would not longer connect via USB, or charge the battery. Luickly the N900 is a favorite with the hacker community (you can see all kinds of N900 related projects here at Hackaday) and [Script] found his way to their N900 Schematic page. Digging into page four he found part F5300 which is labeled 2.0A. He removed the PCB and shielding, and tested the part with a multimeter to confirm it was blown. A quick wire bridge got the phone charging again, but [Script] plans to position a new fuse as soon as he can source the part.

Who says these devices aren’t user serviceable? If we could just get our hands on more service schematics perhaps our gear would last longer.