LayerOne, the first level of security. [Brian Benchoff] and I are excited to take part in our first LayerOne conference this Saturday and Sunday in Monrovia California.
Anyone in the Los Angeles area this weekend needs to get out of whatever they have planned and try out this conference that has a soul. Get the idea of a mega-con out of your head and envision a concord of highly skilled and fascinating hackers gathering to talk all things computer security. Speakers will cover topics like researching 0day exploits, copying keys from pictures taken in public, ddos attacks, social engineering, and more.
It’s not just talks, there is a ton of hands-on at LayerOne as well. I plan to finally try my hand at lock picking. Yep, I’ve covered it multiple times and we’ve even had a session led by [Datagram] at the Hackaday 10th Anniversary but I’ve never found time to give it a roll. Of course electronics are my game and [Brian] and I will both be spending a fair amount of time in the hardware hacking village. We’ll have a bunch of dev boards along with us if you want to try out an architecture with which you’re unfamiliar. This year’s LayerOne badges are sponsored by Supplyframe; we’ll have something in store for the best badge hacks we see during the weekend.
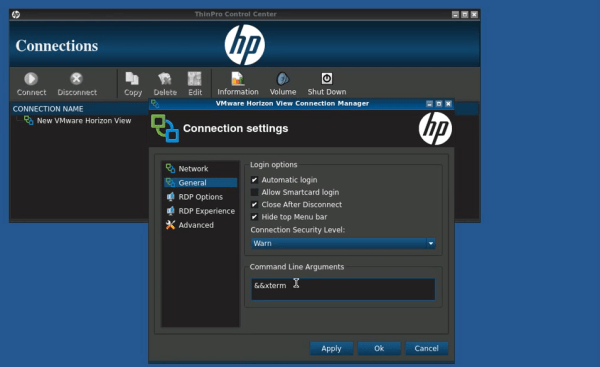
[Roberto] recently discovered a clever way to gain root access to an HP t520 thin client computer. These computers run HP’s ThinPro operating system. The OS is based on Linux and is basically just a lightweight system designed to boot into a virtual desktop image loaded from a server. [Roberto’s] discovery works on systems that are running in “kiosk mode”.
The setup for the attack is incredibly simple. The attacker first stops the virtual desktop image from loading. Then, the connection settings are edited. The host field is filled with garbage, which will prevent the connection from actually working properly. The real trick is in the “command line arguments” field. The attacker simply needs to add the argument “&& xterm”. When the connection is launched, it will first fail and then launch the xterm program. This gives the attacker a command shell running under the context of whichever user the original software is running as.
The next step is to escalate privileges to root. [Roberto] discovered a special command that the default user can run as root using sudo. The “”hpobl” command launches the HP Easy Setup Wizard. Once the wizard is opened, the attacker clicks on the “Thank You” link, which will then load up the HP website in a version of Firefox. The final step is to edit Firefox’s default email program association to xterm. Now when the attacker visits an address like “mailto:test@test.com”, Firefox (running as root) launches xterm with full root privileges. These types of attacks are nothing new, but it’s interesting to see that they still persist even in newer software.
[Josip] has been playing around with race conditions on web interfaces lately, finding vulnerabilities on both Facebook and Digital Ocean. A race condition can occur when a piece of software processes multiple threads using a shared resource.
For example, [Josip] discovered that he was able to manipulate page reviews using just a single Facebook account. Normally, a user is permitted to leave just one review for any given Facebook page. This prevents a single user from being able to skew the page’s overall ranking by making a bunch of positive or negative reviews. The trick to manipulating the system was to intercept the HTTP request that submitted the page review. The request was then replayed over and over in a very short amount of time.
Facebook’s servers ended up processing some of these requests simultaneously, essentially unaware that multiple requests had come in so close together. The result was that multiple reviews were submitted, artificially changing the pages overall ranking even though only one review actually showed up on the page for this user. The user can then delete their single review, and repeat this cycle over and over. It took Facebook approximately two months to fix this vulnerability, but in the end it was fixed and [Josip] received a nice bounty.
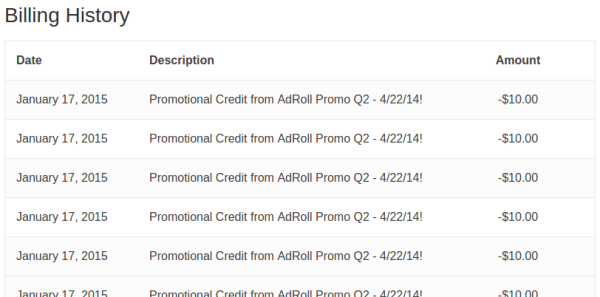
The Digital Ocean hack was essentially the exact same process. This time instead of hacking page reviews, [Josip] went after some free money. He found that he was able to submit the same promotional code multiple times, resulting in a hefty discount at checkout time. Digital Ocean wasted no time fixing this bug, repairing it within just ten days of the disclosure.
Small Office and Home Office (SOHO) wireless routers have terrible security. That’s nothing new. But it is somewhat sad that manufacturers just keep repurposing the same broken firmware. Case in point: D-Link’s new DIR-890L, which looks like a turtled hexapod. [Craig] looked behind the odd case and grabbed the latest firmware for this device from D-Link’s website. Then he found a serious vulnerability.
The usual process was applied to the firmware image. Extract it, run binwalk to find the various contents of the firmware image, and then extract the root filesystem. This contains all the code that runs the router’s various services.
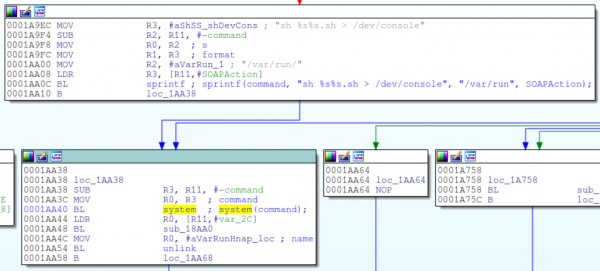
The CGI scripts are an obvious place to poke for issues. [Colin] disassembled the single executable that handles all CGI requests and started looking at the code that handles Home Network Administration Protocol (HNAP) requests. The first find was that system commands were being built using HNAP data. The data wasn’t being sanitized, so all that was needed was a way to bypass authentication.
This is where D-Link made a major error. They wanted to allow one specific URL to not require authentication. Seems simple, compare string A to string B and ensure they match. But they used the strstr function. This will return true if string A contains string B. Oops.
So authentication can be bypassed, telnetd can be started, and voila: a root shell on D-Link’s most pyramid-shaped router. Oh, and you can’t disable HNAP. May we suggest OpenWrt or dd-wrt?
[Ronnie] recently posted a new chapter in his adventures in malware deconstruction. This time the culprit was an infected Excel spreadsheet file. The .xls file was attached to a phishing email claiming to be related to a tax rebate. With tax season in full swing, this type of phishing message would be likely to be opened by an inexperienced user.
[Ronnie] saved the file to a virtual machine to prevent his real workstation from getting infected. He then opened it up in Excel and noticed that it immediately attempted to run macros. A macro is essentially visual basic scripting that runs inside of the spreadsheet file. You can use it for simple automation, cell formatting, or do even more complicated tasks like reach out to external websites and pull information. This malware focused on the latter.
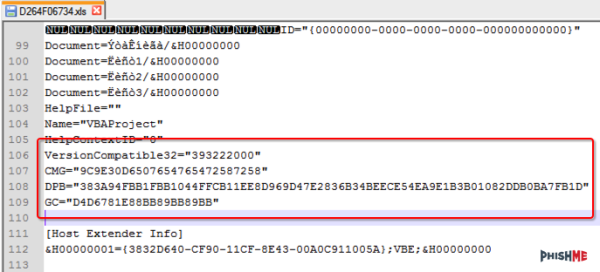
[Ronnie] used the alt + F11 shortcut to view the macros. Unfortunately the attackers had password protected them. [Ronnie] wouldn’t be able to view the macro code without knowing the password. Luckily, he learned of a surprisingly simple trick to completely bypass the macro password. He opened up the .xls file in Notepad++ and located three keys; CMG, DPB, and G. [Ronnie] then created and saved a new blank .xls document and password protected the macros with his own password. He opened up this new file in Notepad++ as well, and located those same three keys. He copied the keys from the new file into the old one, and saved the old file. This effectively changed the password of the malware file to the new one he had set for his new file. This is a nifty trick that apparently only works on the older .xls formats, not the newer .xlsx format.
After loading the macros, [Ronnie] quickly noticed that most of the code was obfuscated to make it difficult to analyze. There were, however, three named modules that reference possible sandbox evasion techniques. The malware first invokes these functions to detect the presence of a virtual machine or other type of sandbox. If it detects nothing, then the rest of the malware program is decoded and executed. [Ronnie] removed these checks and then executed the macro to verify that his change had worked.
The next step was to try to view the decoded instructions. The decoded gibberish was saved to a variable. The simplest way for [Ronnie] to view the contents of the variable was to have the program create a pop-up box that displayed the contents of that variable. After making this change and running the program again, he was able to see exactly what the malware was doing. The code actually invoked Powershell, downloaded a file from the Internet, and then extracted and executed that file. In the full write-up, [Ronnie] goes even further by downloading and analyzing the executable.
[Laxman] is back again with another hack related to Facebook photos. This hack revolves around the Facebook mobile application’s “sync photos” function. This feature automatically uploads every photo taken on your mobile device to your Facebook account. These photos are automatically marked as private so that only the user can see them. The user would have to manually update the privacy settings on each photo later in order to make them available to friends or the public.
[Laxman] wanted to put these privacy restrictions to the test, so he started poking around the Facebook mobile application. He found that the Facebook app would make an HTTP GET request to a specific URL in order to retrieve the synced photos. This request was performed using a top-level access token. The Facebook server checked this token before sending down the private images. It sounds secure, but [Laxman] found a fatal flaw.
The Facebook server only checked the owner of the token. It did not bother to check which Facebook application was making the request. As long as the app had the “user_photos” permission, it was able to pull down the private photos. This permission is required by many applications as it allows the apps to access the user’s public photos. This vulnerability could have allowed an attacker access to the victim’s private photos by building a malicious application and then tricking victims into installing the app.
At least, that could have been the case if Facebook wasn’t so good about fixing their vulnerabilities. [Laxman] disclosed his finding to Facebook. They had patched the vulnerability less than an hour after acknowledging the disclosure. They also found this vulnerability severe enough to warrant a $10,000 bounty payout to [Laxman]. This is in addition to the $12,500 [Laxman] received last month for a different Facebook photo-related vulnerability.
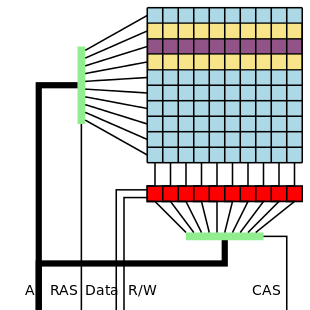
The technique is deceptively simple. Dynamic RAM is organized into a matrix of rows and columns. By performing fast reads on addresses in the same row, bits in adjacent rows can be flipped. In the example image to the left, fast reads on the purple row can cause bit flips in either of the yellow rows. The Project Zero team discovered an even more aggressive technique they call “double-sided hammering”. In this case, fast reads are performed on both yellow rows. The team found that double-sided hammering can cause more than 25 bits to flip in a single row on a particularly vulnerable computer.
Why does this happen? The answer lies within the internal structure of DRAM, and a bit of semiconductor physics. A DRAM memory bit is essentially a transistor and a capacitor. Data is stored by charging up the capacitor, which immediately begins to leak. DRAM must be refreshed before all the charge leaks away. Typically this refresh happens every 64ms. Higher density RAM chips have forced these capacitors to be closer together than ever before. So close in fact, that they can interact. Repeated reads of one row will cause the capacitors in adjacent rows to leak charge faster than normal. If enough charge leaks away before a refresh, the bit stored by that capacitor will flip.
Cache is not the answer
If you’re thinking that memory subsystems shouldn’t work this way due to cache, you’re right. Under normal circumstances, repeated data reads would be stored in the processor’s data cache and never touch RAM. Cache can be flushed though, which is exactly what the Project Zero team is doing. The X86 CLFLUSH opcode ensures that each read will go out to physical RAM.
Wanton bit flipping is all fine and good, but the Project Zero team’s goal was to use the technique as an exploit. To pull that off, they had to figure out which bits they were flipping, and flip them in such a way as to give elevated access to a user level process. The Project Zero team eventually came up with two working exploits. One works to escape Google’s Native Client (NaCL) sandbox. The other exploit works as a userspace program on x86-64 Linux boxes.
Native Client sandbox escape exploit
Google defines Native Client (NaCL) as ” a sandbox for running compiled C and C++ code in the browser efficiently and securely, independent of the user’s operating system.” It was designed specifically as a way to run code in the browser, without the risk of it escaping to the host system. Let that sink in for a moment. Now consider the fact that rowhammer is able to escape the walled garden and access physical memory. The exploit works by allocating 250MB of memory, and rowhammering on random addresses, and checking for bit flips. Once bit flips are detected, the real fun starts. The exploit hides unsafe instructions inside immediate arguments of “safe” institutions. In an example from the paper:
Viewed from memory address 0x20EA0, this is an absolute move of a 64 bit value to register rax. However, if we move off alignment and read the instruction from address 0x20EA02, now it’s a SYSCALL – (0F 05). The NaCL escape exploit does exactly this, running shell commands which were hidden inside instructions that appeared to be safe.
Linux kernel privilege escalation exploit
The Project Zero team used rowhammer to give a Linux process access to all of physical memory. The process is more complex than the NaCL exploit, but the basic idea revolves around page table entries (PTE). Since the underlying structure of Linux’s page table is well known, rowhammer can be used to modify the bits which are used to translate virtual to physical addresses. By carefully controlling which bits are flipped, the attacking process can relocate its own pages anywhere in RAM. The team used this technique to redirect /bin/ping to their own shell code. Since Ping normally runs with superuser privileges, the shell code can do anything it wants.
The TL;DR
Rowhammer is a nasty vulnerability, but the sky isn’t falling just yet. Google has already patched NaCL by removing access to the CLFLUSH opcode, so NaCL is safe from any currently known rowhammer attacks. Project Zero didn’t run an exhaustive test to find out which computer and RAM manufacturers are vulnerable to rowhammer. In fact, they were only able to flip bits on laptops. The desktop machines they tried used ECC RAM, which may have corrected the bit flips as they happened. ECC RAM will help, but doesn’t guarantee protection from rowhammer – especially when multiple bit flips occur. The best protection is a new machine – New RAM technologies include mitigation techniques. The LPDDR4 standard includes “Targeted Row Refresh” (TRR) and “Maximum Activate Count” (MAC), both methods to avoid rowhammer vulnerability. That’s a good excuse to buy a new laptop if we ever heard one!