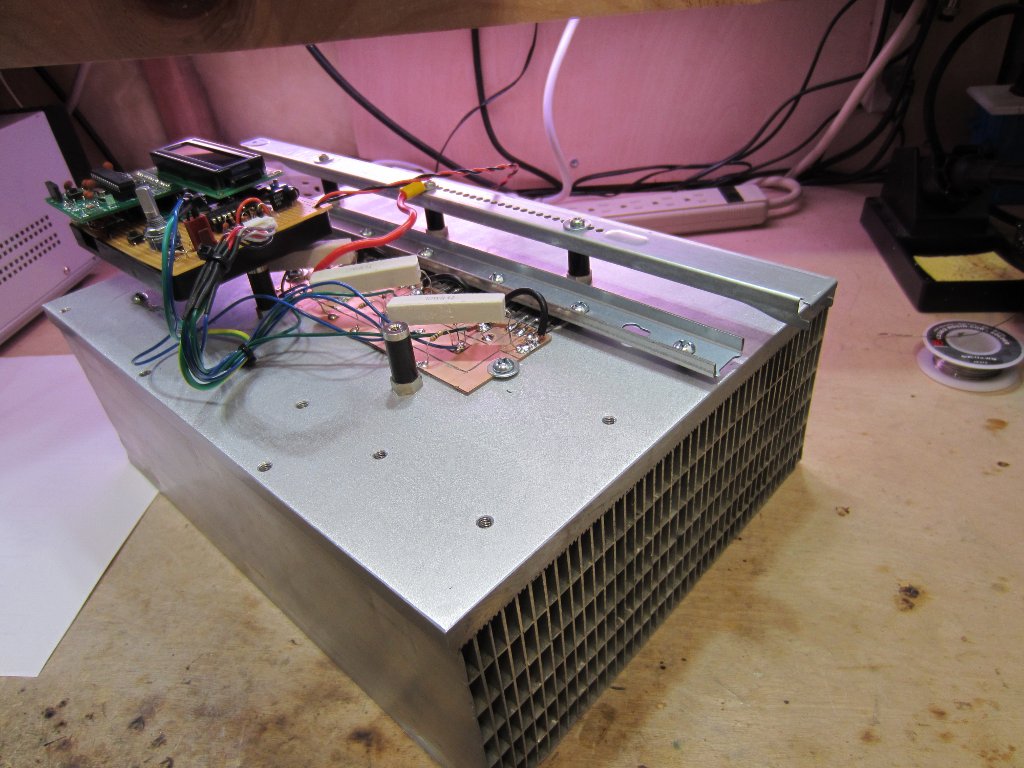
PCBs With Powder Coat

pcb

The toner transfer method of PCB production should be a staple in every maker’s bag of tricks. That being said, it’s a far from ideal solution with a lot of things that can go wrong, ruining hours of work. [Ryan] thinks he has a better solution up his sleeve, still using heat activated toner, but replacing the laser printer with a powder coating gun and a laser engraver.

[Ryan] is using a powder coating gun he picked up from Amazon for about $100. The theory behind it is simple: particles of toner coming out of the gun are statically charged, and bonded to the grounded copper clad board. In real powder coat shops, this coating is baked, resulting in a perfectly hard, mirror-like finish. [Ryan] skipped the baking step and instead through the powder coated board into a laser engraver where the PCB design is melted onto the copper. After that, wash the board off, etch it, and Bob’s your uncle.

What’s really interesting about this method of PCB production is that it doesn’t require a very high power laser. [Ryan] was actually having a problem with the toner burning with his laser engraver, so it might be possible to fab PCBs with a high power handheld laser, or even a Blu Ray laser diode.

Propane Forge Built From A Soup Can

propane-forge-from-soup-can

It doesn’t look like much, but this easy to build propane forge is just what you need to try your hand at blacksmithing. [Code Cowboy] took on the build after watching this how-to video which shows the fabrication of a small knife after completing the forge build.

The first step is to eat all of the soup (or beans if you prefer). With an empty can in hand the stand — made of two angle brackets — and inlet are attached. Next comes the heat proofing for the walls of the forge. At first glance we thought that cat litter was one of the ingredients, but that’s just an empty container used to haul playground sand. The sand is mixed with equal parts of plaster of paris before adding water to achieve a clay-like consistency. This is packed into the can, with a small opening to receive the metal to be heated.

The torch itself can be used to cure the heat shield. After letting the mixture harden a 30 minute burn will force the rest of the water out of the heat proofing.

Continue reading “Propane Forge Built From A Soup Can”

Make Your Own Fume-extracting Glove Box

diy-clean-box

Here’s an easy to follow guide for building your own glove box. It’s a lab tool that contains the project you’re working on to keep things in or out. For instance, we could have used this a few years back when we tried to add an acrylic window to a hard drive. Instead, we ended up putting several hours of work into a cool-looking paperweight. But it will also come in handy for chemistry experiments that generate harmful or dangerous byproducts.

The picture above tells most of the story, but [Jason Poel Smith] does include several good tips about the construction in his video. He uses weather stripping along the edges of the clear container to ensure a seal. The hose is used to provide negative pressure so that no fumes leak out. We figure adding a smaller hole on the opposite side with a charcoal filter will help air pass into the chamber to serve as a fume extractor.

We’ve already seen a similar setup for a reflow oven. Perhaps this is the perfect solution to protect yourself from 3D printing fumes. We’re sure you saw the headlines about 3D printing being as bad as smoking cigarettes.

Continue reading “Make Your Own Fume-extracting Glove Box”

Geometry Class Just Got Augmented

ruler

Just about every engineer needs to take a drawing class, but until now we surprisingly haven’t seen electronics thrown into rulers, t-squares, and lead holders. [Anirudh] decided to change that with Glassified. It’s a transparent display embedded in a ruler that is able to capture hand drawn lines. These physical lines can be interacted with or measured, turning a ruler into a bridge between a paper drawing and a digital environment.

For the display, [Anirudh] mounted a transparent TOLED display with a digitizer input into a ruler. The digitizer captures the pen strokes underneath the ruler, and is able to interact with the physical lines, either to calculate the length and angle of lines, or just to bounce a digital ball inside a hand-drawn polygon.

There’s no word on how this display is being driven, or what kind of code is running on it. [Anirudh] said he will have some schematics and code available up on his website soon (it’s a 404 right now).

A Keygen For The Rigol 2000-series Scopes

A few weeks ago it came to our attention that Rigol’s DS2000-series oscilloscopes were easily unlocked with a few USB commands. We had expected a small microcontroller device would be developed to send these bits to a scope automatically, and we never imagined the final version of this tool hack would be so elegant. Now it’s possible to unlock a DS2072 o’scope using just a serial number and a great encryption hack.

The engineers over a Rigol (bless their hearts) used the same hardware for the $800, 70MHz DS2072 and the $1600, 200MHz DS2202. The only difference between the two are a few bits in the scope’s memory that are easily unlocked if you have the right key. A few folks over on the EEV Blog forum figured out the private key for the scope’s encryption and the user [cybernet] wrote a keygen.

The upgrade process is extremely simple: get the serial number of your DS2072, put it in the keygen, and enter the resulting key into the scope. Reboot, and you have a $1600 scope you bought for half price.

Thermocouple Vacuum Gauge Teardown

We don’t know how [Ben Krasnow] gets his hands on so much cool hardware. This time around is a bit of vintage tech: a thermocouple vacuum gauge.

The part seen above, and represented in the schematic, is the sensor side of things. This is interesting enough by itself. It has an air chamber with an electric heater element in it. When air is present it dissipates the heat, when under vacuum the heat builds and causes the thermocouple to generate some voltage on its connections.

Keep watching his presentation and things get a lot more interesting. The original unit used to measure the sensor is a throwback to the days when everything had sharp corners and if you were running with scissors you’d eventually teach yourself why that’s not such a good idea. The designers were rather cavalier with the presence of mains voltage, as it is barely separated from connections grounding the case itself.

Want to see some of the other cool equipment he’s got on hand? How about a CT scanner he built.

Continue reading “Thermocouple Vacuum Gauge Teardown”

Resistance Decade Box Using DIP Switches

resistance-decade-box

Here’s a simple piece of equipment which you’ll be proud to display on your electronics bench. It’s a resistance decade box. The concept has been around forever — it offers the ability to tune a wide range of resistance values just by adjusting the controls. We especially like the clean look of this one, and think the use of DIP switches is a nice touch.

Check out the toggle switch at the top. It lets you disconnect the resistance values from the output in order to test them with your meter. It may not seem like much, but fudging your switch settings could end up smoking your target project. The value of that feature isn’t lost on us.

The DIP switches are mounted to some Radio Shack breakout boards which work perfectly for hosting the resistors as well. This keeps the inside of the enclosure nice and tidy. The final touch is the printed face plate applied to the cover of the box.

Like we’ve said, this one is nice but our favorite is still this one that uses thumbwheel switches to dial in a value.