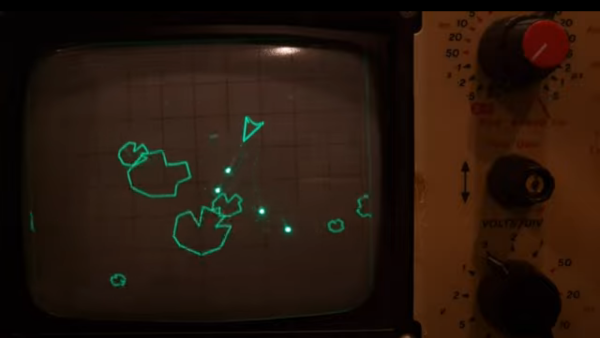
A HVTPI adapter plugged into a USBASP, with a an IDC10 cable plugged into it in turn

HVTPI Primer And Toolkit Equips You For BOM Substitutions

Novel programming interfaces for MCUs might catch us by surprise, but then we inevitably get up to speed with the changes required. Today’s bastion is HVTPI – a “12V reset” addition to the TPI we’ve just started getting used to, and [Sam Ettinger] has shared a simple circuit to teach us all about it, along with PCB files and detailed explanations of how it all works.

HVTPI is an add-on on top of TPI, for which, as Sam explains, you need to hold RST at 12V when TPI would have it be low logic level, and leave it at Vtarget otherwise. For that, he has designed a variety of interposer boards of various complexity and requirements; explaining the choices behind each one and clearing up any misunderstandings that might occur on your way. All of the board files (and the TPI write-up copy) are caringly shared with us in a git repository, too! As a result, if you have an USB-ASP or an Arduino available, now you also have everything to do HVTPI, thanks to Sam’s work and explanations.

We’ve been covering Sam’s exploits before, and can’t help but be grateful for the stop-and-explain detour along the way. HVTPI being used on very small ATTiny parts, we wonder if something new in the vein of his recent FPC board able to fit and function entirely within a Type-C cable end!

With chip shortages, investigating programming interfaces for small and obscure yet in-stock microcontrollers has been, quite literally, paying off, and if you got some projects that need a MCU but won’t consume a whole lot of resources, it could be time to give an ATTiny10 a go. What’s the worst that can happen – you make the smallest chiptunes ever?

Receiver board of the Ethernet tester, with only probing pins, and no resistors populated

Ethernet Tester Needs No LEDs, Only Your Multimeter

Ethernet cable testers are dime a dozen, but none of them are as elegant and multimeter-friendly as this tester from our Hackaday.io regular, [Bharbour]. An Ethernet cable has 8 wires, and the 9 volts of easily available batteries come awfully close to that – which is why the board has a voltage divider! On the ‘sender’ end, you just plug this board onto the connector, powered by a 9 volt battery. On the “receiver” end, you take your multimeter out and measure the testpoints – TP7 should be at seven volts, TP3 at three volts, and so on.

As a result, you can easily check any of the individual wires, as opposed to many testers which only test pair-by-pair. This also helps you detect crossover and miswired cables – while firmly keeping you in the realm of real-life pin numbers! This tester is well thought-out when it comes to being easily reproducible – the PCB files are available in the “Files” section, and since the “receiver” and “sender” PCBs are identical, you only need to do a single “three PCBs” order from OSHPark in order to build your own!

Bharbour has a rich library of projects, and we encourage you to check them out! If you ever want to get yourself up to speed on Ethernet basics, we’ve talked about its entire history – and we’ve even explained PoE! After some intensive learning time, perhaps you can try your hand at crimping the shortest Ethernet cable ever.

A Ryobi belt sander with remote control car parts

Boring Belt Sander Is RC Racer In Disguise

As a child, [David Windestal] already knew that a belt sander was the perfect motor for a banging radio-controlled car. Many years later, the realization of that dream is everything he could have hoped for.

The core of this project is a battery-powered belt sander by a well known manufacturer of gnarly yellow power tools. With an eye for using bespoke 3D printed parts, the conversion appeared straightforward – slap on (or snap on) a pre-loved steering mechanism, add a servo for controlling the sander’s trigger, and that’s pretty much job done. Naturally the intention was to use sandpaper as tread, which is acceptable for outdoor use but not exactly ideal for indoors. A thermoplastic polyurethane (TPU) tread was designed and printed for playtime on the living room floor, where sandpaper may be frowned upon.

The finished product is a mean looking toy with plenty of power. What we really like most about this hack is the commitment to the aesthetics. It’s seriously impressive to see a belt sander so convincingly transformed into a three-wheeler radio-controlled car. The final iteration is also completely reversible, meaning that your belt sander can keep on sanding two by fours on the job site. All the printed parts snap snug into place and are mostly indistinguishable from the stock sander.

Speaking of reversible, there were just a couple of issues with the initial design, if you catch our drift. We won’t spoil what happens, but make sure to watch the video after the break for the full story.

If this hack has whet your appetite for more quirky tool hacks, make sure to check out our coverage of the angle grinder turned slimline belt sander. Or if you can’t get enough of RC, then check out this remote controlled car with active suspension.

Continue reading “Boring Belt Sander Is RC Racer In Disguise”

Two clothespin hacks mentioned in the article, side-by-side.

Need To Probe Circuits? Remember About Clothespins!

After browsing Thingiverse for some printable PCB probe designs, [Henry York] looked around and found a wooden clothespin on his desk. After some collaboration between his 3D printer and his CNC, Henry graced us with a nifty helper tool design that many of us might want to make in a pinch – a small, cheap and easy to make PCB probe, for circuits where soldering and headers are out of the question. Small magnets are glued to the clothespin, holding it flush to a magnetizable work surface (aka a toaster tray), and the probing itself is done by an extruder cleaning needle end. 3D printer and Edge.Cuts files are shared with us – thanks to Henry’s helpfulness, it should be easy to repeat if ever needed!

[Tyler Rosonke] (@zonksec) was programming a batch of badges and needed a reliable way to attach to a 6-pin ISP header – without actually soldering to the badges before they’re handed out to participants! A clothespin materialized nearby yet again – most likely, channeled from a different dimension by the spirit of numerous acrylic-cast pogopin-toothed clip-on tools we scroll by on Aliexpress. With a small perfboard piece and a bunch of pogopins jumping out of their respective drawers, it became no longer necessary to hold a bundle of male-ended pin header wires at a weird angle while nervously looking at the avrdude progress bar. This ended up saving a whole lot of time, something that’s always best spent on adding insidious bugs to the badge firmware (as well as, perhaps, easter eggs).

We’d love to hear about all the small hacks and improvements that you, hackers in our audience, invent. Whether it’s reusing a SOIC flashing clip for ISP programming or printing yourself an octopus-like contraption with needle probes, you should share it with us!

bending the wood

Better Kerf Cuts With A CNC Bit

Bending wood is a complex affair. Despite the curves inherent in trees, most wood does not naturally want to bend. There are a few tricks you can use to bend it however, such kerf cutting and steaming. [JAR made] has a clever hack to make better kerf cuts using a CNC bit.

Typically kerfs are cut with a table saw or a miter saw set to trench. Many laser-cut box generations use kerfs to allow the piece to bend. The downside is that the cuts are straight cuts that are the same thickness throughout. This means that when the wood is bent into its shape, there are large gaps that need to be filled if you want the wood to look continuous. The hack comes in by using a router (not the networking kind) with a 6.2-degree taper. This means that the kerfs that it makes are angled. By placing the right amount of cuts and spacing them out equally, you get a perfectly rounded curve. To help with that even spacing, he whipped up a quick jig to make the cuts repeatable. Once all the cuts were made, the time to bend came, and [JAR made] used some hot water with fabric softener to assist with the bend. His shelves turned out wonderfully.

He makes the important statement that this CNC bit isn’t designed with this use case in mine and the chances of it snapping or breaking are high. Taking precautions to be safe is key if you try to reproduce this technique. Perhaps you can bust out some framing lumber and bend it into some beautiful furniture.

Continue reading “Better Kerf Cuts With A CNC Bit”

Ask Hackaday: What’s Your Worst Soldering Job?

Soldering! It’s the primary method for attaching one component to another in the world of electronics. Whether you’re free-forming a circuit, attaching connectors to cables, or populating a PCB, you’ll eventually find yourself doing some soldering, whether by hand, reflow, or maybe even a fancy wave soldering machine.

It’s a fundamental skill that nevertheless remains one of the biggest hurdles for newcomers to overcome when diving into the electronics hobby. Difficult jobs with tiny components or with large heat sinks can up the challenge for even well-practiced hands. Thus, today we ask the question: What’s your worst soldering job?
Continue reading “Ask Hackaday: What’s Your Worst Soldering Job?”

Coin Cell Eliminator Does More Than Save Batteries

Coin cells are useful things that allow us to run small electronic devices off a tiny power source. However, they don’t have a lot of capacity, and they can run out pretty quickly if you’re hitting them hard when developing a project. Thankfully, [bobricius] has just the tool to help.

The device is simple – it’s a PCB sized just so to fit into a slot for a CR2016 or CR2032 coin cell. The standard board fits a CR2016 slot thanks to the thickness of the PCB, and a shim PCB can be used to allow the device to be used in a CR2032-sized slot instead.

It’s powered via a Micro USB connector, and has a small regulator on board to step down the 5 V supply to the requisite 3 V expected from a typical coin cell. [bobricius] also gave the device a neat additional feature – a pair of pads for easy attachment of multimeter current probes. Simply open the jumper on the board, hook up a pair of leads, and it’s easy to measure the current being drawn from the ersatz coin cell.

If you’re regularly developing low-power devices that use coin cells, this tool is one that could save a lot of mucking about in the lab. [bobricius] has them available on Tindie for those eager to get their hands on one. We’ve seen similar designs before too, albeit pursued in a different way!