It’s A Bird! It’s A Plane! It’s… A Live Air Traffic Plane Spotting Simulation

Plane spotting has been a hobby of aviation enthusiasts for generations. Hanging out by the airport, watching aircraft come and go, maybe even listening to Air Traffic Control on a scanner from your local Radio Shack. Yep- we’ve been there, and it can be a lot of fun! But how can those of us who don’t live near a major controlled airport keep up on the action? As demonstrated by the [Information Zulu] YouTube channel’s Live Stream, seen below the break, the action may be closer than you think!

Aircraft on approach to LAX- Virtually

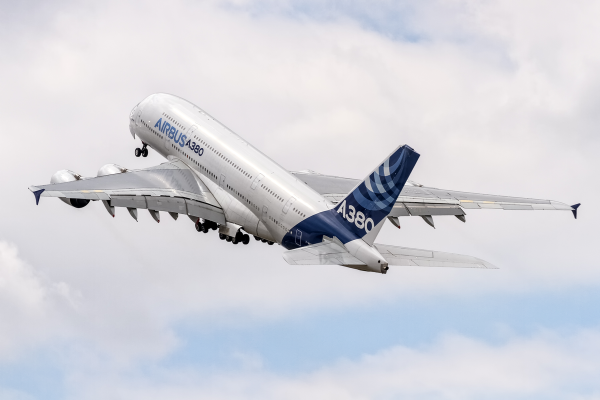
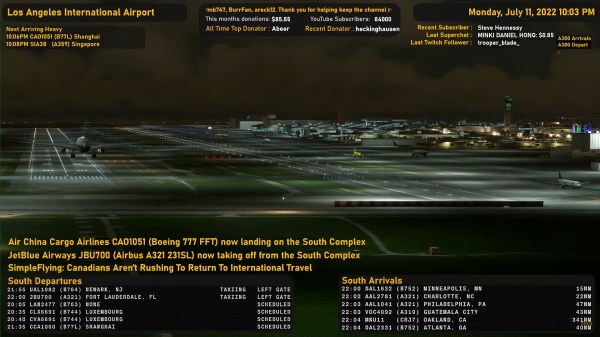
By using publicly available information, software, and some ingenuity, [Information Zulu] has created a live simulation of Los Angeles International Airport (LAX) for your simulated plane spotting pleasure. Aircraft positional data is gained through an ADSB receiver and piped into a the flight simulator software with a Traffic Injection Addon, and the simulator itself is used to properly place aircraft, set the weather, and even the correct aircraft types and liveries. Setting off the illusion of a real plane spotting adventure is the live Air Traffic Control radio chatter!

We love the creativity that went into not just making all of the software available, but in combining it into a cohesive product that can be viewed 24/7 on YouTube that, if you squint just right, could be mistaken for a view of the real thing.

If you’re not familiar with ADSB and how it’s used to track aircraft in such a way that anybody can receive it with the right equipment, check out this beginner’s course on ADSB from a few years back!

Continue reading “It’s A Bird! It’s A Plane! It’s… A Live Air Traffic Plane Spotting Simulation”

Build Your Own… Whatever

You can read all about making, say, a bookshelf or bowling, but unless you’ve actually done it, you don’t really know how it works. That’s the idea behind [codecrafters-io] Build-Your-Own-X GitHub repository. It is a collection of software projects from around the Web that offer “step-by-step guides for recreating our favorite technologies from scratch.”

What can you find there? Well, how about writing your own version of Git itself? Or maybe you’d like to dive into a physics engine, blockchain code, or a text editor. Then there’s our favorite: an operating system.

Continue reading “Build Your Own… Whatever”

Weed Eater String Made From Plastic Bottles

For those who don’t mind constantly adding tiny but measurable amounts of microplastics to their landscaping, string trimmers are an excellent way of maintaining edging around garden beds, trimming weeds, or maintaining ground covers on a steep hill. One problem with them, though, is that not only is the string consumable but it can be expensive. Plus, if you have a trimmer with a proprietary spool you need to hope the company never goes out of business. Or, you can simply refill your string spool with this handy tool.

The build uses plastic bottles to create the string from what would likely become garbage anyway. First, a sharp roller-style knife slices the plastic into a long thin strip. Once cut, it is fed through a heater similar to a hot end on a 3D printer which allows the plastic to be deformed or forged into a cylinder. From there the plastic is added onto a spool, which also has the motor in it that drives the entire mechanism. In this case it is using an old variable-speed drill.

From the comments on the video, there is some discussion about the economics of using this string in a weed eater. It’s likely the plastic won’t last as long as specialty string trimmer string, and the time and expense of making the plastic may never save much money. But we have to give credit to the ingenuity nonetheless. And, if you’re really into recycling plastic just for the sake of keeping it out of the landfill, there are plenty of other ways to go about accomplishing that goal.

I will NEVER buy weed whip line again! from landscaping

Pi Pico Provides Practical PlayStation Pointing

It’s not immediately clear to us why one would need a mouse for the original PlayStation (though we’re sure there’s no shortage of folks eager to jump down into the comments and tell us), but if you ever desire adding improved pointing capabilities to the nearly three decade old console, this project from [Vojtěch Salajka] is certainly one to keep an eye on.

The aptly named “USB to PlayStation Mouse” project does exactly what it sounds like — adapts a generic USB mouse into an input device for Sony’s classic console. Putting one together requires a Raspberry Pi Pico, a 5 V DC-DC USB boost module with female USB-A connector, and a sacrificial controller or peripheral to provide the cable and proprietary connector.

With the hardware assembled per the simple wiring diagram, you just plug the Pico into your computer and copy over the firmware file. [Vojtěch] notes that you’ll need to unplug the mouse before attempting to upload the firmware, presumably because the data pins on the two USB ports have been tied together.

Don’t worry about having to find some obscure title to try out your new peripheral either, [Vojtěch] says the mouse works in the system’s main menu if you boot it without a disc in the drive. Now all you need is a few Raspberry Pi Pico PlayStation Memory Cards to complete the whole set.

Hackable OSHW CardClock Demands Attention

When examining a project, it’s easy to be jaded by a raw parts list. When the main component is an ESP8266, we might say “oh, another 8266 project. yawn!” But we’re certain that when you take a look at [Will Fox]’s Foxie CardClock, it’ll surely grab your attention.

As if all those beautiful LEDs weren’t enough, the rest of the device’s specifications are quite impressive. The core components might be common, but what often separates such projects is the software. With Over The Air updates supported via ArduinoOTA, updates are a snap. A light sensor helps to keep all those LEDs at a sane level, and a once-per-minute synchronization via NTP keeps the time accurate. Even if power is lost, a super-capacitor can hold the time accurate for up to two days with the built in RTC module. There’s even provisions for setting the time using the buttons on the front panel should you want to keep the gadget offline.

The entire project is open source, with the hardware released under the CERN Open Hardware Licence Version 2 and the firmware source code distributed as GPLv3. Users are encouraged to hack and modify the design, and all the information you need to build one of your own is available in the project’s GitHub repository. [Will] also offers a pre-assembled version of the clock for just $45 USD, but unfortunately it seems to be out of stock at the time of this writing.

If credit card sized hacks are your chosen area of interest, you will appreciate this crystal radio made from an actual Credit Card. Thanks to [Abe] for submitting the Tip!

Airbus A380 Completes Flight Powered By Cooking Oil

Fossil fuels are making news for all the wrong reasons of late. Whether it’s their contribution to global climate change or the fact that the price and supply hinges on violent geopolitics, there are more reasons than ever to shift to cleaner energy sources.

In the world of aviation, that means finding a cleaner source of fuel. A test earlier this year took place in pursuit of that very goal, where an Airbus A380 airliner was flown solely on fuel derived from cooking oil.

Continue reading “Airbus A380 Completes Flight Powered By Cooking Oil”

A Handy Tester For A Mountain Of PS/2 Keybords

The hacking life is not without its challenges, and chief among these is the tendency to always be in acquisition mode. When we come across a great deal on bulk equipment, or see a chance to rescue some obscure gear from the e-waste stream, we generally pounce on it, regardless of the advisability.

We imagine this is why [Nathan] ended up with a hoard of PS/2 keyboards. Seriously, there are like thousands of the things. And rather than lug a computer to them for testing, [Nathan] put together this handy Arduino-based portable tester to see which keyboards still have some life left in them. The video below goes into detail on the build, but the basics are pretty simple — an Arduino, a 16×2 LCD display, and a few bits and bobs to run it off a LiPo pack and charge it up. Plus, of course, a PS/2 jack to plug in a keyboard and power it up. Interestingly, the 16×2 display is an old Parallax unit, from the days when RadioShack still existed and sold their stuff. That required a little effort to get it working with the Arduino, but in the end it works like a charm — plug in a keyboard and whatever you type shows up on the screen.

Of course, it’s hard to look at something like this, and that mountain of keyboards in the background, and not scheme up ways to really automate the whole test process. Perhaps an old 3D printer with a stylus mounted where the hot end would go could press each key in turn while the tester output is recorded — something like this Wordle-bot, but on a keyboard scale. That kind of goes against [Nathan]’s portability goal, but it’s still fun to think about.

Continue reading “A Handy Tester For A Mountain Of PS/2 Keybords”