To be fair, the rules of the game have changed lately. Time was when a nipper would ask for the impossible, and we dads would never have to deliver. But with CNC routers, 3D-printing, and industrial-grade CAD software you can use for free, the possibility hurdle is getting ever shorter. Still, when his son put in this request, [Alex Lovegrove] really delivered. Everything on this excavator works, from tracks to boom to bucket. There are hundreds of parts, mostly machined from plywood but with a smattering of 3D-printed gears and brackets. The tracks and slew gear are powered by gear motors, while linear actuators stand in for hydraulic rams on the boom. The videos below show the machine under test and the unbearable cuteness of it being loved.
Hacker parents need not despair, of course. There’s plenty of room left for your imagination to run amok. For inspiration, check out this working railway system, or any of the several backyard roller coasters we’ve featured.
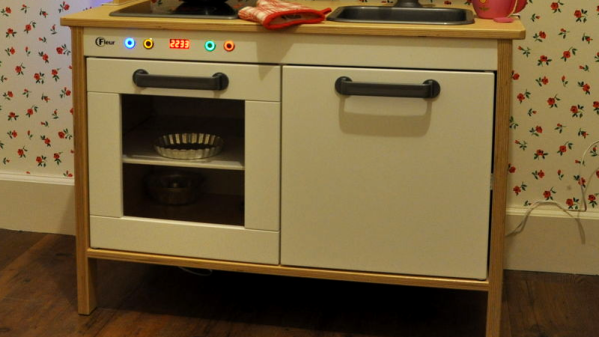
Children have always liked to learn by copying the adults around them, and thus have always desired toys that emulate the tools which their older forebears use on a daily basis. [rhoalt]’s daughter wished for an oven to play with, so a trip to IKEA was in order to get started.
The build begins with the IKEA Duktig, a beautiful fun-sized oven. [rhoalt] then breaks out the hacker staple foods of 7-segment displays, swanky backlit buttons and an Arduino Nano. Through some careful handiwork, the wooden panels that make up the toy oven are drilled and routed out to fit the components.
The electronics are all used to create an oven with a digital timer, and the final effect achieved is rather nice. The glowy buttons can be used to set and reset the timer, while an LED strip inside lights up to simulate cooking. [rhoalt] shares all the construction details along with some parent-friendly tips, like taping over the buzzer to reduce the volume, and ensuring the timer is limited to 10 minutes to avoid any late-night surprises.
It’s a tidy project with a strong sense of fun, and the presentation is top-notch. Even we older, jaded hackers light up for a good glowy-buttoned project, so we’re sure [rhoalt]’s daughter loves her new toy. For more toy oven action, check out this Easy Bake converted to USB. Video after the break.
Most of us are more bits-and-bytes than nuts-and-bolts, but we have the deepest appreciation for the combination of the two. So, apparently, does [rectorsquid]. Check out the design and flow of his rolling ball sculpture (YouTube, embedded below) to see what we mean. See how the arms hesitate just a bit as the ball is transferred? See how the upper arm gently places it on the ramp with a slight downward gesture? See how it’s done with one motor? There’s no way [rectorsquid] designed this on paper, right?
Of course he didn’t (YouTube). Instead, he wrote a simulator that lets him try out various custom linkages in real time. It’s a Windows-only application (sigh), but it’s free to use, while the video guides (more YouTube) look very comprehensive and give you a quick tour of the tool. Of special note is that [rectorsquid]’s software allows for sliding linkages, which he makes very good use of in the rolling ball sculpture shown here.
We’ve actually secretly featured [rectorsquid]’s Linkage software before, in this writeup of some amazing cosplay animatronic wings that used the program for their design. But we really don’t want you to miss out if you’re doing mechanical design and need something like this, or just want to play around.
Anyone know of an open-source linkage simulator that can also output STL files for 3D printing? Or in any format that could be easily transformed into OpenSCAD? Asking for a “friend”.
At this point, we’ve seen the Raspberry Pi jammed into what amounts to every retro game system, handheld or otherwise, that was ever released. While they’re always fun builds, invariably somebody will come along who is upset that the original hardware had to be gutted to create it. It seems as if with each post, a classic gaming aficionado out there has his or her heart broken just a bit more. Will no one put an end to the senseless slaughter of Game Boys?
As it so happens, not all hardware modders are such unconscionable brutes. [Starfire] recently sent his latest creation into the tip line, and it’s designed specifically to address the classic gaming massacre in which Hackaday has so shamefully been a collaborator. His build sacrifices a portable Genesis built by AtGames, and turns it into a Raspberry Pi Zero portable running RetroPie.
Opening up the back panel of his portable Pi shows an incredible amount of hardware smashed into the tiny package. Beyond the obvious Pi Zero, there’s a iUniker 2.8-inch LCD, a 2,200 mAh battery, a two-port USB hub, a Teensy microcontroller, a USB sound card, an audio amplifier, a LiPo charging module, and a boost converter. [Starfire] measured peak power consumption to be 500 mA, which should give about a 3.5 hour run time on the 2,200 mAh battery.
This is all the more impressive when you realize the original AtGames PCB is still in the system, albeit with the center cut out for the Pi’s LCD to fit in. Rather than having to figure out a new way to handle input, [Starfire] simply connected the existing inputs to the digital pins on the Teensy and used some code to convert that into USB HID for the Pi. A few case modifications were necessary, namely the removal of the battery compartment from the back panel and covering up the original SD card slot and ports; but otherwise the finished product looks completely stock.
Over the years, Nintendo has had little trouble printing money with their various gaming systems. While they’ve had the odd misstep here and there since the original Nintendo Entertainment System was released in 1983, overall business has been good. But even for the company that essentially brought home video games to the mainstream, this last year has been pretty huge. The release of the Nintendo Switch has rocketed the Japanese gaming giant back into the limelight in a way they haven’t enjoyed in a number of years, and now they’re looking to keep that momentum going into 2018 with a killer new gaming accessory: a cardboard box.
Some of the contraptions feature surprisingly complex internal mechanisms.
Well, it doesn’t have to be a box, necessarily. But no matter which way you fold it, it’s definitely a piece of cardboard. Maybe a few bits of string here and there. This is the world of “Nintendo Labo”, a recently announced program which promises to let Switch owners create physical objects which they can interact with via specially designed software for the console.
The Labo creations demonstrated in the bombastic announcement video make clever use of the very unique Switch hardware. The removable Joy-Con controllers are generally still used as input devices, albeit in less traditional ways. Twisting and tilting the cardboard creations, which take varied forms such as a fishing rod or motorcycle handlebars, relays input to the appropriate game thanks to the accelerometers and gyroscopes they contain.
Many of the more complex contraptions rely on a less-known feature of the controller: the IR depth camera. By pointing the controller’s camera inside of the devices, the motion of internal components, likely helped along by IR-reflective tape, can be tracked in three dimensions. In the video, the internal construction of some of the devices looks downright intimidating.
Which leads into the natural question: “Who exactly is this for?”
Clearly some of the gadgets, not to mention the folded cardboard construction, are aimed at children, an age group Nintendo has never been ashamed to appeal to. But some of the more advanced devices and overall concept seems like it would play better with creative teens and adults looking to push the Switch in new directions.
Will users be empowered to create their own hardware, and by extension, associated software? Will hackers and makers be able to 3D print new input devices for the Switch using this platform? This is definitely something we’ll be keeping a close eye on as it gets closer to release in April.
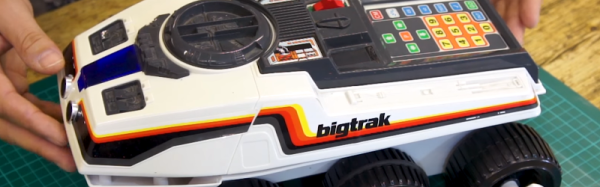
If you were a kid in the 1980s you might have been lucky enough to score a Big Trak — a robotic toy you could program using a membrane keyboard to do 16 different motions. [Howard] has one, but not wanting to live with a 16-step program, he gave it a brain transplant with an Arduino and brought it on [RetroManCave’s] video blog and you can see that below.
If you want to duplicate the feat and your mom already cleaned your room to make it a craft shop, you can score one on eBay or there’s even a new replica version available, although it isn’t inexpensive. The code you need is on GitHub.
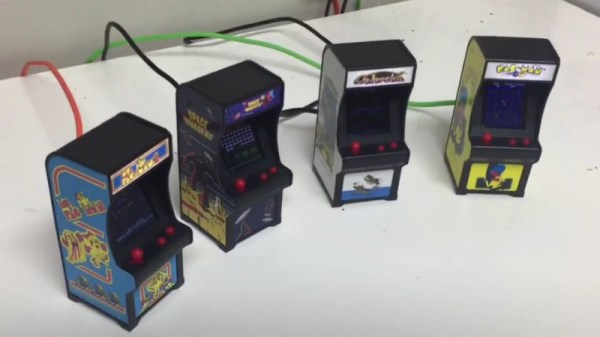
Thanks to the general miniaturization of electronics, the wide availability of cheap color LCD screens, and the fact that licensing decades old arcade games is something of a free-for-all, we can now purchase miniature clones of classic arcade cabinets for about $20 USD. In theory you could play these things, but given they’re less than 4 inches in height they end up being more of a desk novelty than anything. Especially since it seems like most of the effort went into making the cabinet itself; a classic example of “form over function”.
Unfortunately, if you want to buy these little arcade cabinets to use as decoration for your office or game room, they aren’t particularly well suited to the task. The “demo” mode where the game plays itself doesn’t last for very long, and even if it did, the game would chew through batteries at an alarming rate. [Travis] decided to tackle both issues head on by powering his Tiny Arcades over USB and locking them into demo mode.
The stock power for the Tiny Arcade comes from three AAA batteries, or 4.5 V. This made it easy enough to run over 5 V USB, and a four port USB charger is used to provide power to multiple machines at once. Forcing the game to stay in demo mode wasn’t much harder: a 555 timer was used to “push” the demo button with a frequency of every 10 seconds or so to keep the game up and running. A simple timer circuit was put together in the classic “dead bug” style, and sealed up with liquid rubber so it would play nice with the insides of the Tiny Arcade.
Since his little machines wouldn’t need their stock power switches anymore, [Travis] rewired the speaker lead through it. So now the machine stays on and in demo mode as long as it’s plugged into USB power, and you can flip the switch on the back to turn off the sounds. Perfect for sitting up on a shelf or the corner of your desk.