Perfecting The Open Source RC Controller

Over the last few months we’ve seen an influx of homebrew RC controllers come our way, and we’re certainly not complaining. While the prices of commercial RC transmitters are at an all-time low, and many of them can even run an open source firmware, there’s still nothing quite like building the thing yourself. How else are you going to get exactly what you want?
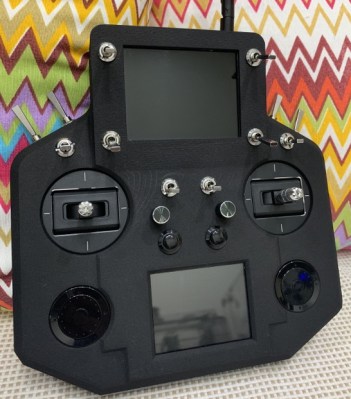
For this entry into the 2019 Hackaday Prize, [Vitor de Miranda Henrique] is working on his own version of the ultimate open source remote control. His design follows some of the trends we’ve already seen in terms of outward design and hardware expandability, but also branches off into some new territory with features such as dual integrated displays.

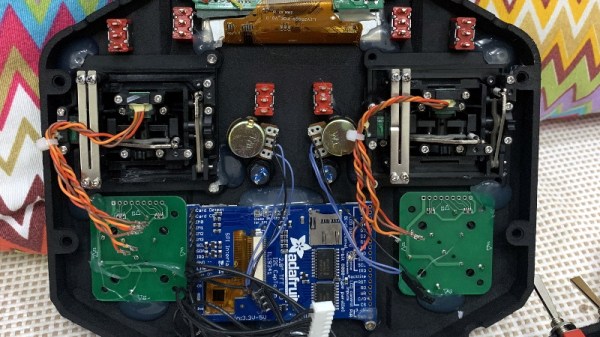
Why does your controller need two displays? The top 4.3 inch TFT is linked up to a 5.2 GHz video receiver, which makes it perfect for controlling vehicles in “first-person” view, such as drones. The lower screen is a 2.8 inch touch screen from Adafruit, which is intended to be used for navigating through menus and options once the firmware is fully fleshed out.

Powering the controller is a ESP32 and dual MCP23017 GPIO expanders to connect up to the array of input devices available to the user. The current iteration of the controller has ten switches, two encoders, some buttons, and a pair of scroll wheels for good measure. Oh, and of course there are a couple of joysticks in the mix as well. All the devices terminate at a custom PCB in the back of the controller which looks to make modifying and adding input devices simple and neat.

We’ve previously seen the Alpha V1, an open source controller with a fairly similar setup, albeit without the dual displays. If even that one is a bit more complex than you’d like, you can always just do it with an Arduino.

A Full-Stack Web Browser

Interviewing to be a full-stack engineer is hard. It’s a lot harder than applying for a junior dev job where you’re asked to traverse a red-black tree on a whiteboard. For the full-stack job, they just give you a pile of 2N2222 transistors. (The first company wasn’t a great fit, and I eventually found a place that gave me some 2N2907s for the interview.) That said, there’s a certain challenge in seeing how far you can push some doped silicon. Case in point, [Alastair Hewitt]. He’s building a computer to browse the world wide web from the gate level up.

The goal of this project is to browse the web using only TTL logic. This presents problems that aren’t readily apparent at first glance. First up is being able to display text on a screen. The easiest way to do this now is to get a whole bunch of modern memories that are astonishingly fast for a 1970s vintage computer. This allows for VGA output, and yes, we’ve seen plenty of builds that output VGA using some big honkin’ memories. It turns out these RAM and ROM chips are a little better than the specs say they are, and this computer is overclocked from the very beginning.

A bigger problem is how to interface with a network. This is a problem for very old computers, but PPP still exists and if you have the software stack you can read something from a server over a serial connection. [Alistar] actually found the UART frequency was more important than the dot clock frequency of VGA, and the system clock must therefore be built around the serial port, not the display interface. This means the text mode interface is actually 96 columns instead of the usual 80 columns.

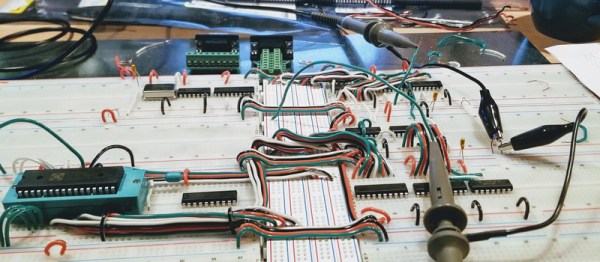
It’s very easy to say that you’re building a computer on a bread board. It’s another thing entirely to actually do it. This is actually a surprisingly well-though out sketch of a computer system that will, theoretically, be able to connect to the Internet. Of course, the reality of the situation is that this computer will be connecting over serial to a computer that’s connected to the Internet, but there’s no shame in that. You can check out the progress on the GitHub for this project.

Your Masterclass In Product Design: Hackaday Prize Mentor Sessions

New to this year’s Hackaday Prize is a set of live mentor sessions and you’re invited! Being at the center of a successful product design project means having an intuitive sense in many, many areas; from industrial design and product packaging, to manufacturing and marketing. This is your chance to learn from those experts who have already been there and want to make your experience better and easier.

We want you to get involved by entering your own project into the Hackaday Prize; now is the time to tell us you’re ready to demo your project with a mentor. Hackaday Prize Mentor Sessions are happening every two weeks throughout the summer. In these video chats we’re inviting some promising Hackaday Prize entries to start off with a “demo day” type of presentation, followed by an interactive session with the mentor hosting each event.

It’s also important that this incredible resource be available to all, so these videos will be published once the mentor session wraps up. This is a master class format where the advice and shared experience have a beneficial effect far beyond the groups sharing their projects.

The 2019 Hackaday Prize focuses on product development. Show your path from an idea to a product design ready for manufacturing and you’ll be on target to share in more than $200,000 in cash prizes!

Meet Some of Our Mentors:

Below you will find just a taste of the mentor sessions in the works. These are the first three mentor session videos that will be published, but make sure you browse the full set of incredible mentors and get excited for what is to come!

Bunnie Huang

Co-founder, Chibitronics


Bunnie is best known for his work hacking the Microsoft Xbox, as well as
his efforts in designing and manufacturing open source hardware. His past projects include the chumby (app-playing alarm clock), Chibitronics (peel-and-stick electronics for crafting), and the Novena (DIY laptop). He currently lives in Singapore where he runs a private product design studio, Kosagi, and actively mentors several startups and students of the MIT Media Lab.

Mattias Gunneras & Andrew Zolty

Co-founders, BREAKFAST NY


Zolty and Mattias founded BREAKFAST in 2009. This studio of multidisciplinary artists and engineers conceives, designs, and fabricates high-tech contemporary art installations and sculptures. BREAKFAST has over 15 large-scale pieces that can be found in various museums, arenas, and lobby spaces throughout the world.

Giovanni Salinas

Product Development Engineer, DesignLab


Giovanni is the Product Development Engineer at Supplyframe DesignLab. He has designed and developed hundreds of products, including consumer electronics, kitchenware, and urban furniture for the North American, European, Chinese and Latin American markets. Through his experience he has honed his expertise in rapid prototyping and DFM in plastics, wood, and metals.

We Want You To Demo Your Product!

Mentor sessions will continue throughout the summer with these and other mentors! Sign up to demo your 2019 Hackaday Prize entry!

A Customizable Open Source Mechanical Numpad

Mechanical keyboards with reduced key counts are all the rage these days, but while those streamlined input devices might look cool on your desk, there are times when the traditional number pad or navigation keys are quite handy. Rather than just going without, [Mattia Dal Ben] decided to put together his own mechanical auxiliary input device for when the main board just isn’t cutting it.

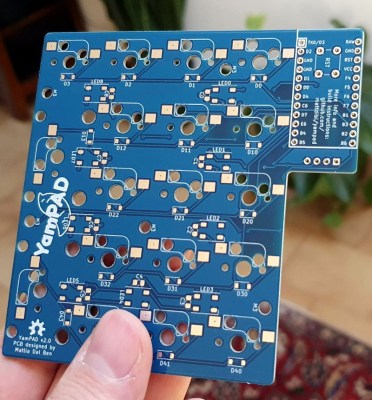
[Mattia] is calling his creation the YamPAD, which stands for Yet Another Mechanical numPAD. One of the major goals for the project is to produce a design that’s easy for others to replicate and customize. His PCB has a socket designed to fit an Arduino Pro Micro, which combined with the QMK firmware, offers a wide array of configuration options. All that’s left is to add in the Cherry MX switches and some 1N4148 diodes.

But if you want to take things a little further, [Mattia] has that covered as well. The PCB design has provisions for RGB LED back-lighting should you find yourself in need of crunching some numbers in the dark. There’s even a spot for a 0.91″ OLED display if you really want to take things to the next level.

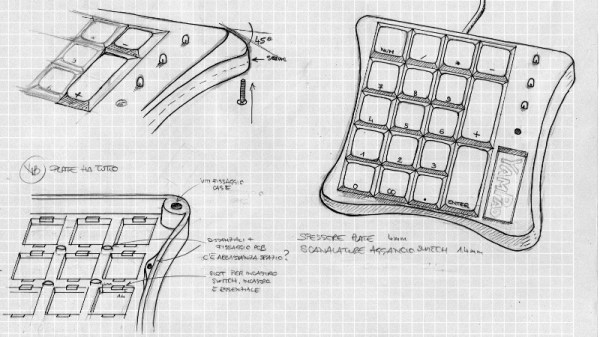
As of right now, the YamPAD is just a bare PCB, but [Mattia] is planning to design a 3D printed enclosure for it soon. The sketches he’s done so far depict a printed case which we think bears more than a passing resemblance to a Wii Fit Balance Board, but of course being a fully open source project, you’ll be free to design your own case based on the PCB’s dimensions. It would be interesting to see what other kind of customization the community might come up with once the design is finalized.

If you like the idea of the YamPAD, you might also want to check out the kbord we covered back in 2017. If you want to see the full keyboard done in this DIY open hardware style, there are already some choice entries into the field.

A 32-bit Boost For Your 3D Printer

It might not be the kind of thing you’ve given much thought to, but if you’ve ever used a desktop 3D printer, it was almost certainly being controlled by an 8-bit CPU. In fact, the common RAMPS controller is essentially just a motor driver shield for the Arduino Mega. Surely we can do a bit better than that in 2019?

For his entry into this year’s Hackaday Prize, [Robert] is working on a 32-bit drop-in replacement board which would allow 3D printer owners to easily upgrade the “brain” of their machines. Of course, there are already a few 32-bit control boards available on the market, but these are almost exclusively high-end boards which can be tricky to retrofit into an older machine. It should also go without saying that they aren’t cheap.

With this board, [Robert] is hoping to create a simpler upgrade path for 8-bit printer owners. Being small and cheap is already a pretty big deal, but perhaps equally importantly, his board is running the open source Marlin firmware. Marlin powers the majority of 8-bit desktop 3D printers (even if their owners don’t necessarily realize it) so sticking with it means that users shouldn’t have to change their software configuration or workflow just because they’ve upgraded their controller.

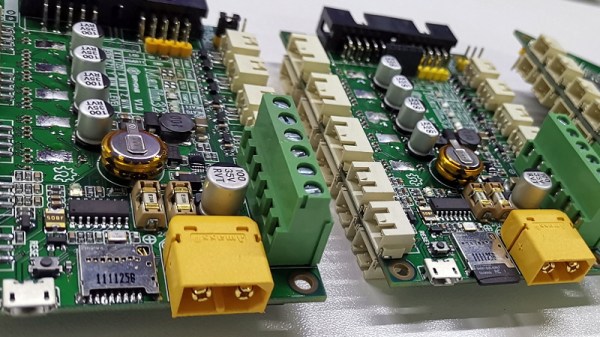
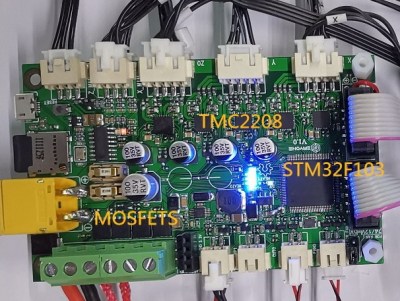
The board is powered by a 72 MHz STM32F103 chip, and uses state-of-the-art Trinamic TMC2208 stepper drivers to achieve near silent operation. The board has an automatic cooling fan to help keep itself cool, and with an XT60 connector for power, it should even be relatively easy to take your printer on the go with suitably beefy RC batteries.

The Two-Dimensional Stepper Motor

Over on hackaday.io and deep in the Hackaday Prize, a lot of cool people are playing around with the possibilities of putting coils in printed circuit boards. On the face of it, it makes sense: drawing spirals on a PCB gets you an electromagnet. This allows you to do all sorts of crazy things. You can make miniature model maglev trains using the track as a motor. Someone built a wearable Tesla coil.

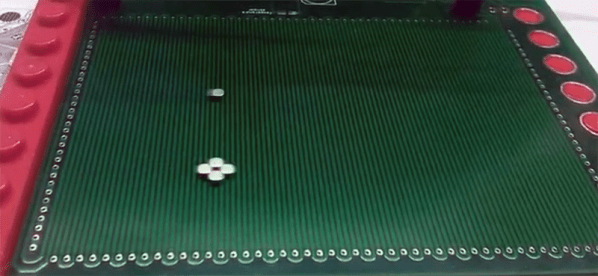
The latest build to show off the possibilities of motors etched on PCBs is [bobricius]’ micro manipulator. It’s a 100 mm square board capable of moving a small magnet around the surface. The point? Well, if you have to ask that question you’re really never going to get the point.

The design of this stepper motor is simply two coils of wire, with the X axis of the grid placed on the top copper layer of the PCB and the Y axis on the bottom copper layer. There are four poles to each of these coils, and they plug right into a standard stepper driver, so to control this board all you need is a basic Arduino and a motor shield. Or a RepRap board, take your pick, you probably have something sitting around in a junk drawer.

In the test of this board, the stepper motor can move small rare earth magnets around quickly and with high repeatability. As for what use this PCB stepper motor has, if you have to ask that question, you’ll never know. Also, because it looks cool.

Continue reading “The Two-Dimensional Stepper Motor”

Pushing 3D Printed Wheels And Transmissions To The Limit

What do you do if you want a robot with great mobility? Walking is hard, and wheels are good enough, especially if you use the ‘wheels within wheels’ Mecanum setup. But you need torque, too. That’s what makes this entry into the Hackaday Prize so fantastic. It’s a Mecanum wheel of sorts, with an integrated gear set that produces a phenomenal amount of torque using a small, cheap stepper motor.

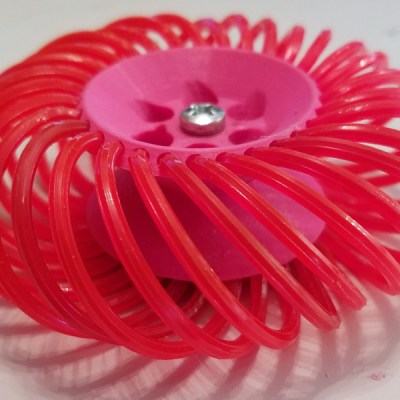
The wheel itself if 3D printed and fully parametric, using nylon weed wacker filament for the treads. This allows the wheel to scoot back and forth like a Mecanum wheel, or at the very least like one of those hyper mobile wheeled robots you see from time to time. It goes backwards, forwards, and side to side, and also has a zero turn radius.

A 3D printed Mecanum wheel is great, but how on earth do you drive it? That problem is solved with this hybrid planetary/strain-wave  3D-printed gear set. [Daren] has created a very compact ‘single’ stage gear set that fits right on top of a stepper motor. It’s thin, flat, and has a gear reduction of about 66:1. That’s a lot of torque in a very small package. Both of these projects are combined, and together they represent a freaky wheel with a lot of torque.

Even though [Daren] doesn’t have a robot in mind for this build, these are most certainly the building blocks of a fantastic robot, and a great entry in the Hackaday Prize.

Continue reading “Pushing 3D Printed Wheels And Transmissions To The Limit”