Real-time Shader, Running On A Game Boy Color

[Danny Spencer] has a brilliant graphical demo that, like all great demos, flexes a deep understanding of the underlying system: a real-time 3D shader on the Game Boy Color.

If you’re not familiar with shaders, they were originally mathematical lighting models (hence the name) and are an integral part of the modern 3D graphics pipeline. One no longer draws pixels directly to a screen to represent objects. Instead, 3D object data is sent to the Graphics Processing Unit (GPU) which handles the drawing. Shaders are what control things like an object’s lighting, textures, and more.

Implementing even a basic real-time shader in software on a Game Boy Color is pretty wild. Not only is it a pixels-and-sprites (and not 3D graphics) kind of system, but the Game Boy’s SM83 CPU doesn’t even have a multiply instruction, nor does it support floats. As [Danny] puts it: given that the entire mathematical foundation of his shader rests on multiplying non-integer numbers, he had to get creative. That makes his demo a very round peg in an extremely square hole.

In the case of [Danny]’s demo, the user can manipulate the position of, and lighting around, a classic Utah teapot in real time. He explains the workflow and shows how the process can be applied to other objects. The ROM is available on GitHub and there’s a video, embedded below.

[Danny] is no stranger to performing feats of technical prowess that are as creative as they are playful, like implementing a working adding machine in a DOOM level.

Continue reading “Real-time Shader, Running On A Game Boy Color”

Ray Marching In Excel

3D graphics are made up of little more than very complicated math. With enough time, you could probably compute a ray marching by hand. Or, you could set up Excel to do it for you!

Ray marching is a form of ray tracing, where a ray is stepped along based on how close it is to the nearest surface. By taking advantage of signed distance functions, such an algorithm can be quite effective, and in some instances much more efficient than traditional ray marching algorithms. But the fact that ray marching is so mathematically well-defined is probably why [ExcelTABLE] used it to make a ray traced game in Excel.

Under the hood, the ray marching works by casting a ray out from the camera and measuring its distance from a set of three-dimensional functions. If that distance is below a certain value, this is considered a surface hit. On surface hits, a simple normal shader computes pixel brightness. This is then rendered out by variable formatting in the cells of the spreadsheet.

For those of you following along at home, the tutorial should work just fine in any modern spreadsheet software, including Google Sheets and LibreOffice Calc. It also provides a great explanation of the math and concepts of ray marching, so is worth a read regardless your opinions on Excel’s status as a so-called “programming language.”

This is not the first time we have come across a ray tracing tutorial. If computer graphics are your thing, make sure to check out this ray tracing in a weekend tutorial next!

Thanks [Niklas] for the tip!

Signed Distance Functions: Modeling In Math

What if instead of defining a mesh as a series of vertices and edges in a 3D space, you could describe it as a single function? The easiest function would return the signed distance to the closest point (negative meaning you were inside the object). That’s precisely what a signed distance function (SDF) is. A signed distance field (also SDF) is just a voxel grid where the SDF is sampled at each point on the grid. First, we’ll discuss SDFs in 2D and then jump to 3D.

SDFs in 2D

A signed distance function in 2D is more straightforward to reason about so we’ll cover it first. Additionally, it is helpful for font rendering in specific scenarios. [Vassilis] of [Render Diagrams] has a beautiful demo on two-dimensional SDFs that covers the basics. The naive technique for rendering is to create a grid and calculate the distance at each point in the grid. If the distance is greater than the size of the grid cell, the pixel is not colored in. Negative values mean the pixel is colored in as the center of the pixel is inside the shape. By increasing the size of the grid, you can get better approximations of the actual shape of the SDF. So, why use this over a more traditional vector approach? The advantage is that the shape is represented by a single formula calculated at many points. Most modern computers are extraordinarily good at calculating the same thing thousands of times with slightly different parameters, often using the GPU. GLyphy is an SDF-based text renderer that uses OpenGL ES2 as a shader, as discussed at Linux conf in 2014. Freetype even merged an SDF renderer written by [Anuj Verma] back in 2020. Continue reading “Signed Distance Functions: Modeling In Math”

OpenGL In 500 Lines (Sort Of…)

How difficult is OpenGL? How difficult can it be if you can build a basic renderer in 500 lines of code? That’s what [Dmitry] did as part of a series of tiny applications. The renderer is part of a course and the line limit is to allow students to build their own rendering software. [Dmitry] feels that you can’t write efficient code for things like OpenGL without understanding how they work first.

For educational purposes, the system uses few external dependencies. Students get a class that can work with TGA format files and a way to set the color of one pixel. The rest of the renderer is up to the student guided by nine lessons ranging from Bresenham’s algorithm to ambient occlusion. One of the last lessons switches gears to OpenGL so you can see how it all applies.

Continue reading “OpenGL In 500 Lines (Sort Of…)”

Ray Casting 101 Makes Things Simple

[SSZCZEP] had a tough time understanding ray tracing to create 3D-like objects on a 2D map. So once he figured it out, he wrote a tutorial he hopes will be more accessible for those who may be struggling themselves.

If you’ve ever played Wolfenstein 3D you’ll have seen the technique, although it crops up all over the place. The tutorial borrows an animated graphic from [Lucas Vieira] that really shows off how it works in a simplified way. The explanation is pretty simple. From a point of view — that is a camera or the eyeball of a player — you draw rays out until they strike something. The distance and angle tell you how to render the scene. Instead of a camera, you can also figure out how a ray of light will fall from a light source.

There is a bit of math, but also some cool interactive demos to drive home the points. We wondered if Demos 3 and 4 reminded anyone else of an obscure vector graphics video game from the 1970s? Most of the tutorial is pretty brute force, calculating points that you can know ahead of time won’t be useful. But if you stick with it, there are some concessions to optimization and pointers to more information.

Overall, a lot of good info and cool demos if this is your sort of thing. While it might not be the speediest, you can do ray tracing on our old friend the Arduino. Or, if you prefer, Excel.

A Look At How Nintendo Mastered Dual Screens

When it was first announced, many people were skeptical of the Nintendo DS. Rather than pushing raw power, the unique dual screen handheld was designed to explore new styles of play. Compared to the more traditional handhelds like the Game Boy Advance (GBA) or even Sony’s PlayStation Portable (PSP), the DS seemed like huge gamble for the Japanese gaming giant.

But it paid off. The Nintendo DS ended up being one of the most successful gaming platforms of all time, and as [Modern Vintage Gamer] explains in a recent video, at least part of that was due to its surprising graphical prowess. While it was technically inferior to the PSP in almost every way, Nintendo’s decades of experience in pushing the limits of 2D graphics allowed them to squeeze more out of the hardware than many would have thought possible.

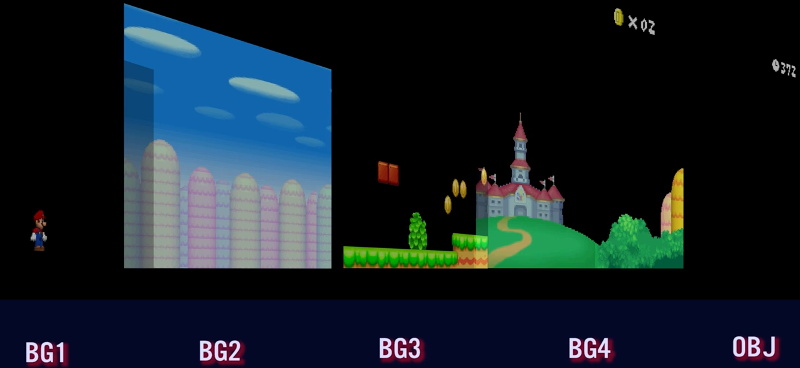
On one level, the Nintendo DS could be seen as a upgraded GBA. Developers who were already used to the 2D capabilities of that system would feel right at home when they made the switch to the DS. As with previous 2D consoles, the DS had several screen modes complete with hardware-accelerated support for moving, scaling, rotating, and reflecting up to four background layers. This made it easy and computationally efficient to pull off pseudo-3D effects such as having multiple backdrop images scrolling by at different speeds to convey a sense of depth.

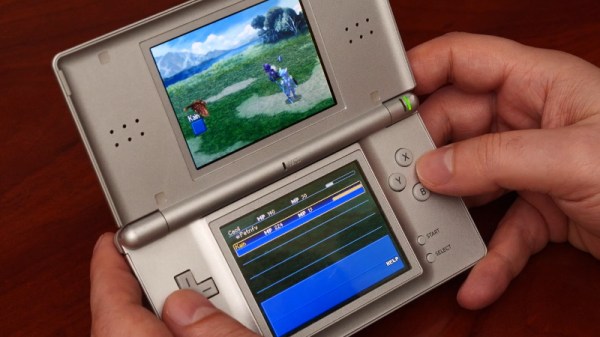
On top of its GBA-inherited tile and sprite 2D engine, the DS also featured a rudimentary GPU responsible for handling 3D geometry and rendering. Hardware accelerated 3D could only used on one screen at a time, which meant most games would keep the closeup view of the action on one display, and used the second panel to show 2D imagery such as an overhead map. But developers did have the option of flipping between the displays on each frame to render 3D on both panels at a reduced frame rate. The hardware can also handle shadows and included integrated support for cell shading, which was a particularly popular graphical effect at the time.

By combining the 2D and 3D hardware capabilities of the Nintendo DS onto a single screen, developers could produce complex graphical effects. [Modern Vintage Gamer] uses the example of New Super Mario Bros, which places a detailed 3D model of Mario over several layers of moving 2D bitmaps. Ultimately the 3D capabilities of the DS were hindered by the limited resolution of its 256 x 192 LCD panels; but considering most people were still using flip phones when the DS came out, it was impressive for the time.

Compared to the Game Boy Advance, or even the original “brick” Game Boy, it doesn’t seem like hackers have had much luck coming up with ways to exploiting the capabilities of the Nintendo DS. But perhaps with more detailed retrospectives like this, the community will be inspired to take another look at this unique entry in gaming history.

Continue reading “A Look At How Nintendo Mastered Dual Screens”

Neural Networks Walk Better Than Humans For Game Animation

Modern day video games have come a long way from Mario the plumber hopping across the screen. Incredibly intricate environments of games today are part of the lure for new gamers and this experience is brought to life by the characters interacting with the scene. However the illusion of the virtual world is disrupted by unnatural movements of the figures in performing actions such as turning around suddenly or climbing a hill.

To remedy the abrupt movements, [Daniel Holden et. al] recently published a paper (PDF) and a video showing a method to greatly improve the real-time character control mechanism. The proposed system uses a neural network that has been trained using a large data set of walking, jumping and other sequences on various terrains. The key is breaking down the process of bipedal movement and its cyclic behaviour into a series of sub-steps or phases. Each phase translates to a natural posture for the character while moving. The system precomputes the next-phases offline to conserve computational resources at runtime. Then considering user control, previous pose of the character(including joint positions) and terrain geometry, the consequent frame of the animation is computed. The computation is done by a regression network that calculates future position of the joints and a blending function is used for Motion Matching as described in a presentation (PDF) and video by [Simon Clavet]. Continue reading “Neural Networks Walk Better Than Humans For Game Animation”