If you’re looking to jack up your car and you don’t have anything on hand, your 3D printer might not be the first tool you look towards. With that said, [Alan Reiner] had great success with a simple idea to create a surprisingly capable scissor jack with a multi-material print.
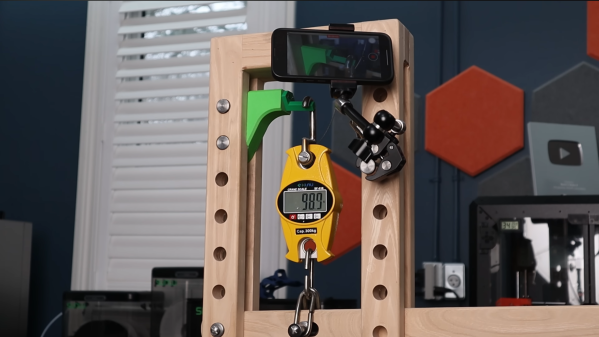
The design will look familiar if you’ve ever pulled the standard jack out of the back of your car. However, this one isn’t made fully out of steel. It relies on an M6 bolt and a rivet nut, but everything else is pure plastic. In this scissor jack design, rigid PETG arms are held in a scissor jack shape with a flexible TPU outer layer. Combined with the screw mechanism, it’s capable of delivering up to 400 pounds of force without failing. It’s an impressive figure for something made out of 80 grams of plastic. The idea came about because of [Alan’s] recent build of a RatRig VCore4 printer, which has independent dual extruders. This allowed the creation of single prints with both rigid and flexible filaments included.
[Alan] did test the jack by lifting up his vehicle, which it kind of achieved. The biggest problem was the short stroke length, which meant it could only raise the back of the car by a couple inches. Printing a larger version could make it a lot more practical for actual use… if you’re willing to trust a 3D-printed device in such use.
Files are on Printables if you wish to make your own. It’s worth paying attention to the warning upfront that [Alan] provides—”THIS CAN CREATE A LOT OF FORCE (400+ lbs!), WHICH MEANS IT CAN STORE A LOT OF ENERGY THAT MIGHT BE RELEASED SUDDENLY. Please be cautious using 3d-printed objects for high loads and wear appropriate safety equipment!”
Funnily enough, we’ve featured 3D printed jacks before, all the way back in 2015! Video after the break.
Continue reading “3D Printed Jack Mixes Two Filaments For Great Performance”