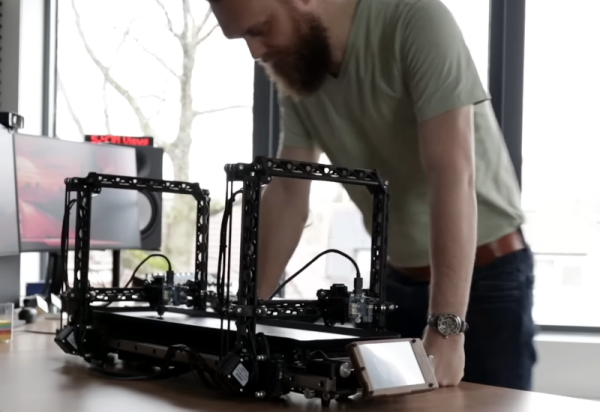
This week Jonathan Bennett and Katherine Druckman sit down with Gina Häußge to talk OctoPrint! It’s one of our favorite ways to babysit our 3D printers, and the project has come a long way in the last 12 years! It’s a labor of love, primarily led by Gina, who has managed to turn it into a full time job. Listen in to hear that story and more, including how to run an Open Source project without losing your sanity, why plugins are great, and how to avoid adding a special services employee as a co-maintainer!
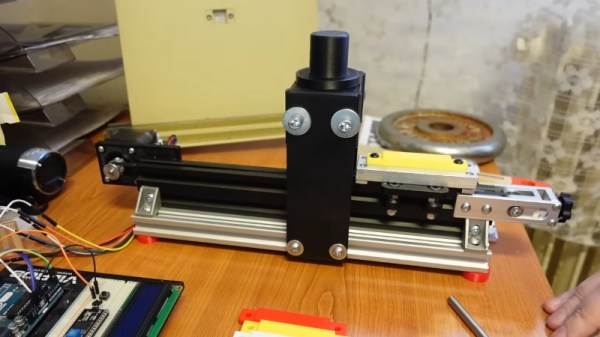
If you look at [Proper Printing’s] latest video — see below — you’ll immediately get the idea behind his latest printer. There are two heads on two separate gantries, which, of course, opens up many possibilities. But when you think you’ve seen enough, you find out the heated bed is a kitchen griddle, and… well, for us, we had to keep watching.
The heated bed idea was interesting, although the flatness left something to be desired. While it is a simple idea, getting the two gantries to move reliably across the hotbed griddle took a lot of parts and a careful design. We wonder how evenly the griddle heats — ours definitely has hot spots when we cook with it.
Over the couple of decades or so since it started to be available at an affordable level, 3D printing has revolutionized the process of making custom objects. But as anyone with a 3D printer will know, sometimes the materials don’t quite live up to the application. There is a huge variety of available filaments to help make better prints, but which one really is the most hard-wearing? [My Tech Fun] set out to measure the resistance to wear of a variety of different 3D printed materials.
The test takes a standard print made across a variety of different materials, and several of each using different manufacturers’ offerings. These are then put on a test rig that moves backward and forward twice a second, with the test piece rubbing against a steel shaft under pressure from a 2.5 kg weight.
As might be expected, the common and cheap PLA performed the worst while PETG, PA, and TPU performed the best. But for us the interesting part comes in the variance between brands; the best PLA sample outperforms the worst ABS and nearly equals the worst of the PETG. Proof that maybe you do get what you pay for.
The whole test is well worth a watch, and if you 3D print anything that might be subjected to mechanical stress you should find it to be of interest. If comparing filaments is something you’d like to see more of, we’ve featured some tests before.
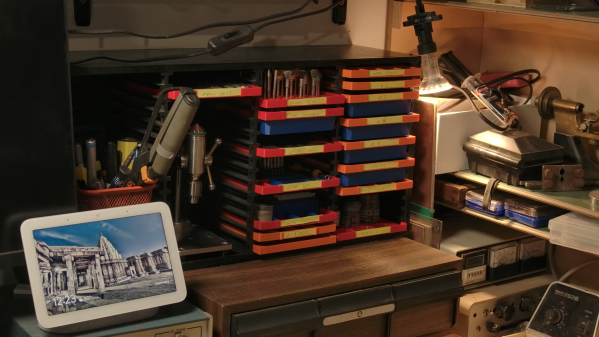
What in the world could an accessory for an obsolete audio medium possibly have to do with keeping all your unruly bits and pieces in order? First of all, we’re not sure the CD is quite dead yet; we’ve got about a thousand of them packed away somewhere, and we’re pretty sure they’ll be back in style again one of these days. Until then, though, the lowly CD rack might be just what you need to get your shop under control.
As [Chris Borge] relates the story, he stumbled over this CD rack at a thrift sale and quickly realized its potential. All it took was some quick design work and a bit of 3D printing. Okay, a lot of 3D printing, including some large, flat expanses for the drawer bottoms, which can be a problem to print reliably. His solution was simple but clever: pause the print and insert a piece of stiff card stock to act as the drawer bottom before continuing to print the sides. This worked well but presented an adhesion problem later when he tried to print some drawer dividers, so those were printed as a separate job and inserted later.
Sadly, [Chris] notes that the CD format is not quite Gridfinity compatible, but that’s not a deal breaker. He also doesn’t provide any build files, but none are really necessary. Once you’ve got the basic footprint, what you do with your drawers is largely dependent on what you’ve got to store. The video below has a lot of ideas for what’s possible, but honestly, we’re looking at all those little parts assortment kits from Bojack and Hilitchi piled up in a drawer and just dreaming about the possibilities here. Add a voice-activated, LED inventory locator, and you’d really have something. Off to the thrift store!
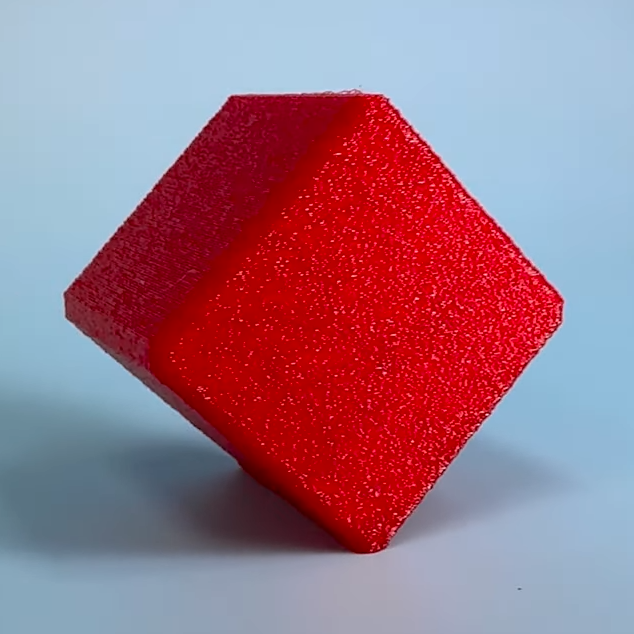
[Slant 3D] knows a lot about optimizing 3D prints so that they can be cranked out reliably with minimal need for post-processing, and in this short video he uses a cube as a simple example of how a few design changes can not only optimize for production, but can even hide layer lines pretty effectively.
Just to be perfectly clear, layer lines cannot be eliminated entirely without some kind of post-processing. But [Slant 3D]’s tips sure goes a long way toward making a part lose that obvious 3D-printed “look”. They also dovetail nicely with advice on how to optimize cranking out high numbers of parts in a print farm.
Adding texture to the outer layer is especially effective when combined with non-traditional part orientations.
One simple way to avoid visible layer lines is to put some kind of texture onto the part. This can be modeled into the part’s surface, or the slicer software can be used to modify the exterior of the print to add a texture such as a geometric pattern or by applying a fuzzy skin modifier.
Printing a texture onto the exterior is great, but the outcome can be even further improved by also printing the object in a non-traditional orientation.
Using a cube as an example, printing the cube on a corner has the advantage of putting the layer lines in a different orientation as well as minimizing the contact area on the print bed. This applies the texture across more of the part, and looks less obviously 3D printed in the process. Minimizing bed adhesion also makes parts much easier to remove, which has obvious benefits for production. [Slant 3D] points out that performing these operations on a 3D-printed part is essentially free.
A few other optimizations for production involve rounding sharp corners to optimize tool travel paths, and putting a slight chamfer on the bottom of parts to avoid any elephant foot distortion (Elephant’s foot can be compensated for, but simply putting a slight chamfer on a part is a design change that helps avoid accounting for machine-to-machine variance.)
Even if one has no need to optimize for high production volume, the tips on hiding layer lines with design changes is great advice. Watch it all in action in the short video, embedded below.
The secret to cranking out a furniture-sized metal frame in minutes is Liquid Metal Printing (LMP), demonstrated by researchers at the Massachusetts Institute of Technology. They’ve demonstrated printing aluminum frames for tables and chairs, which are perfectly solid and able to withstand post-processing like drilling and milling.
The system heats aluminum in a graphite crucible, and the molten metal is gravity-fed through a ceramic nozzle and deposited into a bed of tiny 100-micron glass beads. The beads act as both print bed and support structure, allowing the metal to cool quickly without really affecting the surface. Molten aluminum is a harsh material to work with, so both the ceramic nozzle material and the glass beads to fill the print bed were selected after a lot of testing.
This printing method is fast and scalable, but sacrifices resolution. Ideally, the team would love to make a system capable of melting down recycled aluminum to print parts with. That would really be something new and interesting when it comes to manufacturing.
The look of the printed metal honestly reminds us a little of CandyFab from [Windell Oskay] and [Lenore Edman] at Evil Mad Scientist, which was a 3D printer before hobbyist 3D printers or kits were really a thing. CandyFab worked differently — it used hot air to melt sugar together one layer at a time — but the end result has a similar sort of look to it. Might not be pretty, but hey, looks aren’t everything.
(Update: see it in action in this video, which is also embedded just below. Thanks [CityZen] for sharing in the comments!)
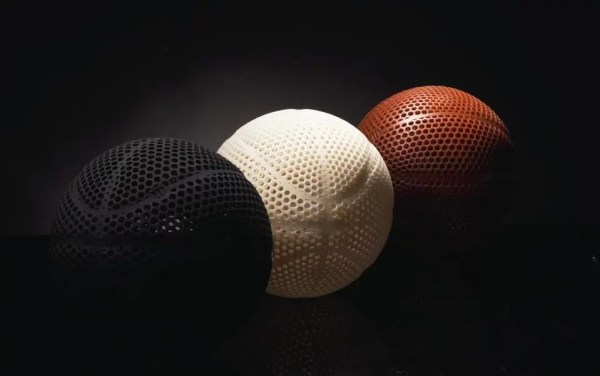
Basketball has changed a lot over the years, and that goes for the sport as well as the ball itself. While James Naismith first prescribed tossing soccer balls into peach baskets to allow athletes to stay in shape over the winter, today, the sport looks quite different both rule-wise and equipment-wise.
The basketball itself has gone through a few iterations. After the soccer ball came a purpose-built leather ball with stitches and a rubber bladder inside. The first molded version came in 1942, although most balls continued to be made of leather, especially for indoor-only use. Today, the NBA still uses leather-clad balls, but that could change. Wilson, the official supplier of NCAA postseason tournament balls, has developed a 3D-printed basketball that never needs to be inflated.
Much like a regular ball, the Wilson Airless Gen1 has eight lobes, bounces like you’d expect, and can be palmed, provided your hand is big enough. We would argue forcefully that it is far from airless, though we do get the point. According to TCT Magazine, the ball “nearly fits” the performance specs of a regular basketball, including weight, size, and rebound. This may not be good enough for the NBA today, but we doubt innovation over at Wilson has stopped abruptly, so who knows what the future holds?
Interested in trying one out? You may be better off trying to design and print one yourself. The limited-edition ball will be available on February 16th at Wilson.com for the low, low price of $2,500. It would probably pair well with the can’t-miss robotic hoop. Or, pair it with a giant 3D-printed hand for display purposes.
Main and thumbnail images via Wilson Sporting Goods