Power Loss Recovery Might Make 3D-Printed Blobs

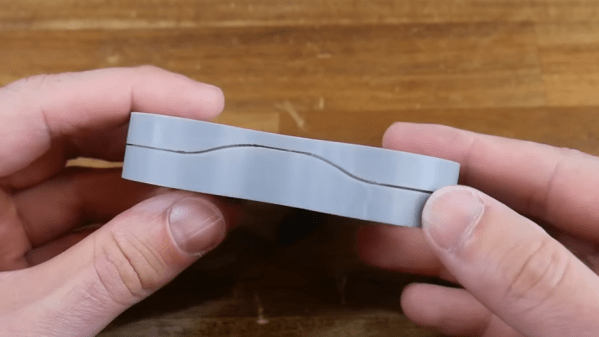
[Geek Detour] had a mystery to solve. A round part he was printing had a distinct pattern of blobs. If you’ve been 3D printing for any length of time, you know that pauses in printing can cause blobs like this. He also showed a perfectly-printed version of the same part and claimed it was from the same printer with the same material and even slicer settings. So what was causing the blobs? You can find the answer in the video below.

As you might guess from the title, however, the issue was the power loss recovery feature built into the printer. While there’s a lot going on in the video, you can break it down to a few items, all of which you can fix in one way or another including the simple fix: turn off power loss recovery.

Continue reading “Power Loss Recovery Might Make 3D-Printed Blobs”

RotBot Adds An Extra Dimension To 3D Printing, With A Twist

It always seemed to us that the Z-axis on a 3D printer, or pretty much any CNC machine for that matter, is criminally underused. To have the X- and Y-axes working together to make smooth planar motions while the Z-axis just sits there waiting for its big moment, which ends up just moving the print head and the bed another fraction of a millimeter from each other just doesn’t seem fair. Can’t the Z-axis have a little more fun?

Of course it can, and while non-planar 3D printing is nothing new, [Stefan] over at CNC Kitchen shows us a literal twist on the concept with this four-axis non-planar printer. For obvious reasons, it’s called the “RotBot,” and it comes via the Zurich University of Applied Sciences, where [Michael Wüthrich] and colleagues have been experimenting with different slicing strategies to make overhang printing more manageable. The hardware side of things is actually pretty intuitive, especially if you’ve ever seen an industrial waterjet cutter in action. They modified a Prusa printer by adding a rotating extension to the print head, putting the nozzle at a 45° angle to the print bed. A slip ring connects the heater and fan and allows the head to rotate 360°, with the extruder living above the swiveling head.

On the software side, the Zurich team came up with some clever workarounds to make conical slicing work using off-the-shelf slicers. As [Stefan] explains, the team used a “pre-deformation” step to warp the model and trick the slicer into generating the conical G-code. The G-code is then back-transformed in exactly the opposite process as pre-deformation before being fed to the printer. The transformation steps are done with a bit of Python code, and the results are pretty neat. Watching the four axes all work together simultaneously is quite satisfying, as are the huge overhangs with no visible means of support.

The academic paper on this is probably worth a read, and thankfully, the code for everything is all open-sourced. We’re interested to see if this catches on with the community.

Continue reading “RotBot Adds An Extra Dimension To 3D Printing, With A Twist”

A bike computer sits on a wooden background. The back of the bike computer has a 3D printed attachment with two white translucent zip ties running through the back.

Repairing A Bike GPS With 3D Printing

We love hacks that keep gadgets out of the trash heap, and [Brieuc du Maugouër] has us covered with this 3D printable replacement mount he designed for his bike GPS.

One of the most frustrating ways a gadget can fail is when a small, but critical part of the device fails. [du Maugouër] combined a 3D printed back and four M2x6mm screws to make a robust new mount to replace the broken OEM mount on his handlebar-mounted GPS. Slots for zip tie mounting are included in case the replacement mount breaks before yet another replacement can be printed. Apparently [du Maugouër] agrees with Chief O’Brien that “in a crunch, I wouldn’t like to be caught without a second backup.” [Youtube]

It’s exciting that we’re finally in a time when 3D printed replacement parts are living up to their potential. This would be a lot easier if more manufacturers posted 3D printed design files instead of getting them pulled from 3D file platforms, but makers will find a way regardless of OEM approval.

We’ve covered a lot of bike hacks over the years including DIY Bike Computers and GPS Trackers. Do you have a project that keeps something from becoming trash or might save the world another way? There’s still time to enter the Save the World Wildcard round of the Hackaday Prize (closes October 16th).

A sliced digital file of a marker light enclosure. Background is a white and grey grid and object itself is a series of print path lines in red, orange, and green.

3D Printing Hard-To-Find Vintage Vehicle Parts

When I was growing up, my dad and I restored classic cars. Combing junkyards for the pieces we needed was a mixture of interesting and frustrating since there was always something you couldn’t find no matter how long you looked. [Emily Velasco] was frustrated by the high price of parts even when she was able to find them, so she decided to print them herself. She wrote an excellent tutorial about designing and 3D printing replica parts if you find yourself in a similar situation.

All four marker lights on [Velasco]’s 1982 Toyota pickup were on their way to plastic dust, and a full set would run her $160. Instead of shelling out a ton of cash for some tiny parts, she set out to replicate the marker lamps with her 3D printer. Using a cheap marker lamp replacement for a more popular model of pickup as a template, she was able to replace her marker lamps at a fraction of the cost of the options she found online. Continue reading “3D Printing Hard-To-Find Vintage Vehicle Parts”

Make Your Own Color Gradient 3D Printing Filament

Color gradient filament is fun stuff to play with. It lets you make 3D prints that slowly fade from one color to another along the Z-axis. [David Gozzard] wanted to do some printing with this effect, and learned how to make his own filament to do the job. 

[David] intended to 3D print a spectrogram of a gravity wave, and wanted the graph to go from blue to yellow. Only having a single-color printer, he needed color shift filament, but couldn’t find any blue-to-yellow filament online.

The resulting color-shifting print looks great, demonstrating the value of the technique.

Thus, he elected to create it himself. He started by creating a spiral model in Fusion 360, with a hexagonal cross-section and slowly tapering off to a point. Slicing and printing this in blue results in a filament that slowly fades down to a point. The opposite shape can then be printed in yellow, tapering from a point up to a full-sized filament. The trick is to print one shape, then the other, by mashing the G-code together and changing the filament from blue to yellow along the way. The result is the blue and yellow plastic gets printed together into a single filament that gradually changes from one to the other.

Notably, the filament is smaller than the original filaments used to create it, so it’s necessary to run slightly different settings when using it. [David] has shared the models on Thingiverse for those eager to recreate the technique at home. His resulting gravity wave print is impressive, demonstrating that this technique works well!

We’ve seen similar different techniques used for creating multi-color filaments before, too. Video after the break.

Continue reading “Make Your Own Color Gradient 3D Printing Filament”

Peer-Reviewed Continuity Tester

One of the core features of the scientific community is the concept of “peer review” where any claims made by a scientist are open to be analyzed and reproduced by others in the community for independent verification. This leads to either rejection of ideas which can’t be reproduced, or strengthening of those ideas when they are. In this community we typically only feature the first step of this process, the original projects from various builders, but we don’t often see someone taking those instructions and “peer reviewing” someone’s build. This is one of those rare cases.

[oxullo] came across [Leo]’s original build for the ultimate continuity tester. This design is much more sensitive than the function which is built in to most multi-meters, and when building this tool specifically some other refinements can be built in as well. [oxullo] began by starting with the original designs, but made several small modifications. Most of these were changing to surface-mount parts, and switching some components for ones already available. Even then, there was still a mistake in the PCB which was eventually corrected. The case for this build is also 3D printed instead of being made out of metal, and with the original video to work from the rest fell into place easily.

[oxullo] is getting comparable results with this continuity tester, so we can officially say that this design is peer reviewed and tested to the highest of standards. If you’re in need of a more sensitive continuity sensor, or just don’t want to shell out for a Fluke meter when you don’t need the rest of its capabilities, this is the way to go. And don’t forget to check out our original write-up for this tester if you missed it the first time around.

Big 3D Printed BMO Is Also An OctoPrint Server

OctoPrint is a useful tool for 3D printers, providing remote access to essentially every 3D printer with a USB port. [Allie Katz] decided to build an OctoPrint server in the shape of a life-sized BMO from Adventure Time, and the results are cute as heck.

A Raspberry Pi 4 is the heart of the build, with [Allie] selecting a 8 GB model for the job. It’s paired with a Raspberry Pi touchscreen that serves as BMO’s face. The Pi is also given a stereo audio output board, and hooked up to a custom PCB that runs all of BMO’s buttons. Printing BMO itself was fairly straightforward, but requires some experience working with larger PETG parts. A useful note for those playing along at home is that Polymaker PolyLite PETG in teal is just about a perfect dupe for BMO’s authentic body color.

A bit of Python code animates BMO’s face and delivers funny quips at the press of a button. When it’s time to work, though, the touchscreen serves as a straightforward interface for OctoPrint. The resulting build is both fun and functional, and a great example of what 3D printing really can achieve. It’s a cute figurine and a functional print all in one, something we don’t see everyday!

Continue reading “Big 3D Printed BMO Is Also An OctoPrint Server”