Colorful Split Keyboard Uses VGA Connections

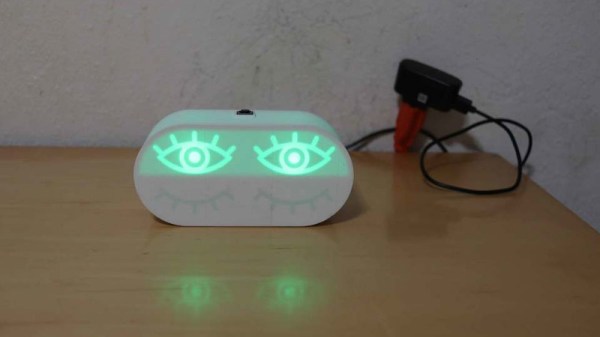
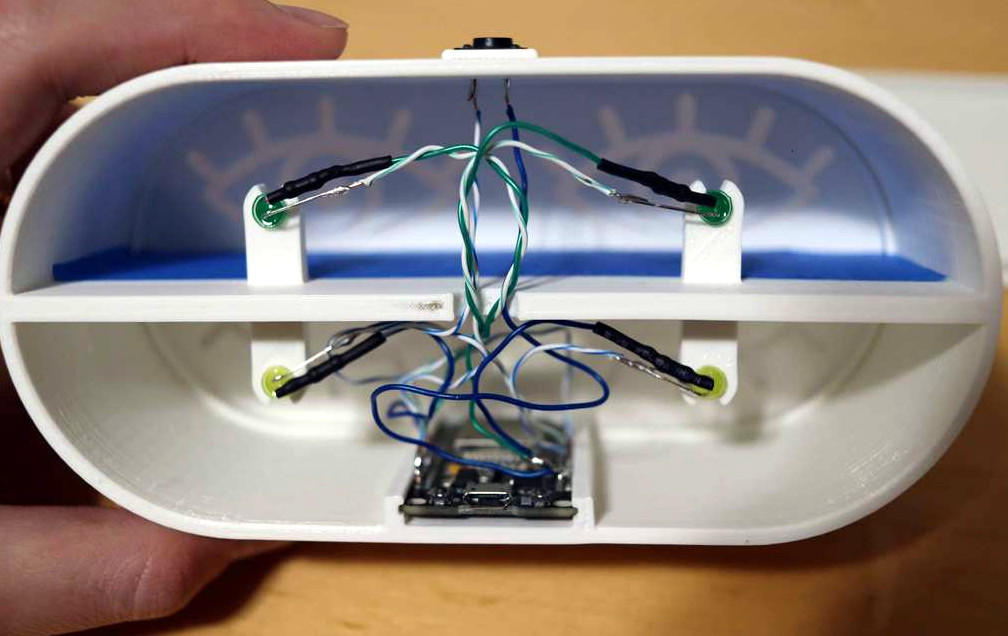
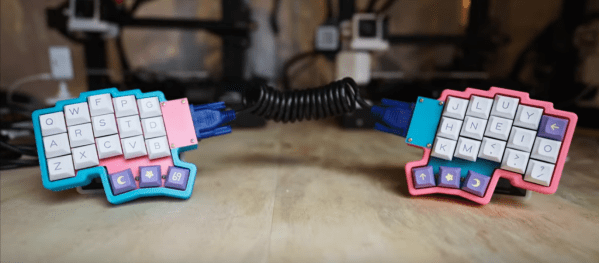
When it comes to building a split keyboard, you have a lot of options when it comes to the cable. Many will use a standard 3.5 mm TRRS cable, and others might use something more esoteric like RJ-45 to run between the halves. This only works if you’re using two controllers; if you only want one controller, you have to pass the matrix from one side to the other, which typically requires more than the four wires offered by the aforementioned choices. While rummaging around, [Joe Scotto] found a VGA cable and thought, why not use that?

This lovely Barbie-themed peripheral is a split version of an earlier board he built called the ScottoFly, which is a monoblock split with a void in the middle. As with that one, this is hand-wired using thicc brass insulated with heat-shrink, uses a solid 3D-printed plate, and a printed case. And like a madman, [Joe] coiled the cable.

Unfortunately, this proved to be problematic in the wire breakage sense, or so he thought. The real problem turned out to be that the middle row of pins on a VGA connector all act like ground, so they can’t be used to pass rows and columns. However, there were still enough viable pins to send the 4×5 matrix across. Be sure to check out the build video after the break.

Continue reading “Colorful Split Keyboard Uses VGA Connections”

Two Esoteric Programming Languages, One Interpreter

Many of you will have heard of the esoteric programming language Brainf**k_. It’s an example language that’s nearly impossible to use because it’s too simple. It’s basically a Turing computer in code – you can essentially put characters into an array, read them out, increment, decrement, and branch. The rest is up to you. Good luck!

What could be worse? Befunge, a language that parses code not just left-to-right or top-to-bottom, but in any direction depending on the use of ^, v, >, and <. (We love the way that GOTO 10 looks like a garden path in the example.)

Uniting the two, [rsheldiii] brings us BrainFunge, a Brainf**k_ interpreter written in Befunge. And surprisingly, the resulting write-up sheds enough light on both of the esoteric programming languages that they make a little bit of sense. If you try to read along, you’ll definitely be helped out by Esolang Park, which was new to us, and accommodates the non-traditional parsing while displaying the contents of the stack.

If you get a taste of the esoteric, and you find that you’d like a little more, we have a great survey of some of the oddest for you. After cutting your teeth on Befunge, for example, we bet you’ll be ready for Piet.

The KrakenSDR in its metal case, with five small antennas connected to it

Open-Source Passive Radar Taken Down For Regulatory Reasons

Open-source technology brings a world that laws and regulations are not quite prepared for. As a result, every now and then, open projects need to work around governmental regulations. In today’s news, KrakenRF team has stumbled into an arms-trafficing legal roadblock for their KrakenSDR-based passive radar code, and is currently figuring it out. There’s no indication that there’s been any legal action from the USA government – the team’s being proactive, as fas as we’re told.

KrakenSDR hardware, to simplify it a lot, is five RTL-SDRs on one PCB – with plenty of work put in to do it the right way. It gets you much further than a few dongles – there’s shielded case, suitable connectors, reliable power distribution, a proper USB hub, and importantly, receiver synchronization hardware. Naturally, there’s nice things you can build with such a hefty package – one of them is passive radar, which was a prominent selling point on both KrakenSDR’s pre-launch page back in 2021, and on their crowdfunding page just a week ago. How does that work?

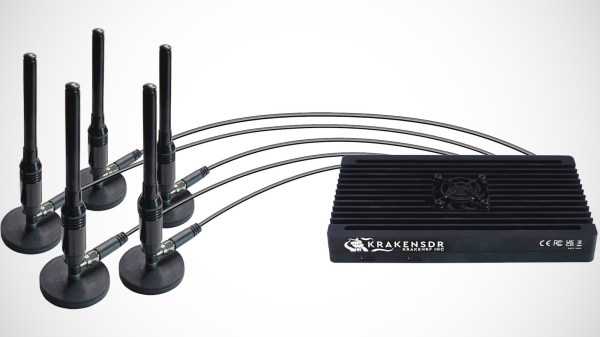
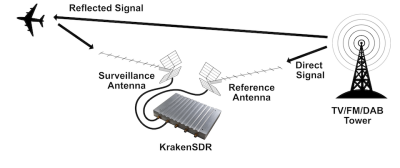
There’s RF emissions floating around you in the air, unless you’re at sea or in the desert. Whether it’s airplane transponders, cell towers, or a crappy switch-mode PSU, the radiowaves emitted interact with objects all around you. If you have multiple receivers with directional antennas, you can catch waves being reflected from some object, compare the wave reflected wave to the wave received from the initial source, and determine the object’s properties like location and speed. If you’d like to know more, IEEE Spectrum has covered this topic just a week ago, and the previously-deleted KrakenSDR wiki page has more details for you to learn from.

Through exposure in IEEE Spectrum, the KrakenSDR work has received plenty of attention and comments. And this is where the International Traffic in Arms Regulations (ITAR) laws come in. We’re not lawyers, but it does look like passive radar is on the list. Today, the code repository and the documentation pages are scrubbed clean while the team is talking to legal experts.

Dealing with this is intimidating, and we wish them luck in clearing this with legal. In the bad old days, certain encryption algorithms were famously in scope, which appeared absolutely ridiculous to us at the time. The laws did eventually change to better reflect reality, but the wheels of justice turn slowly.

ESP32 LED Eyes Help Keep Toddler In Bed

We’ve seen a lot of custom clocks here at Hackaday, many of which have pushed the traditional definition of the timepiece to its absolute limit. But for all their wild designs, most of them do have something in common: they assume you can actually read a clock and understand the concept of time. But what if you’re developing a clock for a toddler who’s only just coming to terms with such heady ideas?

The answer, at least for [Riley Parish] is a set of 3D printed eyes that are illuminated with either yellow or green LEDs depending on whether or not it’s time to get out of bed. More than just the color of the light, the eye design (which is embedded into the rear of the front panel) switches between wide-open and tightly shut depending on the time of day.

Internally the device is very simple, with the 5 mm LEDs and their associated resistors connected directly to the digital out pins on an ESP32 development board. While the dual-core microcontroller is admittedly pretty overkill for flipping some LEDs every 12 hours or so, the firmware does at least pull the current time from NTP — plus the powerful MCU offers plenty of room to grow. A web front-end to configure the device or check its current status would only be a few more lines of code.

As it so happens, this isn’t the first toddler timepiece to grace these pages. Perhaps unsurprisingly, those previous examples also used changing color to help indicate the passage of time.

solenoid wound pickup coil next to a selection of bolts and a steel rod

The Barkhausen Effect: Hearing Magnets Being Born

The Barkhausen effect — named after German Physicist Heinrich Barkhausen — is the term given to the noise output produced by a ferromagnetic material due to the change in size and orientation of its discrete magnetic domains under the influence of an external magnetic field. The domains are small: smaller than the microcrystalline grains that form the magnetic material, but larger than the atomic scale. Barkausen discovered that as a magnetic field was brought close to a ferrous material, the local magnetic field would flip around randomly, as the magnetic domains rearranged themselves into a minimum energy configuration and that this magnetic field noise could be sensed with an appropriately arranged pickup coil and an amplifier. In the short demonstration video below, this Barkhausen noise can be fed into an audio amplifier, producing a very illustrative example of the effect.

One example of practical use for this effect is with non-destructive testing and qualification of magnetic structures which may be subject to damage in use, such as in the nuclear industry. Crystalline discontinuities or impurities within a part under examination result in increased localized mechanical stresses, which could result in unexpected failure. The Barkhausen noise effect can be easily leveraged to detect such discontinuities and give the evaluator a sense of the condition of the part in question. All in all, a useful technique to know about!

If you were thinking that the Barkhausen is a familiar name, you may well be thinking about the Barkhausen stability criterion, which is fundamental to describing some of the conditions necessary for a linear feedback circuit to oscillate. We’ve covered such circuits before, such as this dive into bridge oscillators.

Continue reading “The Barkhausen Effect: Hearing Magnets Being Born”

Art of 3D printer in the middle of printing a Hackaday Jolly Wrencher logo

Brainstorming

One of the best things about hanging out with other hackers is the freewheeling brainstorming sessions that tend to occur. Case in point: I was at the Electronica trade fair and ended up hanging out with [Stephen Hawes] and [Lucian Chapar], two of the folks behind the LumenPnP open-source pick and place machine that we’ve covered a fair number of times in the past.

Among many cool features, it has a camera mounted on the parts-moving head to find the fiducial markings on the PCB. But of course, this mean a camera mounted to an almost general purpose two-axis gantry, and that sent the geeks’ minds spinning. [Stephen] was talking about how easy it would be to turn into a photo-stitching macrophotography rig, which could yield amazingly high resolution photos.

Meanwhile [Lucian] and I were thinking about how similar this gantry was to a 3D printer, and [Lucian] asked why 3D printers don’t come with cameras mounted on the hot ends. He’d even shopped this idea around at the East Coast Reprap Festival and gotten some people excited about it.

So here’s the idea: computer vision near extruder gives you real-time process control. You could use it to home the nozzle in Z. You could use it to tell when the filament has run out, or the steppers have skipped steps. If you had it really refined, you could use it to compensate other printing defects. In short, it would be a simple hardware addition that would open up a universe of computer-vision software improvements, and best of all, it’s easy enough for the home gamer to do – you’d probably only need a 3D printer.

Now I’ve shared the brainstorm with you. Hope it inspires some DIY 3DP innovation, or at least encourages you to brainstorm along below.

At A Loss For Words? Try A Teleprompter

With everyone doing videos these days, you might want to up your narration game with a teleprompter. [Modern Hobbyist] can help. Since he does videos — like the one about the teleprompter below — we assume he built it out of his own need for the device. Actually, this is his second teleprompter. The first one was larger and not battery-powered, so this new version offers more portability. The camera shoots through the teleprompter screen so you can look right at the camera and still stay on script.

The project reuses some of the original teleprompter code, showing a text file via a Raspberry Pi. There’s also a control keyboard that lets you remotely control the scrolling speed. The real key to this project though is the 3D printed housing. Well, that and the reflective glass screen. Given that, you could do the actual text display in a number of ways.

Apparently, the portability of the build is limited somewhat by the weight of the camera. You could, of course, use something lighter or perhaps add some weight opposite to at least balance it a bit. The 3D printing files are on Thingiverse and the rest is on GitHub, so you can easily make changes if you want.

You would think we would see more teleprompter projects, and we do see some. We’ve also seen a hack to let you look through your laptop screen on video conferences.

Continue reading “At A Loss For Words? Try A Teleprompter”