A Handy OSHW USB Cable Tester For Your Toolkit

There’s no shame in admitting you’ve been burned by a cheapo USB cable — ever since some bean counter realized there was a few cents to be saved by producing “power only” USB cables, no hardware hacker has been safe. But with this simple tester from [Álvaro Prieto] in your arsenal, you’ll never be fooled again.

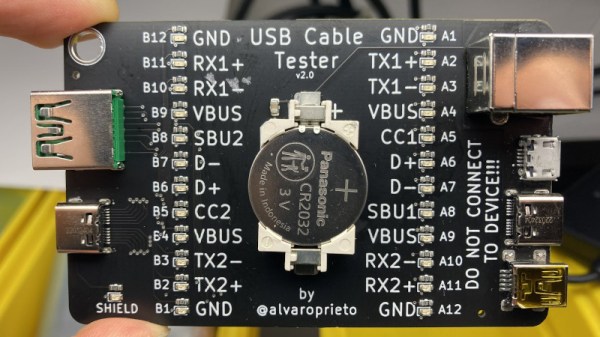
It’s about as straight-forward a design as possible, utilizing nothing more than a two dozen LEDs, their associated resistors, and a common CR2032 coin cell. Simply plugging both sides of your cable into the various flavors of USB connectors on the tester will complete the necessary circuits to light up the corresponding LEDs, instantly telling you how many intact wires are inside the cable. So whether you’re dealing with some shady cable that doesn’t have the full complement of conductors, or there’s some physical damage that’s severed a connection or two, you’ll know at a glance.

A sage warning for most of the devices we build.

Obviously the tester is designed primarily for the 24 pins you’ll find in a proper USB-C connector, but it’s completely backwards compatible with older cables and connectors. We appreciate that he even included the chunky Type B connector, which we’ve always been fond of thanks to its robustness compared to the more common Mini and Micro variants.

Keep in mind though that this tester will only show you if there’s a connection between two pins, it won’t verify how much power it can actually handle. For that, you’ll need some extra equipment.

New Part Day: Exotic Filament For RF Dielectric Structures

The world of microwave RF design appears to the uninitiated to be full of unimaginably exotic devices, as engineers harness the laws of physics to tame radio signals to their will. Among the weapons in their arsenal are materials of known dielectric properties, from which can be made structures with the desired effects on RF that encounters them. This has traditionally been a difficult and expensive process, but it’s one now made much easier by the availability of 3D printer filaments with a range of known dielectric values.

It’s best to think of the structures which can be designed using these materials as analagous to Fresnel lenses we’re all used to in the light domain. The example piece given by Microwave Journal is a metasurface for use in a steerable antenna, something that would be a much more difficult piece of work by more traditional means.

Normally when we inform you of a new special filament we’d expect it to be more costly than standard PLA, but this filament is in a class of its own at 275 euros per kilogram. So the interest for most readers will probably be more in the technology than the expectation of use, but even then we can see that there will still be microwave experimenters in our range who might be tempted by its unique properties. We look forward to what is developed using it.

Via Microwave Journal. Thanks to [Eric Mockler] for the tip!

Hackaday Links Column Banner

Hackaday Links: November 20, 2022

Lots of space news this week, with the big story being that Artemis I finally blasted off for its trip to the Moon. It was a spectacular night launch, with the SLS sending the crew-rated but vacant — well, mostly vacant — Orion spacecraft on a week-ish long trip to the Moon, before spending a couple of weeks testing out a distant retrograde orbit. The mission is already returning some stunning images, and the main mission goal is to check out the Orion spacecraft and everything needed for a crewed Artemis II lunar flyby sometime in 2024. If that goes well, Artemis III will head up in 2025 with a crew of four to put the first bootprints on the Moon in over 50 years.

Of course, like the Apollo missions before it, a big part of the crewed landings of the Artemis program will likely be the collection and return of more lunar rock and soil samples. But NASA likes to hedge its bets, which is perhaps why they’ve announced an agreement to purchase lunar regolith samples from the first private company to send a lander to the Moon. The Japanese start-up behind this effort is called ispace, and they’ve been issued a license by the Japanese government to transfer samples collected by its HAKUTO-R lander to NASA. Or rather, samples collected on the lander — the contract is for NASA to take possession of whatever regolith accumulates on the HAKUTO-R’s landing pads. And it’s not like ispace is going to return the samples — the lander isn’t designed to ever leave the lunar surface. The whole thing is symbolic of the future of space commerce, which is probably why NASA is only paying $5,000 for the dirt.

Continue reading “Hackaday Links: November 20, 2022”

This Standalone Camera Gets The Picture Through With SSTV

These days, sending a picture to someone else is as simple as pulling out your smartphone and sending it by email or text message. It’s so simple a child can do it, but that simple user experience masks a huge amount of complexity, from the compression algorithms in the phones to the huge amount of distributed infrastructure needed to connect them together. As wonderful and enabling as all that infrastructure can be, sometimes it’s just too much for the job.

That seems to have been the case for [Dzl TheEvilGenius], who just wanted to send a low-resolution image from a remote location. It turns out that hams solved that problem about 70 years ago with slow-scan television, or SSTV. While most of the world was settling down in front of “I Love Lucy” on the regular tube, amateur radio operators were figuring out how to use their equipment to send pictures around the world. But where hams of yore had to throw a considerable amount of gear at the problem, [Dzl] just used an ESP-32 with a camera and some custom code to process the image. The output from one of the MCU’s GPIO pins is a PWM audio signal which can be fed directly into the microphone input of a cheap portable transceiver.

To decode the signal, [Dzl] used one of the many SSTV programs available. There’s no mention of the receiver, although it could be pretty much anything from another Baofeng to an SDR dongle. The code is available in the article, as is an audio file of an encoded image, if you just want to play around with the receiving and decoding side of the equation.

We could see something like this working for a remote security camera, or even for scouting hunting spots. If you want to replicate this, remember that you’ll need a license if you want to transmit on the ham bands — relax, it’s easy.

A smartphone-sized PCB is in a person's hand. A large blue chip package houses a 486 and the board has a SoundBlaster card and a 40 PIN Raspberry Pi Connector along one edge for attaching a Raspberry Pi Zero.

TinyLlama Is A 486 In Your Pocket

We love retrocomputing and tiny computers here at Hackaday, so it’s always nice to see projects that combine the two. [Eivind]’s TinyLlama lets you play DOS games on a board that fits in your hand.

Using the 486 SOM from the 86Duino, the TinyLlama adds an integrated Crystal Semiconductor audio chip for AdLib and SoundBlaster support. If you populate the 40 PIN Raspberry Pi connector, you can also use a Pi Zero 2 to give the system MIDI capabilities when coupled with a GY-PCM5102 I²S DAC module.

Audio has been one of the trickier things to get running on these small 486s, so its nice to see a simple, integrated solution available. [Eivind] shows the machine running DOOM (in the video below the break) and starts up Monkey Island at the end. There is a breakout board for serial and PS/2 mouse/keyboard, but he says that USB peripherals work well if you don’t want to drag your Model M out of the closet.

Looking for more projects using the 86Duino? Checkout ISA Sound Cards on 86Duino or Using an 86Duino with a Graphics Card.

Continue reading “TinyLlama Is A 486 In Your Pocket”

A working, partially disassembled thermal camera

Cheap Display Fix Brings Thermal Camera Back To Life

When it comes to repairability of electronic devices, much depends on how helpful the original manufacturer is. Some make repairs very easy by publishing detailed service manuals and selling spare parts. Others keep everything under wraps to protect their intellectual property, turning even a supposedly simple fix into a reverse engineering ordeal. When [BuyItFixIt] got his hands on a FLIR multimeter-thermal camera combination instrument with a broken display, he quickly found that FLIR was firmly in the “all our designs are top secret” camp and wouldn’t even tell him what kind of display they had used.

Not to be deterred, [BuyItFixIt] took the meter apart and tried to find out what was going wrong. The signals from the microprocessor seemed to reach the display OK, so the fault was somewhere in the screen itself. The display’s part number didn’t return any useful results online, but AliExpress did have a very similar-looking display available with a slightly different part number. This display seemed to work at first, but the instrument then got caught in a boot loop.

Unlike FLIR, the supplier of the replacement display was happy to supply datasheets, and even had one available for the original FLIR part. With this new information [BuyItFixIt] was able to deduce that the new screen didn’t output one signal that the processor expected to see, causing it to reset itself. A simple workaround was to connect the corresponding pin to a PWM signal from the backlight controller, which fooled the CPU into thinking the proper display was connected.

In this case, a $12 display and a single piece of wire were enough to bring an expensive instrument back to life, but things are not always that simple. More complex machines can take weeks to debug, even if parts are available. If not, you might even need to design your own. Continue reading “Cheap Display Fix Brings Thermal Camera Back To Life”

A Gaggia classic espresso machine with an LCD screen attached to the top, sitting on a table with vase of yellow lily flowers to its left and sunlight coming in from a window from the right.

Homebrew Espresso Maker Modding With Gaggiuino

For those that don’t know, Gaggia is a company that produces a line of affordable “entry-level” espresso coffee makers that offer good quality consumer espresso machines at reasonable prices. The entry level machines don’t offer fine grained control over temperature, pressure and steam which is where the Gaggiuino project comes in.

A schematic of the Gagguino project

The Gaggiuino project is an “after market” modification of many espresso makers, such as the Gaggia classic and Gaggia classic pro. The main additions are a MAX6675 thermocouple module paired with a K-Type thermocouple sensor for closed loop control over the temperature. Options for adding an AC dimmer module that attaches to the pump motor and a 0 Mpa to 1.2 Mpa ranged XDB401 pressure sensor, installed in line between the pump and the boiler, provide further closed loop control over the pressure and flow profiling.

Load cells can be attached to the drip tray to allow for feedback about the pour weight with a Nextion 2.4″ LCD touchscreen provides the user interface for profile selection and other interactivity. The project offers a “base” modification using an Arduino Nano as the microcontroller, in line with its namesake, but has an option for an STM32 Blackpill module that can provide more functionality beyond the scope of the Nano.

The Gaggiuino project is open source with code and extensive documentation available on GitHub. There is also a Discord community for those wanting help with their build or that have the inclination to share their passion for DIY espresso modding with the Gaggiuino. Espresso machine hacks are a favorite of ours and we’ve featured many projects on espresso machine builds and mods ranging from PID control of classic espresso makers to beautifully minimal closed loop homebrew espresso machines.

Continue reading “Homebrew Espresso Maker Modding With Gaggiuino”