Hacking Together A Color Changing Water Wall

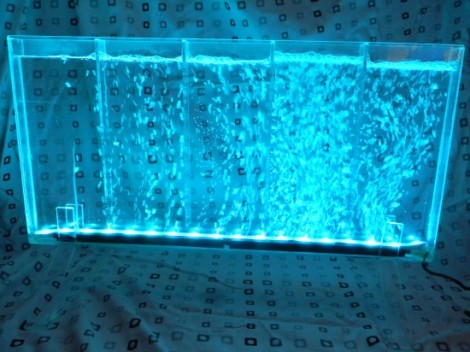
[BadWolf’s] girlfriend wanted him to build her a lamp for Christmas and he didn’t disappoint. What he came up with is a water-filled color changing lamp with bubbles for added interest. See for yourself in the clip after the jump.

The color changing properties are easily taken care of by some waterproof RGB LED strips. [BadWolf] went the Arduino route for this project but any microcontroller will be able to fill the role of color cycling. The enclosure is all hand-made from acrylic sheets. He grabbed some chemical welding liquid from the hardware store and applied it to the acrylic with a syringe. That’s easy enough when attaching the edges to one side of the enclosure. But it gets much tougher when it’s time to seal up the other side. He recorded a video of this which shows the syringe taped to a rod so he can get it down in there, pushing the plunger with a second extension device.

Bubbles are supplied by a small aquarium pump. We’re wondering if this will need frequent cleaning or if you can get some pool chemicals to keeps it nice and clear (or just a teaspoon of bleach)? Continue reading “Hacking Together A Color Changing Water Wall”

Happy Late Lit Acrylic Valentines Day

Although [Danman] was right on time with his home-hacked Valentines day gift, this article comes to you a little late. With the message on the heart changed, however, it could be a perfect “Sorry I forgot Valentines Day again” gift, so it may still be useful.

The concept isn’t that complicated, simply a strip of LED lights around a piece of acrylic. A battery holder and switch rounds out this build. It’s a neat way to light things up, but what we thought was especially interesting was the way it was engraved and cut out with a minimum of traditional tools.

Sure, [Danman] had access to a bandsaw, but as for actually engraving the outline he used a modified electric toothbrush! We’d love to see that build written up. If that wasn’t enough, the lettering was “ghetto blasted”, as he puts it, using a compressed air nozzle, a pen tube, and a styrofoam cup full of ceramic dust! Macgyver would be proud!

A Lot Of Love Went Into This Glowing Valentine

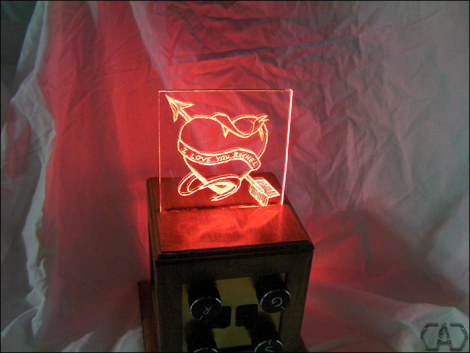
[Will] didn’t pick up a card, rose, and bottle of wine for Valentine’s Day like most guys. Nope, he planned way ahead and built this color-selectable glowing Valentine. When we first saw it, we figured he threw some LEDs together with a microcontroller and edge-lit a piece of acrylic. While that is technically what happened, there was a lot more design and craftsmanship at play here than you might think.

First off, the controller board is a beautifully designed two-sided PCB which he etched rather than throwing a mess of wires and hot glue into an enclosure. Speaking of enclosures, he grabbed a wooden picture box from the big box store and used a piece of brass plate stock to serve as the control panel. The enclosure was finished with tinted polyurethane after having a slit added to the top for the acrylic. The message itself was milled using an engraving bit and a Dremel tool. This was done by hand and we think achieves a finished look that is comparable to the CNC milled ornaments we’ve seen in the past.

Get a good look at the device and a demonstration of its features in the clip after the jump.

Continue reading “A Lot Of Love Went Into This Glowing Valentine”

Hackaday Links: December 25, 2011

Ah, Christmas. That wonderful time of year when you can roll out of bed to the screams and wails of children, grab a hot cocoa, and spend several hours arguing with an 8-year-old about which LEGO set to build first. Simply magical. While you’re waiting for the Doctor Who Christmas special to come on, settle down with these wonderful Christmas-themed builds that came in over the last few weeks.

One step closer to Robot Santa

Here’s an interesting way to spice up your seasonal headwear. [Mark] took a Santa hat and added a string of multicolored LEDs to the brim. The lights were picked up at a drug store for a dollar. Control is through a simple push button connected to an ATtiny13. Press the button, the lights cycle in a different pattern. Very cool, so check out the video.

A holographic holiday tree

[Auger] posted this very cool light up Christmas tree decoration on Instructables. This tree is made up of three pieces of acrylic. Different designs were laser cut into each piece of plastic – candy canes for the ‘red’ piece, stars and tinsel for the ‘yellow’ piece, and the tree for the ‘green’ piece. LEDs of the respective colors are cemented to the bottom of each bit of plastic. It’s called light piping and is used everywhere. This is the first time we’ve seen three colors, though.

This is what nerds do, and it’s awesome

[Rickard Dahlstrand] was playing around with his phone trying to take deliberately fuzzy pictures of his tree. He noticed the dashes produced from the LED Christmas lights must be produced from PCM dimming. Going through the EXIF data in the picture, he found the exposure time was 1/17th of a second. 1/17 of a second = ~ 58 ms / 5 (cycles on the picture) = ~11 ms per cycle = ~100 Hz frequency on the PCM dimming. Of course this is just about 2 times the line frequency in [Rickard]’s native Sweden, so we’ll call this confirmed. There’s no blog post for this, but we’ve never seen a clearer example of applied geekery. Simply awesome.

Yeah, we measured [Rickard] on a nerd meter

In the spirit of giving, [Johannes] decided to tell the entire world exactly how nerdy he is. He built a ‘Nerd Alert’ meter out of an old 1950s Japanese multimeter. The old guts of the meter were chucked, and a simple amp made out of a transistor amplifies the current flowing through the user’s fingers. A neat scale ([Johannes] measures somewhere between Amiga Workbench and Space invaders) replaces the old, boring, number-based one. Again, no write-up, but here’s some awesome build pictures.

Finally a use for all those old radio tubes

[AUTUIN] took apart a vacuum tube with a blow torch and a diamond cutting wheel. Surprisingly, he was able to put it back together, but not before making a wonderful Christmas ornament. There are two copper wires inside the envelope that are the leads to a single orange-red LED. The whole thing is powered by a watch battery. We’ll be sure to reference [AUTUIN] next time we have to take apart a glass bulb, because he managed not to burn, cut or blind himself.

Six things in a links post? It’s a Christmas miracle!

[Darryl] sent in a nice tool to select and display all of the hacker/maker merit badges available from Adafruit. Oh, we’re still trying to figure out who to give 10 badges to. We’re giving away skull ‘n wrench badges to the top ten hacks ever featured here. Leave a note in the comments, or tell us who should win.

Holiday wishes

Now put the computer down and go spend some time with your families, or failing that, strangers. Of course there’s an all day Doctor Who marathon, and that thing isn’t going to watch itself…
How To Grow Your Own EL Wire DNA Helix Lamp

el-wire-helix-lamp

[LucidMovement] was looking for some crystal-based artwork and just couldn’t seem to find anything that fit the bill, so he decided to build something himself.

The inspiration for his desk lamp came from something we’re all familiar with, a DNA double-helix. To grow the crystals he built a helix-shaped growing substrate out of nichrome and EL wires, submerging them in a warm alum solution. Once he had a nice set of crystals, he mounted it in an acrylic tube, filling the air space with clear silicone to seal off the display. He then mounted the silicone-filled tube on top of a rotating acrylic stand that he had cut for the project. The stand is made from several sheets of acrylic and contains both the gearing for movement as well as RGB LEDs to light the display from the bottom.

The lamp looks great when sitting idle, but when he powers it on it really shines (no pun intended). [LucidMovement] put a ton of work into the lamp, and offers up all sorts of tips, tricks, and considerations for anyone looking to build their own. Be sure to check out his writeup for plenty more details, and stick around to see a short video of the lamp in action.

Continue reading “How To Grow Your Own EL Wire DNA Helix Lamp”

Lighted Acrylic Christmas Ornaments

If you’ve gone to the trouble of building your own CNC mill we know you’re always on the lookout for things to use it for. [Boris Landoni] wrote in with just the thing for the holiday season; a set of lighted acrylic Christmas ornaments.

One of the interesting properties of acrylic is how it reacts when edge-lit. The material pipes the light, until it bounces off of a disturbance in the surface. The first step is to design the outline of the ornament as all cut edges will glow. Next, [Boris] uses artCAM to design the internal parts to be cut. This application translates the relief cuts necessary to really make your design shine (sorry, we couldn’t resist). The best examples of this are the angel and candle seen above.

Each of these acrylic pieces has a slot cut on the bottom to hug an LED. [Boris] used small project boxes with a PCB for that diode, as well as a button battery for power.

Hone Your Skills By Building Control Modules

If you ask us, there’s no substitute for learning by doing. But often the hardest part of acquiring new skills is coming up with the idea for a project that utilizes them. [Mike Rankin] wanted to develop a project using laser cut acrylic, and settled on building a control box for an RGB LED strip. He got some practice modeling objects in SolidWorks and seeing the process through to the final build. But it also let him explore an area of microcontroller programming in which he had little experience.

The LED strip he’s using depends on the HL1606. This is an SPI addressable chip that we see popping up in a lot of projects these days. It’s pretty simple to send red, green, and blue values through the data bus, and it allowed [Mike] to try his hand at programming menus and sub-menus. The controller takes input from a clickable rotary encoder. The settings are displayed on an OLED screen, with all the hardware nestled comfortably in his custom-cut enclosure.

Don’t miss the demo video embedded after the break.

Continue reading “Hone Your Skills By Building Control Modules”