Simple Jig Gives Plastic Homes To Orphaned Projects

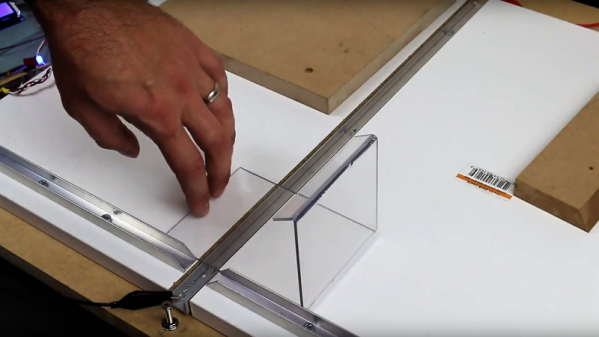
Look around your bench and chances are pretty good that there’s a PCB or scrap of perfboard or even a breadboard sitting there, wires and LEDs sprouting off it, doing something useful and interesting. Taking it to the next level with a snazzy enclosure just seems too hard sometimes, especially if you don’t have access to a 3D printer or laser cutter. But whipping up plastic enclosures can be quick and easy with this simple acrylic bending outfit.

At its heart [Derek]’s bending rig is not much different from any of the many hot-wire foam cutters we’ve featured. A nichrome wire with a tensioning spring is stretched across a slot in a flat work surface. The slot contains an aluminum channel to reflect the heat from the wire upward and to protect the MDF bed; we wonder if perhaps an angle section set in a V-groove might not be more effective, and whether more vertical adjustment range would provide the wider heating area needed for wider radius bends. It works great as is, though, and [Derek] took the time to build a simple timer to control the heating element, for which of course he promptly built a nice looking enclosure.

We can imagine the possibilities here are endless, especially if you use colored acrylic or Lexan and add in some solvent welding. We’ve covered acrylic enclosure techniques before; here’s a post that covers the basics.

Continue reading “Simple Jig Gives Plastic Homes To Orphaned Projects”

Homemade Bulletproof Glass, Built And Tested

Hackers tend to stash away lots of stuff that seems useless, right up until it saves the day. This includes not just junk in our parts bin but brains full of tips and tricks for the shop. With that in mind, you might want to file away a few of the tips in [AvE]’s video of how he made bulletproof glass for a rainy day.

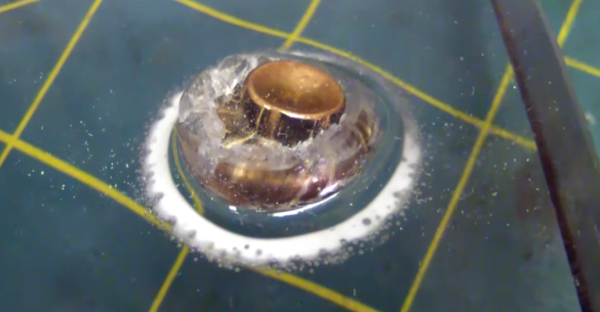
By his own admission, [AvE]’s video is a little disjointed, and the topic of the bulletproof glass is only covered at the beginning and again briefly at the end. Most of the video concerns the machining of a stout stand for the glass for testing on the range. There’s plenty to learn from the machining, though, and [AvE] is always good for a laugh, so the video is worth a watch. The bulletproof glass itself is part of a long-term project that [AvE] is releasing first to his Patreon patrons – a ridiculously over-built flashlight dubbed “The Midnight Sun”. His first two tries at laminating the Lexan discs were less that optimal, as both brands of cyanoacrylate glue clouded the polycarbonate. Stay tuned to the end of the video for the secret of welding Lexan together into an optically clear sandwich.

As for testing under fire, [AvE] sent the rig off to buddy [TAOFLEDERMAUS] for the hot lead treatment. The video after the break shows that the glass is indeed bulletproof, as long as the bullet in question is a .22LR. Not so much for the 9mm, though – that was a clear punch-through. Still, pretty impressive performance for homebrew.

If you want something that can stop an arrow, there’s a lot of materials science to be learned from the ancient Greeks.

Continue reading “Homemade Bulletproof Glass, Built And Tested”

Homemade Polariscope Is Super Easy To Make

polariscope

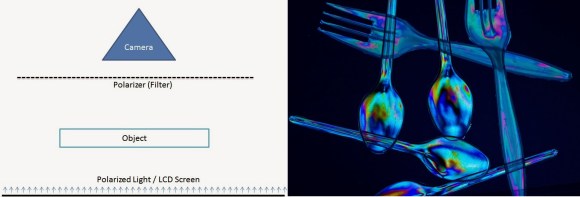
[Abhimanyu Kumar] was watching YouTube videos one day when he came across something called a Polariscope — After learning how it worked, he discovered you can make your own using household items!

First off, what is a Polariscope? Well, put simply, it is a device that can show you the photoelasticity of a clear specimen, which can reveal the stress distribution in the material! And it is actually really easy to make one.

All you need to build your own is:

  • A polarized light source (any modern LCD monitor)
  • A transparent specimen (plastic cutlery, glass statues, plastic you can bend, etc)
  • A circular polarizing filter (the cheap 3D glasses you didn’t return at the theater)

Then just place the objects in the order shown in the diagram and start snapping some photos. This would be really cool for checking stress concentrations in a project — provided you are using some Lexan or acrylic!

Lighted Acrylic Christmas Ornaments

If you’ve gone to the trouble of building your own CNC mill we know you’re always on the lookout for things to use it for. [Boris Landoni] wrote in with just the thing for the holiday season; a set of lighted acrylic Christmas ornaments.

One of the interesting properties of acrylic is how it reacts when edge-lit. The material pipes the light, until it bounces off of a disturbance in the surface. The first step is to design the outline of the ornament as all cut edges will glow. Next, [Boris] uses artCAM to design the internal parts to be cut. This application translates the relief cuts necessary to really make your design shine (sorry, we couldn’t resist). The best examples of this are the angel and candle seen above.

Each of these acrylic pieces has a slot cut on the bottom to hug an LED. [Boris] used small project boxes with a PCB for that diode, as well as a button battery for power.

Machine Your Own Ring Light

[Alan] acquired a stereo microscope from eBay, and decided to save some more money by designing, machining, and assembling his own arc reactor ring light to go along. After finding an LED driver board sitting around as well as ordering some surface mount LEDs, he set about using a lathe to cut away a block of lexan, making sure to include slots for the lights as well as the microscope mount point. Follow the link to see the detailed build photos, as well as some comparison shots with and without the ring light.

A month or two earlier though, and [Alan] would have had a fantastic start to an Iron Man costume.