This GCode Post-Processor Squeezes Lines Into Arcs

When the slicer software for a 3D printer model files into GCode, it’s essentially creating a sequential list of connected line segments, organized by layer. But when the features of the original model are dense, or when the model is representing small curves, slicers end up creating a proliferation of teeny segments to represent this information.

This is just the nature of the beast; lots of detail translates into lots of teeny segments. Unfortunately, some printers actually struggle to print these models at the desired speeds, not because of some mechanical limitation, but because the processor cannot recalculate the velocities of these segments fast enough. The result is that some printers simply stutter or slow down the print, resulting in print times that are much higher than they should be.

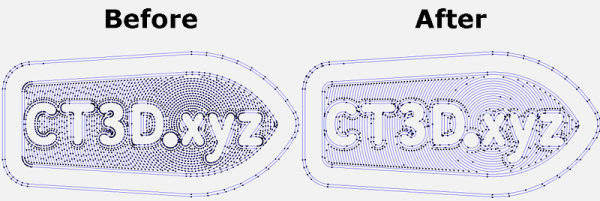
Enter Arc Welder, a GCode compression tool written by [FormerLurker] that scrutinizes GCode files, hunts for these tiny segments, and attempts to replace contiguous clusters of them with a smaller number of arcs. The result is that the number of GCode commands needed to represent the model drop dramatically as connected clusters of segment commands become single arc commands.

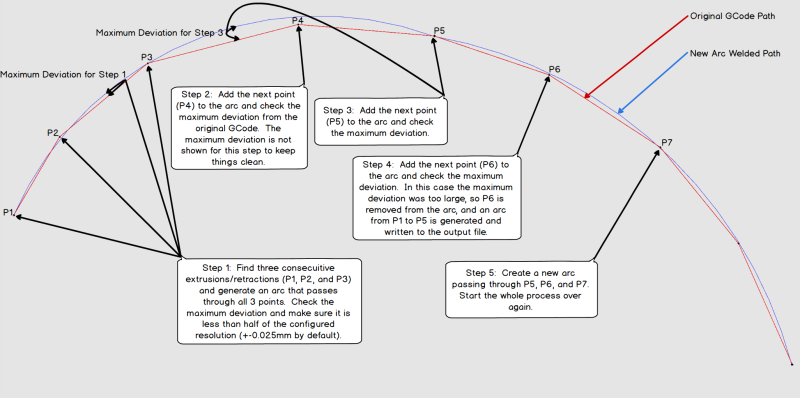
“Now wait”, you might say, “isn’t an arc an approximation of these line segments?” And yes–you’re right! But here lies the magic behind Arc Welder. The program is written such that arcs only replace segments if (1) an arc can completely intersect all the segment-to-segment intersections and (2) the error in distance between segment and arc representation is within a certain threshold. These constraints act such that the resulting post-processing is true to the original to a very high degree of detail.

A concise description of Arc Welder’s main algorithm as pulled from the docs

This whole program operates under the assumption that your 3D printer’s onboard motion controller accepts arc commands, specifically G2 and G3. A few years ago, this would’ve been uncommon since, technically, 3D printing and STL file only requires moving in straight line segments. But with more folks jumping on the bandwagon to use these motion control boards for other non-printing applications, we’re starting to see arc implementations on boards running Marlin, Smoothieware, and the Duet flavor of RepRap Firmware.

For the curious, this program is kindly both well documented on operating principles and open source. And if [FormerLurker] seems like a familiar name before–you’d be right–as they’re also the mind behind Octolapse, the 3D printing timelapse tool that’s a hobbyist crowd favorite. Finally, if you give Arc Welder a spin, why not show us what you get in the comments?

Thanks for the tip [ImpC]!

Fuel From Water Using Only An Arc Welder

Water, high currents, blinding balls of plasma, and a highly flammable gas that’s toxic enough to kill you in three minutes if you breathe enough of it. What’s not to love about this plasma-powered water gas generator?

In all seriousness, [NightHawkInLight] is playing with some dangerous stuff here, and he’s quite adamant about this one being firmly in the “Don’t try this at home” category. But it’s also fascinating stuff, since it uses nothing but a tank of water and an electric arc to produce useful amounts of fuel very quickly. It’s easy to jump to the conclusion that he’s talking about the electrolytic splitting of water into the hydrogen-oxygen mix HHO, but this is something else entirely.

Using a carbon electrode torch connected to his arc welder, a setup that’s similar to the one he used to make synthetic rubies, [NightHawkInLight] is able to strike an underwater arc inside a vessel that looks for all the world like a double-barreled bong. The plasma creates a mixture of carbon monoxide and hydrogen which accumulates very rapidly in the gasometer he built to collect the flammable products produced by a wood gasifier.

The water gas burns remarkably cleanly, but probably has limited practical uses. Unless you live somewhere where electricity costs practically nothing, it’ll be hard to break even on this. Still, it’s an interesting look at what’s possible when plasma and water mix.

Continue reading “Fuel From Water Using Only An Arc Welder”

A Quick And Easy Recipe For Synthetic Rubies

With what it takes to make synthetic diamonds – the crushing pressures, the searing temperatures – you’d think similar conditions would be needed for any synthetic gemstone. Apparently not, though, as [NightHawkInLight] reveals his trivially easy method for making synthetic rubies.

Like their gemstone cousin the sapphire, rubies are just a variety of corundum, or aluminum oxide. Where sapphire gets its blue tint mainly from iron, rubies get their pink to blood-red hue from chromium. So [NightHawkInLight]’s recipe starts with aluminum oxide grit-blasting powder and chromium (III) oxide, a common green pigment and one of the safer compounds in a family that includes spectacularly toxic species like hexavalent chromium compounds. When mixed together, the two powders are heated in a graphite crucible using an arc welder with a carbon electrode. The crucible appears to be made from an EDM electrode; we’ve seen them used for air bearings before, but small crucibles are another great use for the stuff. There’s some finesse required to keep the nascent rubies from scattering all over the place, but in the end, [NightHawkInLight] was rewarded with a large, deep pink ruby.

This looks like a fun, quick little project to try sometime. We wonder if the method can be refined to create the guts of a ruby laser, or if perhaps it can be used to create sapphires instead.

Continue reading “A Quick And Easy Recipe For Synthetic Rubies”

Five-Stage Coilgun Powered By An Arc Welder!

Coilguns used to be the weapons of science fiction. Nowadays, whenever we see someone build one in their workspace it always serves as an inspiring reminder that the future is now. YouTuber [Cody’sLab] has done just that, assembling a rudimentary — but beefy — coilgun in his workshop.

The one in the video is based off an old design that used a 12V battery and without any fancy electronics. This new model has five coil stages along its two-foot length. Four wooden dowels and two copper tubes are arranged in a hexagonal shape to form the barrel and accelerator rails. The coils are each 100 feet of 14-gauge thin coated copper wire, all connected to a common ground. Still lacking any complex electronics, this version eventually gets its projectile launched a good few dozen feet. The ‘bullet’ is a piece of  steel with some brass to prevent it spinning in the barrel, while a hole has been drilled in it to accommodate a spring which keeps the two graphite brushes contacting the copper tubes.

The first test proved to be a little underwhelming, and [Cody] had to try something drastic — so he hooked it up to an arc welder to fire the projectile using 22V and 200A.

Continue reading “Five-Stage Coilgun Powered By An Arc Welder!”

Sodium Pickle Lights

A few weeks ago, the folks at the 23b hackerspace held Sparklecon, an event filled with the usual infosec stuff, locks and lockpicking, and hardware. A con, of course, requires some cool demonstrations. They chose to put a pickle in an arc welder, with impressive results.

This build began several years ago when the father of one of 23B’s members pulled off a neat trick for Halloween. With a cut and stripped extension cord, the two leads were plugged into a pickle and connected to mains power. The sodium in the pickle began to glow with a brilliant orange-yellow light, and everyone was suitably impressed. Fast forward a few years, and 23b found itself with a bunch of useless carbon gouging rods, a 200 Amp welder, a pickle, and a bunch of people wanting to see something cool.

The trick to making a pickle brighter than the sun was to set the arc just right; a quarter of an inch between the electrodes seemed optimal, but even then pickle lighting seems very resilient against failing jigs made from a milk crate, duct tape, and PVC. Video (from the first Sparklecon, at least) below.

Continue reading “Sodium Pickle Lights”

Fail Of The Week: This Inanimate Titanium Rod

You saw [Chris] cast aluminium on the cheap using Kinetic Sand a few weeks ago, didn’t you? He recently got his meaty hands on some titanium through the magic of modern transactional methods and was bowled over by its strength, hardness, and poor heat transfer.

He thought he would cast it into a nice, strong bottle opener. As you can probably guess, that didn’t go so well. First off, it wasn’t easy to saw through the thin rod. Once he did get it split in twain, it was surprisingly cool to the touch except at the tip. This is nasty foreshadowing, no?

[Chris] takes a moment to help us absorb the gravity of what he’s about to do, which of course is to send several hundred amps through that poor rod using a DC arc welder. Special precautions are necessary due to the reaction between oxygen and heated titanium. His trusty graphite crucible is grounded to the bottom of a big aluminium tub, and a cozy blanket of argon from a TIG welder will shield the titanium from burnination.

Well . . . the titanium didn’t melt. Furthermore, the crucible is toast. On the up side, vise-enabled cross-sectional examination of the crucible proved that there was still gold in them there walls.

Do you have any (constructive, on-topic) suggestions for [Chris]? Let him know below.

Continue reading “Fail Of The Week: This Inanimate Titanium Rod”