Display Twitter On An Arduino

If you ever wanted your name out on the Internet, now is your time to shine. [Chris] hooked up an Arduino to the Internet and is streaming the results of combing through Twitter live to the entire world.

The SocialBot9000, as [Chris] calls his build, is an Arduino Uno connected to an Ethernet shield and an LCD character display. The firmware uses the Twitter API to search for recent posts containing the phrase, ‘socialbot9000.’ A PHP script on the Arduino does all the heavy lifting and with the great Bildr tutorial on getting the Ethernet shield up and running, [Chris] was off to the races.

Because it’s extremely doubtful that everyone on the Internet could manage typing a message into Twitter that would be correctly parsed by the SocialBot9000, [Chris] put a small form up on the build log that will correctly generate the message and take you to your Twitter account for posting. After all that was done, [Chris] decided to have some fun and set up a live feed from a camera in front of the LCD display for the world to watch.

Winning Video Games By Letting Arduino Push Your Buttons

[Lars] shows you how to get a perfect score on the first four levels of BIT.TRIP RUNNER by using an Arduino to time and send button presses. This is a pretty simple game that uses a couple of buttons to jump or slide past obstacles. The constant speed of the character makes it quite easy to time these movements without any input from the game. This means that the pixel sampling which some web-game bots use isn’t really necessary here. Just work out the timing and hard-code it into the sketch. As you’ll see after the break, it works perfectly

The real value of this hack is the guide he wrote to send key presses from the Arduino hardware. It’s not hard at all, but there are several steps and this will get you up and running in no time. Where might you go from here? It wouldn’t take much to turn this into a keyboard prank that misspells all your words.

Continue reading “Winning Video Games By Letting Arduino Push Your Buttons”

Microcontroller Gives You More Control Of Your Camera Lens

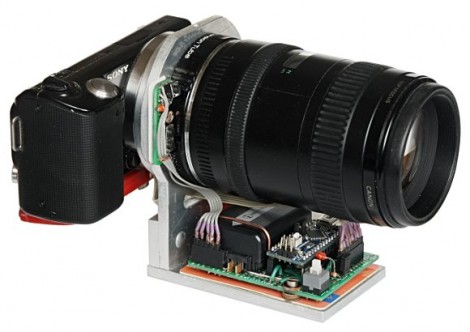
Here’s one way to get more control of your camera lenses. [Vladimir] built an Arduino-based pass-through ring (translated) which intercepts automatic lens controls. It’s meant for use with the Canon EOS lenses which have their own electronics allowing control of things like focus and zoom.

It seems like part of the motivation here was to uses the lenses with other brands of cameras. But [Vladimir] does also talk about the possibility of improving on some of the sensors that don’t perform well in certain climate conditions (think of how crystal oscillators will drift as temperature changes).

The machine translation is a bit rough to follow, but it seems the adapter ring still uses the settings sent in from the camera but has the Arduino clone to translate them into a format that the lens is expecting. In addition to this there is a set of buttons on that small PCB beside the lens which allow for fine tuning the aperture.

This is a lengthy writeup, but there’s two more on the way that will help fill in the gaps of how this hack works with different lens models, and some more tips on how to use it.

[Thanks Vasily]

Autonomous Metal Detector Lets You Sit Back, Get Rich

thunderbird7-autonomous-metal-detector

As a kid, metal detectors seemed like great fun. Every commercial I saw beckoned with tales of buried treasure “right in my own back yard” – a bounty hard for any kid to pass up. In reality, the process was both time consuming and tedious, with little reward to be had. [Gareth] liked the idea of scouring the Earth with a metal detector, but he liked sitting and relaxing even more. He decided he could easily partake in both activities if he built himself an autonomous metal detecting robot.

He stripped down a hand held metal detector, and installed the important bits on to the front of an R/C chassis. An Arduino controls the entire rig via a motor shield, allowing it to drive and steer the vehicle while simultaneously sweeping the metal detector over the ground. He fitted the top of the rover with a camera for remotely watching the action from the comfort of his patio, along with a laser which lets him pinpoint the location of his new found goods.

Continue reading to see a short video of the robot in action, and be sure to check out his site for more build details.

Continue reading “Autonomous Metal Detector Lets You Sit Back, Get Rich”

Electronic Bag Pipes Need No Bag And Use Only 1 Pipe

A lot of people might turn their noses up at an electronic version of bagpipes. But we see a definite need for them. After all, it’s pretty hard to take your bagpipes on a road trip, but this eChanter will have no trouble entertaining your fellow travelers.

The musical instrument is Arduino-based and the builder can decide between a headphone jack (use it with that FM transmitter when in the car!) or a speaker. The version seen above uses headphones with a piece of PVC pipe as the body, screw heads as touch sensors, and a project box to hold the electronics. But there are a lot of alternatives suggested, such as using automatic sprinkler parts. It sounds like a riser, connector, and pop-up sprinkler head body will do just as well hosting all of the components.

Want to hear what it sounds like? There’s an mp3 clip under the final steps section.

[audio http://www.echanter.com/marine-corps-hymn.mp3]

Android 3.1 Devices Have USB Host Mode. Here’s How To Use It.

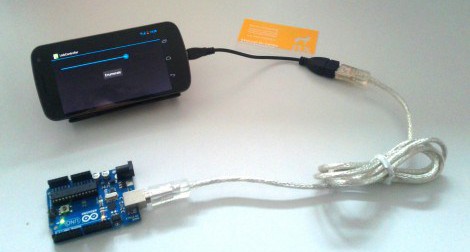
With the coming of Android 3.1 you finally have the option of using the device as a USB host. This may be through a USB OTG (On-the-Go) adaptor, but nonetheless it’s a feature which was sorely missed until now. [Manuel] put together a guide on using Android as a USB host. As you can see, his example hardware is an Arduino board but this is applicable with just about any device.

The tutorial implements a test app for the Android device where a slider will set the brightness of the Arduino’s on-board LED. The Arduino sketch is nothing special, it just reads data received on the UART. This means that it doesn’t care if it’s connected to an Android, PC, OSX, or Linux system, it goes about its business until the RX interrupt updates the data variable.

This will greatly simplify a lot of projects we’ve seen, such as this message scrolling belt buckle. That used extra hardware to make the Arduino the host, a step that is now necessary.

Retro Hardware Mash-up Spouts Archaic Geekery

This delightful little box is something only a hacker could love. It uses some second-hand hardware to display random sayings attributed to [Buckminster Fuller]. The image above doesn’t do the display justice. There are other photos which show very crisp lettering which is easier to read.

[Autuin] always keeps his eyes open for cool gear at the end of its consumer life. The screen for this project is a CRT from a Coleman TV lantern (you know, for camping… bah!). It finds a home in the chassis of an old non-functional radio he had picked up a few years earlier. With those parts in hand the real adventure started: getting an Arduino to read in quotes and generate a TV out signal to display them.

We love the SD card holder which he fashioned from a card-edge connector he grabbed at the local electronics store. From there he scoured the Internet for help on where to patch into the TV signal. Once the right trace was discovered the Arduino TV out library does the heavy lifting.