Making Minty Fresh Music With Markov Chains: The After Eight Step Sequencer

Step sequencers are fantastic instruments, but they can be a little, well, repetitive. At it’s core, the step sequencer is a pretty simple device: it loops through a series of notes or phrases that are, well, sequentially ordered into steps. The operator can change the steps while the sequencer is looping, but it generally has a repetitive feel, as the musician isn’t likely to erase all of the steps and enter in an entirely new set between phrases.

Enter our old friend machine learning. If we introduce a certain variability on each step of the loop, the instrument can help the musician out a bit here, making the final product a bit more interesting. Such an instrument is exactly what [Charis Cat] set out to make when she created the After Eight Step Sequencer.

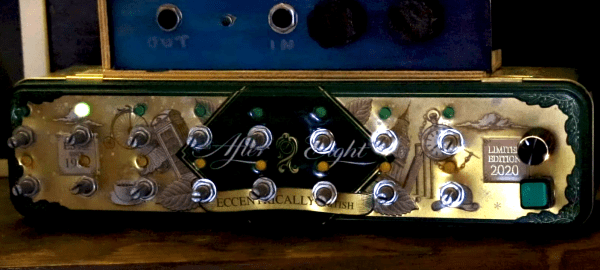
The After Eight is an eight-step sequencer that allows the artist to set each note with a series of potentiometers (which are, of course, housed in an After Eight mint tin). The potentiometers are read by an Arduino, which passes MIDI information to a computer running the popular music-oriented visual programming language Max MSP. The software uses a series of Markov Chains to augment the musician’s inputted series of notes, effectively working with the artist to create music. The result is a fantastic piece of music that’s different every time it’s performed. Make sure to check out the video at the end for a fantastic overview of the project (and to hear the After Eight in action, of course)!

[Charis Cat]’s wonderful creation reminds us of some the work [Sara Adkins] has done, blending human performance with complex algorithms. It’s exactly the kind of thing we love to see at Hackaday- the fusion of a musician’s artistic intent with the stochastic unpredictability of a machine learning system to produce something unique.

Thanks to [Chris] for the tip!

Continue reading “Making Minty Fresh Music With Markov Chains: The After Eight Step Sequencer”

Rodriguez — IV Curve Tracer On The Cheap

In response to an online discussion on the Electrical Engineering Stack Exchange, [Joseph Eoff] decided to prove his point by slapping together a bare-bones IV curve tracer using an Arduino Nano and a handful of passives. But he continued to tinker with the circuit, seeing just how much improvement was possible out of this simple setup. He squeezes a bit of extra resolution out of the PWM DAC circuit by using the Timer1 library to obtain 1024 instead of 256 steps. For reading voltages, he implements oversampling (and in some cases oversampling again) to eke out a few extra bits of resolution from the 10-bit ADC of the Nano. The whole thing is controlled by a Python / Qt script to generate the desired plots.

While it works and gives him the IV curves, this simplicity comes at a price. It’s slow — [Joseph] reports that it takes several minutes to trace out five different values of base current on a transistor. It was this lack of speed that inspired him to name the project after cartoon character Speedy Gonzales’s cousin,  Slowpoke Rodriguez, AKA “the slowest mouse in all of Mexico”. In addition to being painstakingly slow, the tracer is limited to 5 volts and currents under 5 milliamps.

[Joseph] documents the whole design and build process over on his blog, and has made the source code available on GitHub should you want to try this yourself. We covered another interesting IV curve tracer build on cardboard ten years ago, but that one is much bigger than the Rodriguez.

Automated Watering Machine Has What Plants Crave: Fertilizer

We’ve seen countless automated plant care systems over the years, but for some reason they almost never involve the secret sauce of gardening — fertilizer. But [xythobuz] knows what’s up. When they moved into their new flat by themselves, it was time to spread out and start growing some plants on the balcony. Before long, the garden was big enough to warrant an automated system for watering and fertilizing.

This clever DIY system is based around a 5L gravity-fed water tank with solenoid control and three [jugs] of liquid fertilizer that is added to the water via peristaltic pump. Don’t worry, the water tank has float switches, and [xythobuz] is there to switch it off manually every time so it doesn’t flood the flat.

On the UI side, an Arduino Nano clone is running the show, providing the LCD output and handling the keypad input. The machine itself is controlled with an ESP32 and a pair of four-channel relay boards that control the inlet valve, the four outlet valves, and the three peristaltic pumps that squirt out the fertilizer. The ESP also serves up a web interface that mimics the control panel and adds in the debug logs. These two boards communicate using I²C over DB-9, because that’s probably what [xythobuz] had lying around. Check out the demo video after the break, and then go check on your own plants. They miss you!

Don’t want to buy just any old peristaltic pumps? Maybe you could print your own.

Continue reading “Automated Watering Machine Has What Plants Crave: Fertilizer”

Go Ape With A Banana Macropad

The super fun thing about macro pads is that they’re inherently ultra-personalized, so why not have fun with them? This appealing little keeb may have been a joke originally, but [dapperrogue] makes a valid point among a bunch of banana-related puns on the project page — the shape makes it quite the ergonomic little input device.

Inside this open-source banana is that perennial favorite for macro pads, the Arduino Pro Micro, and eight switches that are wired up directly to input pins. We’re not sure what flavor of Cherry those switches are, hopefully brown or green, but we suddenly wish Cherry made yellow switches. If you want to build your own, the STLs and code are available, and we know for a fact that other switch purveyors do in fact make yellow-stemmed switches.

Contrary to what the BOM says, we believe the sticker is mandatory because it just makes the build — we imagine there would be fewer double takes without it. Hopefully this fosters future fun keyboard builds from the community, and we can’t wait to sink our teeth into the split version!

There are a bunch of ways to make a macropad, including printing everything but the microcontroller.

Via r/mk and KBD

Realistic Mission Control Box Is A Blast For All Ages

A lot of electronic busy boxes that are built for children are simply that — a mess of meaningless knobs and switches that don’t do much beyond actuating back and forth (which, let’s be honest, is still pretty fun to do). But this Mission Control Center by [gcall1979] knocks them all out of orbit. The simulation runs through a complete mission, including a 10-minute countdown with pre-flight system checks, 8.5 minutes of powered flight to get out of the atmosphere that includes another four tasks, and 90 minutes to orbit the Earth while passing through nine tracking stations across the world map.

That’s a lot time to keep anyone’s attention, but fortunately [gcall1979] included a simulation speed knob that can make everything go up to 15 times faster than real-time. This knob can be twiddled at any time, in case you want to savor the countdown but get into space faster, or you don’t have 90 minutes to watch the world map light up.

The main brain of this well-built box is an Arduino Mega, which controls everything but the launch systems’ mainframe computer — this is represented by bank of active LEDs that blink along with the voice in the sound clips and runs on an Arduino Uno and a couple of shift registers. To keep things relatively simple, [gcall1979] used an Adafruit sound board for the clips.

We love everything about this build, especially the attention to detail — the more important pre-flight tasks are given covered toggle switches, and there’s a Shuttle diagram that lights up as each of these are completed. And what Shuttle launch simulator would be complete without mushroom buttons for launch and abort? Grab your victory cigar and check out the demo video after the break.

Is your child too young to be launching the Shuttle? Here’s an equally cool busy box with toddler brains in mind.

Continue reading “Realistic Mission Control Box Is A Blast For All Ages”

Piggy Bank Slot Machine Puts A Spin On Saving

Saving money is inherently no fun until the time comes that you get to spend it on something awesome. Wouldn’t you be more likely to drop your coins into a piggy bank if there was a chance for an immediate payout that might exceed the amount you put in? We know we would. And the best part is, if you put such a piggy bank slot machine out in the open where your friends and neighbors can play with it, you’ll probably make even more money. As they say, the house always wins.

Drop a coin in the slot and it passes through a pair of wires that act as a simple switch to start the reels spinning. Inside is an Arduino Uno and a giant printed screw feeder that’s driven by a small stepper motor and a pair of printed gears. The reels have been modernized and the display is made of four individual LED matrices that appear as a single unit thanks to some smoky adhesive film.

This beautiful little machine took a solid week of 3D printing, which includes 32 hours wasted on a huge piece that failed twice. [Max 3D Design] tried rotating the model 180° in the slicer and thankfully, that solved the problem. Then it was on to countless hours of sanding, smoothing with body filler, priming, and painting to make it look fantastic.

If you want to make your own, all the files are up on Thingiverse. The code isn’t shown, but we know for a fact that Arduino slot machine code is out there already. Check out the build and demo video after the break.

As much as we like this build’s simplicity, it would be more slot machine-like if there was a handle to pull. Turns out you can print those, too.

Continue reading “Piggy Bank Slot Machine Puts A Spin On Saving”

Mind-Controlled Flamethrower

Mind control might seem like something out of a sci-fi show, but like the tablet computer, universal translator, or virtual reality device, is actually a technology that has made it into the real world. While these devices often requires on advanced and expensive equipment to interpret brain waves properly, with the right machine learning system it’s possible to do things like this mind-controlled flame thrower on a much smaller budget. (Video, embedded below.)

[Nathaniel F] was already experimenting with using brain-computer interfaces and machine learning, and wanted to see if he could build something practical combining these two technologies. Instead of turning to an EEG machine to read brain patterns, he picked up a much less expensive Mindflex and paired it with a machine learning system running TensorFlow to make up for some of its shortcomings. The processing is done by a Raspberry Pi 4, which sends commands to an Arduino to fire the flamethrower when it detects the proper thought patterns. Don’t forget the flamethrower part of this build either: it was designed and built entirely by [Nathanial F] as well using gas and an arc lighter.

While the build took many hours of training to gather the proper amount of data to build the neural network and works as the proof of concept he was hoping for, [Nathaniel F] notes that it could be improved by replacing the outdated Mindflex with a better EEG. For now though, we appreciate seeing sci-fi in the real world in projects like this, or in other mind-controlled projects like this one which converts a prosthetic arm into a mind-controlled music synthesizer.

Continue reading “Mind-Controlled Flamethrower”