Doorbell Hack Makes Coworkers Less Annoying

doorbell_wav_player

Hackaday reader [Sprite_tm] works in an office building that used to house several businesses, and as a remnant of the previous configuration, a doorbell sits in the hallway just outside his office. Several of his coworkers get a kick out of ringing the doorbell each time they enter the office. While not annoyed at the practice, he was getting tired of the same old “ding-dong” and decided to shake things up a bit.

He wanted to modify the doorbell to play random sounds when triggered, but he was pressed for time as it was March 31st, and he wanted to get it installed for April Fools’ Day. Without any real plan or bill of materials in mind, he pieced things together with whatever he happened to have sitting around.

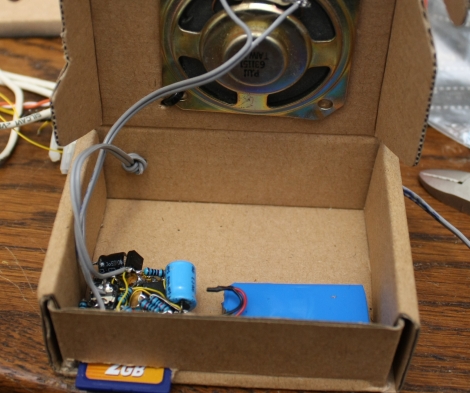
He used a design borrowed from Elm-chan in order to play wav files from an SD card with an ATTiny85, and used an L293 H-Driver as an improvised sound amplifier. After sorting out some power-related problems, and configuring the circuit to be as stingy with its battery as he could, he declared the project complete. He originally aimed to deadbug everything on the metal sleeve of the SD card socket (which is awesome), but considering the size of the speaker and the battery he selected for the project, he ended up stuffing everything into a cardboard box.

We don’t care too much about how he packaged it, we just wanted to know what his co-workers thought of his doorbell augmentation. In the end, they loved it, but we imagine this doesn’t do anything to discourage any of them from hitting the doorbell multiple times a day.

Stick around to see a quick video of his doorbell hack in action.

Continue reading “Doorbell Hack Makes Coworkers Less Annoying”

Hackaday Reader Throwdown: Electronic Dice

electronic_dice

Hackaday reader [Daid] posted in our forums showing off a set of electronic dice he recently constructed. Back in January, we featured a similar set of electronic dice built with an Arduino that was way overpowered as far as [Daid] was concerned. Not satisfied with simply saying it could be done better, he put his money where his mouth is – something we would love to see more of.

He used an ATTiny2313 to provide the device’s logic, outputting the dice values on a set of four 7 segment displays. The whole setup is controlled by a single push button that serves triple duty rolling the dice, configuring how many sides the dice have, as well as selecting how many dice are being thrown.

He admits that the wiring job is a bit of a mess, but he was going for function over form, and it works just fine. He also says that he would have finished it far sooner if it hadn’t been for those meddling kids some broken 7 segment displays.

We think he did quite a nice job, though we’re all ears if you think you can do it better.

Make Your Own Minimalist AVR ISP

Giving a programmer is a great way to get people started in microcontrollers so If you want a cheap simple AVR programmer this might just be what you’re looking for. It combines the V-USB firmware, USBtiny software, a few resistors, and some zener diodes. An interesting trick using this programmer is if your trying to program another 8 pin ATtiny you can use some tape to isolate the USB data pins and then piggyback the target ATtiny on the programmer.

Unfortunately in order to flash the ATtiny for your programmer you need a working programmer so it’s somewhat of a catch-22.  Make sure your careful when setting the fuse bits because it will use the reset pin making it hard to reprogram without additional programming hardware. AVRs in general are a great way to start using microcontrollers so if your interested give out tutorials a go. You’ll find some tips to get started in addition to information about using an Arduino, or a DAPA cable to flash the firmware to this chip.

Timelapse Circuit For Point And Shoot Cameras

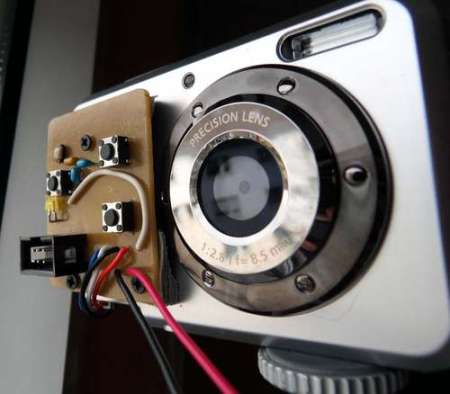
[Andyk75] has done some fantastic work documenting his timelapse addition to his digital camera.  Most of the more expensive models of cameras have a remote shutter release, but the point and shoot jobs usually don’t. He decided to add the ability to turn the camera on, then shoot a picture, then turn it back off. Pretty smart, since these things tend to eat batteries pretty quickly if left on.  He is using an ATtiny24 for the brains, but the circuit should be pretty adaptable to others. The final piece has several features, like the ability to change the length of time between shots and automatically shut down when it gets too dark outside to continue. He has posted the schematics as well as the board layouts if you can find them amongst the ads in instructibles. You can check out a video of a sunset taken with this camera after the break.

Continue reading “Timelapse Circuit For Point And Shoot Cameras”

Magically Repair AVR Chips

If you’ve ever spent time working with AVR microcontrollers you’ve probably set the fuse bits incorrectly at least once. The ATmega fusebit doctor will automatically repair the fuse bits and get you back in business until your next mishap. The ATmega8 that powers the device has the chip signatures for the ATmega family stored inside so it will automatically detect which chip you’re trying to ‘unbrick’. From there it looks up the correct fuse bits and resurrects the sick microcontroller. This is useful in recovering a chip that has serial programming disabled, used the reset pin as I/O, or just enabled an external clock without the necessary hardware to deliver on that feature.

This magic is taken care of by using High Voltage Parallel Programming. We’ve seen HVPP used in the Arduino rescue shield and it is a valuable feature of the AVR Dragon, our favorite AVR programmer, as well as others. Still, you can hardly beat the ease of plugging a dead chip into this board and pressing one button. Oh, did you brick a member of the ATtiny family? There’s a rescue board for those too.

[Thanks Stewe]

Minimalist AVR Programmer Is Just Fab!

Whether you’re burning a new bootloader to an Arduino board, or doing away with a bootloader to flash Atmel chips directly, an in-system programmer (ISP) is an indispensable tool for working with AVR microcontrollers. If cost has held you back, it’s no longer an excuse: FabISP is a barebones USB-based AVR programmer that can be pieced together for about ten bucks.

FabISP was created by [David Mellis] as a product of MIT’s Fab Lab program, which provides schools with access to design and manufacturing tools based around a core set of fabrication capabilities, so labs around the world can share results. But the FabISP design is simple enough that you don’t need a whole fab lab. It’s a small, single-sided board with no drilling required; the parts are all surface-mounted, but not so fine-pitched as to require reflow soldering. Easy!

There’s still the bootstrap problem, of course: you need an AVR programmer to get the firmware onto the FabISP. This would be an excellent group project for a hackerspace, club or school: if one person can provide the initial programmer to flash several boards, each member could etch and assemble their own, have it programmed, then take these out into the world to help create more. We must repeat!

[Thanks Juan]

Oscilloscope Doubles As A Serial Terminal

PC-based USB oscilloscopes are fast becoming all the rage. [Matt Sarnoff’s] Terminalscope takes the reverse approach, adapting an oscilloscope into a full serial terminal. You may have seen something similar before in the Dutchtronix/SparkFun O-Clock, but [Matt’s] project goes one further by adding a PS/2 keyboard port for full bidirectional serial communication, and with much sharper display resolution to boot.

The mostly VT-100 compatible Terminalscope is built around two AVR microcontrollers: an ATmega328P runs full-tilt to generate the video signal and handle serial I/O, while an ATtiny45 handles keyboard input to avoid interrupting the ’328’s duties. Rather than vector trace each character, a raster-scanning approach is used: the beam follows a fixed X/Y path (like a television), while modulating the Z input (beam intensity) to form an image. The device can be connected to a PC via serial port or USB-to-TTY adapter, or directly to another microcontroller to debug serial output.

We recently showed an oscilloscope being used as a multichannel digital logic display. The Terminalscope provides yet another use for this essential bench tool and could nicely round out a “poor man’s” testing setup. The schematic and full source code are available for download.