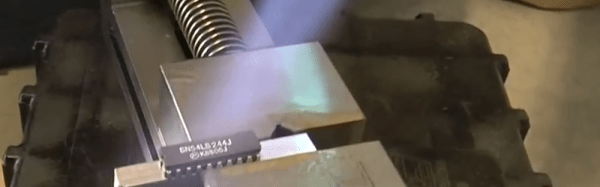
Ceramic Hot-end Mount Seeks To Improve Extrude Performace

ceramic-hot-end-mount

Take a gander at the part of this extruder head which looks like a chess pawn. It’s the mounting bracket for the hot end and it’s made out of ceramic. [Ed] came up with the idea to use ceramic to mount the hot end when trying to improve the design while keeping it rather simple and easy to assemble. The concept uses the thermal properties of the ceramic to insulate well enough to operate the extruder at higher temperatures without causing other problems.

Where does one get a custom ceramic part anyway? Turns out you can get low volume runs from China much like PCBs. The minimum order was ten units, which was still a leap of faith since he had no way of testing the design in advance. The first run with the new part went quite well, but only for the first layer and then the filament jammed. He’s still not sure why, but overcame the issue by lining the inside of the ceramic with a PTFE tube. This means he now has to use a smaller filament to fit through it. But the quality of the prints he’s getting with 1.75mm stock and the ceramic head are superb.

It may even be possible to print this ceramic part some day. We remember seeing another extruder that can deposit ceramic clay.

Retrofitting A 60-year Old Electric Heater

electric_heater_retrofit

[John] found an old Kenmore electric heater at a junk store one day, and thought it would look great in his bathroom. The only problem with the unit is that it was built back in the 1940s/1950s, so it lacked any sort of modern safeguards that you would expect from an indoor heater. There was no on/off switch, no fuse, no thermostat, and no tip switch – though it did have a nice, flammable cloth-covered power cord.

Since [John] wasn’t too keen on burning his house down in the name of staying warm, he decided to retrofit the old unit’s shell with a new ceramic heater. He found a $20 unit that looked like it would fit, so he disassembled both heaters and got to work. The Kenmore’s innards were scrapped, then he gave the unit a nice fresh coat of high-temp paint. The new heater was cut to fit inside the old unit’s shell, controls and safety features intact.

He says that it works very well, and that it looks great in his bathroom. If you’re considering doing something similar, be sure to check out his writeup – it is very thorough and has plenty of details that will help you along the way.

Open3DP Looks At 3D Printing In Common Materials

[Buddy Smith] sent us a link to Open3DP which he calls “REAL 3d printing hacks”. Open3DP showcases the projects of the Solheim Rapid Prototyping Laboratory at the University of Washington. They’re working on 3D printing in materials that can be commonly acquired and to that end they publish recipes for powder printing in materials such as sugar, ceramic, and glass. Take a look through their archives. We found the post on microwave kilns interesting, as well as the writeup about Shapeways glass printing which is seen above. We’ve also embedded a short video on Open3DP’s work after the break.

Update: [Mark Ganter] dropped us a line to clarify that Open3DP was the first to develop printable glass about a year ago, called Vitraglyphic. They’ll also be presenting papers at Rapid2010 and announcing a new printable material.

Continue reading “Open3DP Looks At 3D Printing In Common Materials”

PID SMD Reflow Hot Plate

[mightyohm] put together a nice piece of lab kit. It’s a PID controlled hot plate. The plate is capable of reaching 500F, hot enough to do SMD reflow soldering. The large chunk of metal has a hole drilled through the center to contain a cartridge heater. A thermocouple is used to monitor the temperature of the plate. Ceramic standoffs separate the plate from the rest of the device, but he still needs to come up with a way to stop the radiant heating. The control box houses the surplus PID controller along with the power switch and solid state relay (SSR).