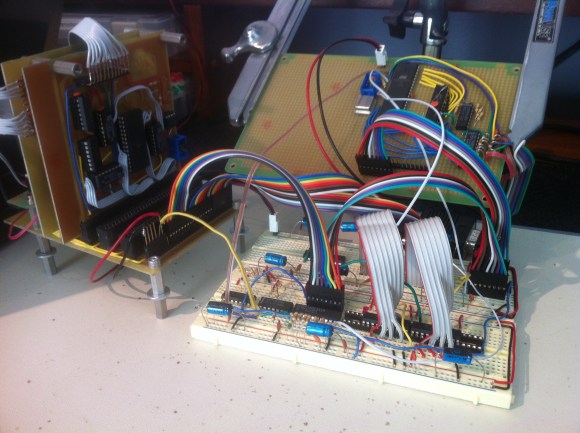
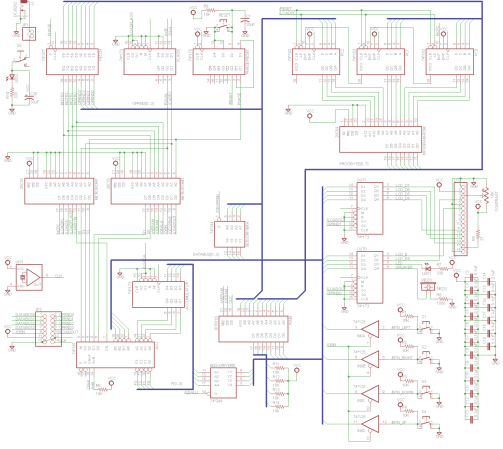
8-bit Logic Chip Computer Build

[Kyle] has been hard at working building an 8-bit computer from the ground up. He’s using a set of logic IC’s for the various components, and some NVRAM chips to store the control words. What you see above is the roadmap for his instruction set. He’s just started writing them to the chips, making the job easier by building an Arduino-based programmer.

We’ve enjoyed watching [Quinn Dunki’s] progress with her Z80  6502-based PC build which started on a breadboard in much the same way but has come a long way since those humble beginnings. Recently we also looked in on a 4-bit computer that is using discrete components. But [Kyle’s] take on the challenge falls somewhere in between the two.

The gist of his design can be found in one of his earlier post. He’s got a ring counter which starts by clearing the address register. It then loads the NVRAM address of the next instruction which is then executed on the subsequent count. It seems the build still has some way to go so make sure to keep your eye out for updates.

[via Reddit]

Building A Computer With Discrete Transistors

You’re going to want to do some stretching before undertaking a soldering project like this one. We’re betting that the physical toll of assembling this 4-bit discrete processor project is starting to drive [SV3ORA] just a bit crazy. This small piece of electronic real estate is playing host to 62 transistors so far, and he’s not done yet.

It’s one thing to build some logic gates in Minecraft (and then turn then into a huge 16-bit ALU). But it’s another thing to actually commit to a physical build. [SV3ORA] does a great job of showing the scope of the project by posting a tight shot of one inverter, then three in a row, then the entire 8-bit address and display system. These gates are built on the copper side of the board, with the power feed, LEDs for displays, and jumpers for control on the opposite side. We’re excited to see where he goes with this project!

But hey, if you don’t want to do that much soldering there’s a lot you can do on a few breadboards.

Mechanical CPU Clock Is Just As Confusing As Its Namesake

[Lior Elazary] designed and built this clock to simulate the function of a CPU. The problem is that if you don’t already have a good grasp of how a CPU works we think this clock will be hopelessly confusing. But lucky for us, we get it, and we love it!

Hour data is shown as a binary number on Register A. This is the center column of red parts and is organized with the MSB on the bottom, the LSB on the top, and left-pointing bits function as digital 1. The clock lacks the complexity necessary for displaying any other time data. But that’s okay, because the sound made by the ball-bearing dropping every minute might drive you a bit loony anyway. [Lior] doesn’t talk about the mechanism that transports that ball bearing, but you can see from the video after the break that a magnet on a circular path picks it up and transports it to the top of the clock where gravity is used to feed the registers. There are two tracks which allow the ball to bypass the A register and enter the B register to the right. This works in conjunction with register C (on the left) to reset the hours when the count is greater than 11.

If you need a kickstart on how these mechanical adders are put together, check out this wooden adder project.

Continue reading “Mechanical CPU Clock Is Just As Confusing As Its Namesake”

Giving An Old Atari Computer A Much Needed Upgrade

As a kid, [Boisy] cut his teeth on the TRS-80 Color Computer. It was a wonderful machine for its day, featuring a relatively powerful Motorola 6809 CPU. Although his CoCo was theoretically more powerful than its Commodore and Apple contemporaries, the graphics and sound capabilities of [Boisy]’s first love paled in comparison to his friends 6502-based machines. A little jealously and thirty years go a long way, because now [Boisy] is adding a 6809 microprocessor to the 6502-based machines Atari put out.

[Boisy]’s goal for his Liber809 project was simple: Put a 6809 CPU in an Atari XEGS and get NitrOS-9, the Unix-like OS for the TRS-80 CoCo running on his Frankenputer. After a few months of work, [Boisy] completed his goal and more so: the Liber809 also works on the Atari 1200XL.

To put [Boisy]’s work in perspective, it’s like he took a Macintosh from 1993 and made it run on an Intel 486. While that’s not a terribly accurate analogy, we hope our readers will understand the fortitude needed to make a computer run on a completely different processor.

After the break, you can check out a neat demo app written by [SLOR] from the AtariAge forums showcasing a 6809 running in a machine designed for a 6502. Awesome work for all involved

Continue reading “Giving An Old Atari Computer A Much Needed Upgrade”

Building A Computer Around A TTL CPU

[Bill’s] worked on his homebrew computer for almost a decade. He didn’t start with a Z80 processor like a lot of the projects we’ve seen, but instead build the CPU itself from 74-series TTL chips and a ridiculous amount of wire wrapping to connect it all.

The video after the break shows off the functionality. We love the front panel, which is packed with information but manages to remain organized and offers many convenient features. Our favorite is the ability to pause execution and scroll through the registers by spinning the dial. The clock signal has a variable speed which is selected by an internal DIP switch package that can be changed during a pause. It runs MINIX and has a library of programs, but perhaps most surprising is its ability to serve webpages.

Lately we’ve been interested in drilling down through program language abstractions to understand what is going on inside the silicon. This has given us new respect for those building processors from scratch. Think of it this way, if you actually need to build each instruction out of gates, you’ll be able to understand how those instructions work at the most fundamental level.

Continue reading “Building A Computer Around A TTL CPU”

J1: A Small, Fast, CPU Core For FPGA

[James Bowman] of the Willow Garage published a paper on his J1 CPU core for field-programmable gate arrays. This was originally developed and used for the Ethernet cameras on the PR2 (you know, that incredibly expensive beer delivery system?) robot. It uses a 16-bit von Neumann architecture and lacks several processor features you’d expect a CPU to have such as interrupts, multiply and divide, a condition register, and a carry flag. None-the-less, its compact at just 200 lines of Verilog and it can run at 80 MHz. [James] compares the J1 to three different FPGA CPU Cores commonly used and discusses how the system is built in his 4-page paper that has the details you’re interested in but won’t take all day to dig through.

Electromechanical Computer Built From Relays

This is Zusie, a computer built out of electromechanical relays. [Fredrik Andersson] picked up a lot of about 100 telephone exchange circuit boards, each with about 16 relays on them. After getting to know a heat gun really well he ended up with 1500 working relays with which to play. The machine runs slowly, it iss noisy, but it definitely works. After the break you can see it running and assembly code program that he wrote.

The instruction set is based on boards running microcode. These store the operational commands for each instruction the processor has available to it and they run in parallel with the rest of the operations.

We’re always surprised to see that these home-built processors work. Mostly because of the complexity involved in assembling them. How hard is it to find a shorting connection or a malfunctioning relay? Those problems aren’t limited to this application either, what do you do if a transistor-logic CPU has a malfunctioning chip?

Continue reading “Electromechanical Computer Built From Relays”