Body Of A Trinket, Soul Of A Digispark

TrinketDigispark

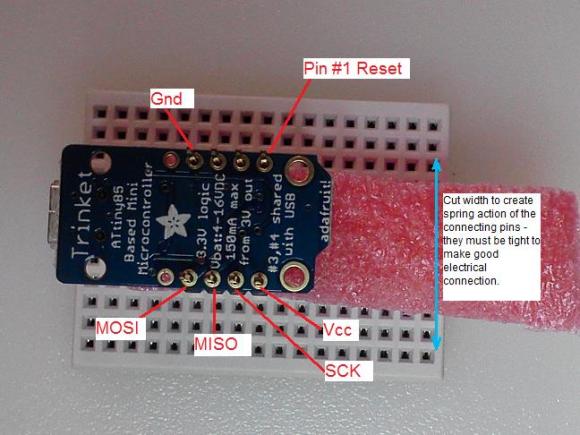
Adafruit’s Trinket and digiStump’s Digispark board are rather close cousins. Both use an ATtiny85 microcontroller, both have USB functionality, and both play nice with the Arduino IDE. [Ray] is a fan of both boards, but he likes the Trinket hardware a bit better. He also prefers the Digispark libraries and ecosystem. As such, he did the only logical thing: he turned his Trinket into a Digispark. Step 1 was to get rid of that pesky reset button. Trinket uses Pin 1/PB5 for reset, while Digispark retains it as an I/O pin. [Ray] removed and gutted the reset button, but elected to leave its metal shell on the board.

The next step was where things can get a bit dicey: flashing the Trinket with the Digispark firmware and fuses. [Ray] is quick to note that once flashed to Digispark firmware, the Trinket can’t restore itself back to stock. A high voltage programmer (aka device programmer) will be needed. The flashing process itself is quite a bit easier than a standard Trinket firmware flash. [Ray] uses the firmware upload tool from the Micronucleus project. Micronucleus has a 60 second polling period, which any Trinket veteran will tell you is a wonderful thing. No more pressing the button and hoping you start the download before everything times out! Once the Trinket is running Digispark firmware, it’s now open to a whole new set of libraries and software.

Halloween Doorknocker Decoration Hack

halloweenDoorHack

If you’re new to hacking, Halloween is a great excuse to get started, and [Chuck] has put together an inexpensive animated Halloween decoration that you can show off on your front door. After scoring a $5 plastic Halloween doorknocker from Wal-Mart, [Chuck] gathered together a small pile of components and then set about breathing some life (death?) into its scary but motionless face.

Though he opted to use a Digispark, you should be able to use any Arduino that is small enough to stuff inside the plastic head. [Chuck] cut some holes in the eyeballs and glued in two RGB LEDs, then cobbled together a quick-and-dirty mount in the mouth area to hold a small servo. The lights and the servo are wired to the Digispark, which turns the lights on and instructs the servo to slam the ring against the door. It’s is battery powered and currently has only two settings: on or off. This should be good enough to scare the kids for this year, but [Chuck] has plans to add a much-needed motion sensor and sound via a Bluetooth connection. 

As simple as this build is, it could be just the thing to get you in the holiday spirit, or to introduce the young hacker in your home to the world of electronics and coding. Check out the short video of the doorknocker after the break, then swing by [Chuck’s] website for detailed build instructions and his Github for the source code. If you’re having trouble finding this doorknocker at Wal-Mart, [Chuck] recommends a similar one on Amazon. Don’t stop now! Make some Flickering Pumpkins too, or if you want a challenge, hack together your very own Pepper’s Ghost illusion.

Continue reading “Halloween Doorknocker Decoration Hack”

LED Tie Plays Tetris

tetris

[Bill] has been working with a gaggle of 8th graders this summer at a STEM camp, impressing them with his geeky attire such as an 8-bit and PCB ties, and an LED illuminated lab coat. The adolescent tinkerers asked him what he would be wearing on the last day. Not wanting to let the kids down, he whipped up an LED Tetris tie in an evening.

The Tetris board is a 20 x 4 grid of WS2811 based RGB LED strips, controlled by a Digispark dev board. Structurally, the tie is just two bits of card stock with the electronic bits sandwiched in between. and taped to a cheap clip-on. In the video below, the tie doesn’t have any sort of input to control the movement and rotation of blocks. [Bill] plans to update his tie with some rudimentary AI so it can play itself.

All the code is over on [Bill]’s git. It’s still a work in progress, but from the STEM student’s reaction, there’s a lot of potential in this tie.

Continue reading “LED Tie Plays Tetris”

Karma Controller Makes Reddit A Game

karma-controller-reddit

[Will] likes Reddit so much he built this dedicated controller that lets him play the social website like a video game.

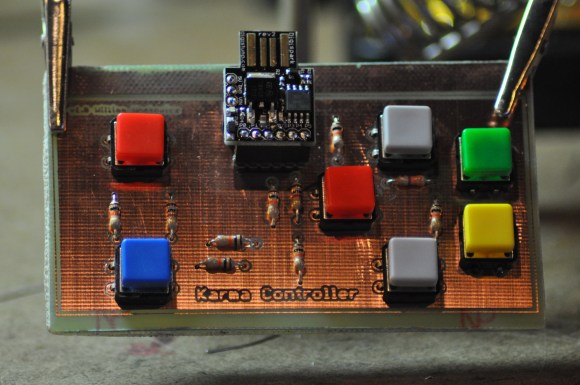
He calls it he Karma Controller. In this case, ‘Karma’ refers to ability to accumulate a large number of net up-votes on a Reddit post. The device features seven buttons which are all it takes to up and down vote, navigate up and down on the Reddit listings, toggle images, as well as open and close new tabs for the comments section. We’re wondering if it allows you to follow a link to the post source too?

One of the reasons that we’re featuring this is that it’s only [Will’s] second electronics project. If you’re still reluctant to get your hands dirty we hope this acts as inspiration. He started by building the first version on a hunk of protoboard. The Digispark microcontroller seen at the top reads from his button network and communicates with the computer via USB. Once the design was proven he had some help etching this circuit board which is version 2. He shows it off in the clip after the jump.

If you just want some buttons for voting you should take a look at this project which includes a 3D printed enclosure and button covers.

Continue reading “Karma Controller Makes Reddit A Game”

Working 3D Printed Stepper Motor

Stepper Small 1

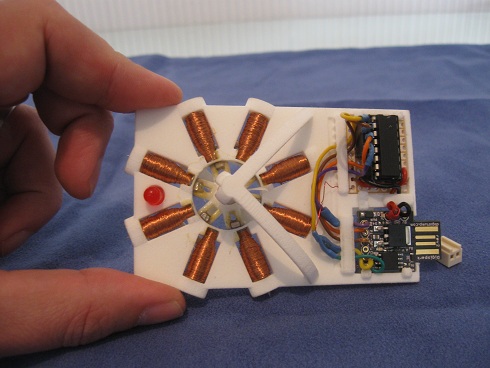
Most 3D printers use stepper motors to control the movement of the extruder head. If you could actually print those motors it would be one more big step toward self-replicating hardware. Now obviously [Chris Hawkins’] working 3d printed stepper motor wasn’t built 100% through 3D printing, but the majority of the parts were. All that he had to add was the electronic driver pieces, magnets, wire, and a few nails.

The coils are made up of nails wrapped in magnet wire. The rotor is a 3D printed framework which accepts neodymium rare earth magnets. The axle is pointed which reduces the friction where it meets the cone-shaped support on either side of the frame. The IC on the upper right is a transistor array that facilitates switching the 20V driving the coils. The board on the lower right is a Digispark, which is an ATtiny85 breakout board that includes a USB edge connector for programming and a linear regulator which is how he gets away with feeding 20V as the source.

Don’t miss the demo video after the break where you can see the motor stepping 7.5 degrees at a time.

Continue reading “Working 3D Printed Stepper Motor”

Teensy Tiny Arduino Board With An ATtiny85

Planning another Arduino build? If you’re just doing something simple like switching a relay or powering a LED, you might want to think about the Digispark. It’s a very small ATtiny-based Arduino compatible board developed and Kickstarted by [Erik].

The Digispark is based on the very popular Atmel ATtiny85, an 8 pin microcontroller that provides a quarter of the Flash storage and RAM as the ‘official Arduino’ ATMega328p. The lower storage space and RAM doesn’t mean the ’85 is a slouch, though; it can run Arduino code without a hitch, providing six pins for whatever small project you have in mind.

Right now, [Erik]’s Kickstarter is offering three Digisparks for the price of a single Arduino. At that price, it’s cheap enough to leave in a project and not be repurposed after the build is over. [Erik] is also working on a few shields for the Digispark – only RGB LED shield for now, but hopefully he’ll get some more finished by the time the Kickstarter ends.